How to Deploy Application onto Tomcat Server-2023?

Table of Contents

Deploy Artifact on Tomcat Server​

  • In the previous Module-2, we have seen how to build our code.
  • In this Module-3, we are going to see how we can deploy our code on the target environment.
  • As a target environment, We are going to use a Tomcat Server.
  • So We will set up our EC2 instance and stands on top of that
  • We will install Tomcat.
  • Then we will set up a Jenkins job, which will deploy the code onto the Tomcat Server.
  • That is what we are going to do in this Module
Deploy Application on Tomcat Server

Setup A Tomcat Server:-

Here, we are going to see how to set up the Tomcat server. For this, we will follow below Steps-

STEP 1:- Setup a Linux EC2 Instance​

Now we will access the EC2 instance with the help of the Mobaxterm terminal-

STEP 2:- Install Java, Because Tomcat runs on top of Java

After creating and accessing the EC2 instance, we will install Java and then will install Tomcat.

For that, we will use below commands

				
					sudo su -
amazon-linux-extras
amazon-linux-extras install java-openjdk-11
java --version


STEP 3:- Install & Configure Tomcat(Nothing but extracting and configuring)

Now we will install tomcat and configure that. For installing Tomcat and configure the Tomcate server, we will use below commands.

				
					pwd
cd /opt
wget https://dlcdn.apache.org/tomcat/tomcat-9/v9.0.79/bin/apache-tomcat-9.0.79.tar.gz
ll
tar -xvzf apache-tomcat-9.0.79.tar.gz  ##extract the tar file
mv apache-tomcat-9.0.79 tomcat  


STEP 4:-Start Tomcat Server

				
					cd tomcat/
cd bin/
./startup.sh


STEP 5:- Access Tomcat Web UI on Port 8080

Now we will access tomcat application from browser on port 8080

NOTE:-Using unique ports for each application is a best practice in an environment. But tomcat and Jenkins runs on ports number 8080. But you can change if you want

                                         http://<Public_IP>:8080


To fix this issue, we need to do the few following steps-

Now, we need to Update the user’s information in tomcat.users.xml. Add the below users to the conf/tomcat-users.xml file

				
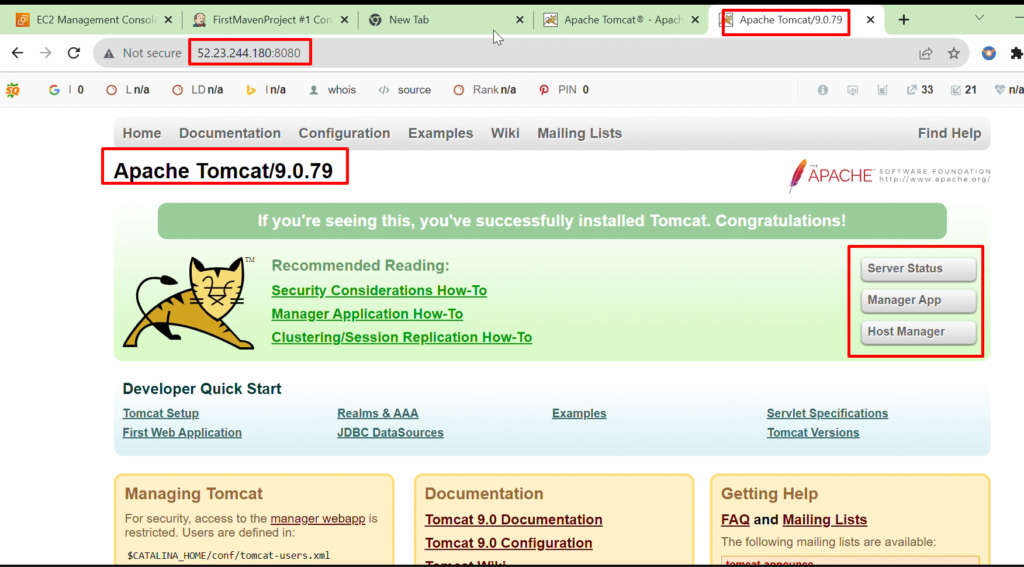
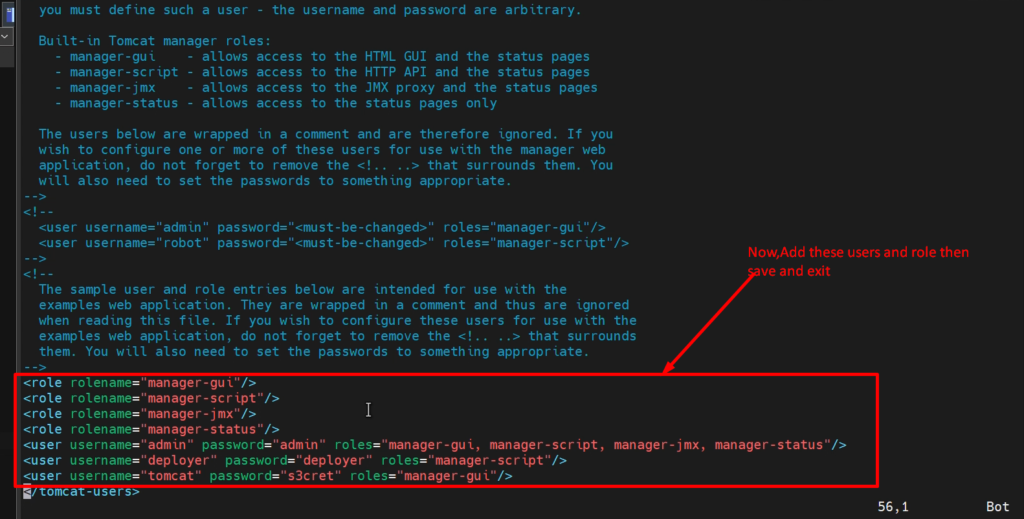
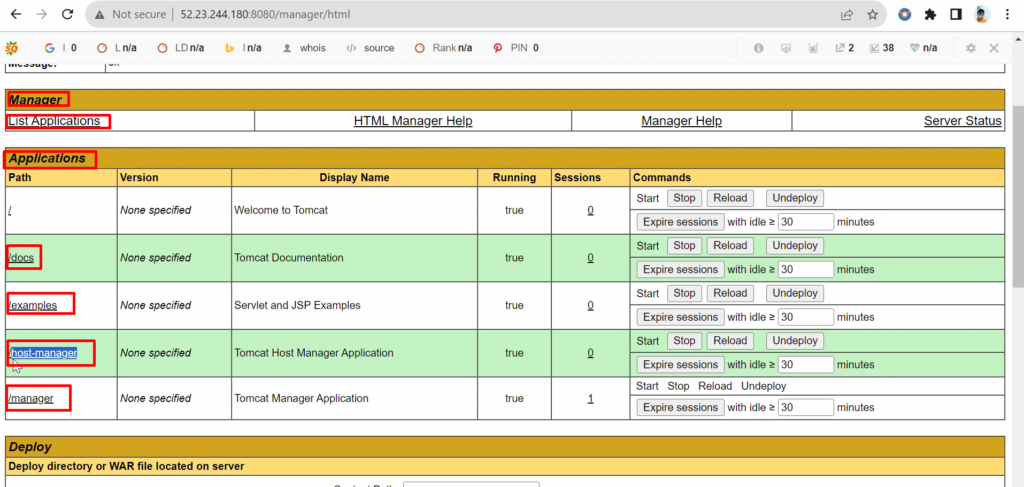
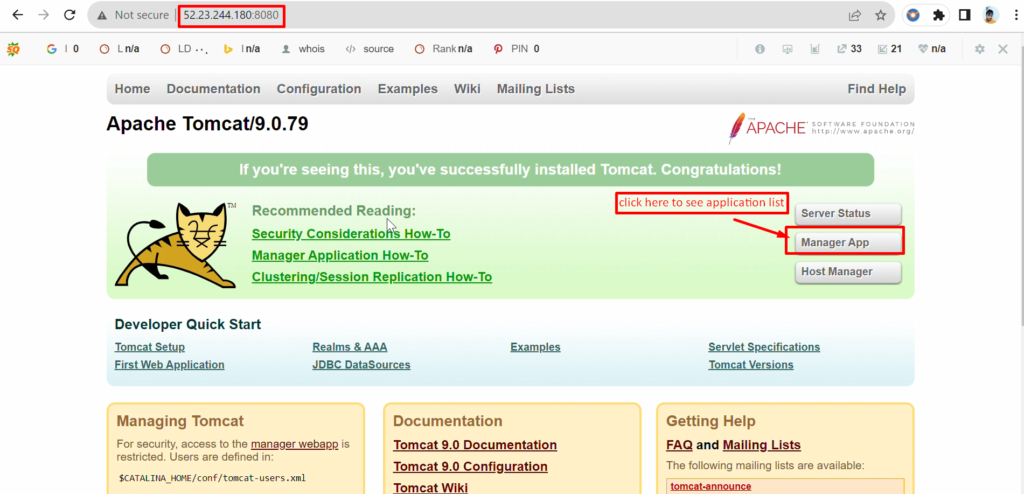
					<role rolename="manager-gui"/>
<role rolename="manager-script"/>
<role rolename="manager-jmx"/>
<role rolename="manager-status"/>
<user username="admin" password="admin" roles="manager-gui, manager-script, manager-jmx, manager-status"/>
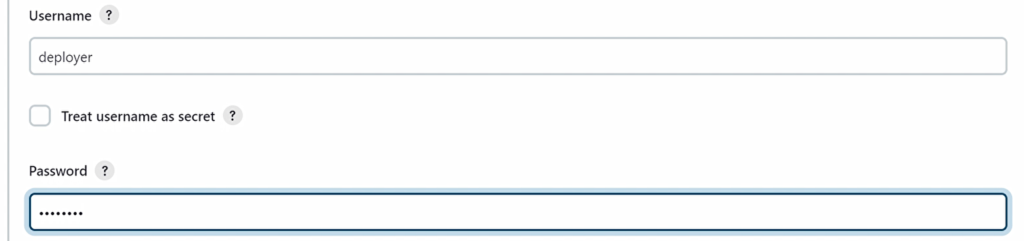
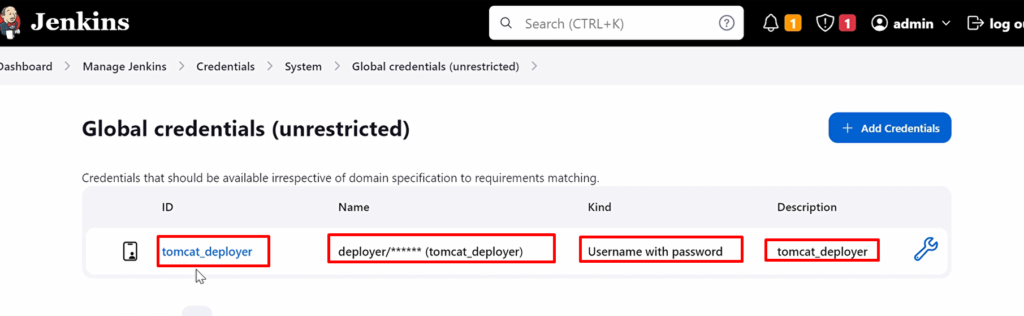
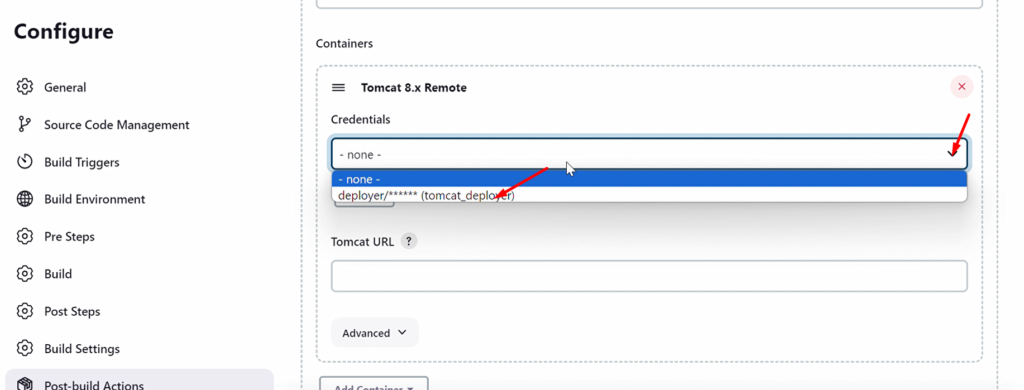
<user username="deployer" password="deployer" roles="manager-script"/>
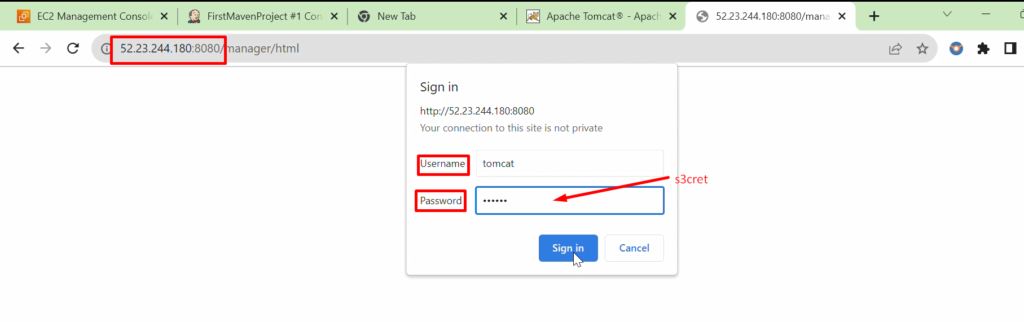
<user username="tomcat" password="s3cret" roles="manager-gui"/>


Now, we will create link files for tomcat startup.sh and shutdown.sh. So that we can start and shut the tomcat from any directory-

FOR START-UP TOMCAT:-

				
					ln -s /opt/tomcat/bin/startup.sh /usr/local/bin/tomcatup
Echo $PATH


FOR SHUT-DOWN TOMCAT:-

				
					ln -s /opt/tomcat/bin/shutdown.sh /usr/local/bin/tomcatdown


After doing all the above steps, we will again try to access Tomcat manager app.

And username &Password will be given as USER NAME =” deployer ”, Password=”s3cret” for manager GUI access because we have added these usernames and passwords in previous steps

Video Recording

Still you have any doubt in any steps, please go through this  video again

Integrate Tomcat With Jenkins:-

We are going to see how to integrate Tomcat with Jenkins. 

Once, we can integrate then only we can deploy our code onto Tomcat Server.

For this, We need to below two steps-

  1. Install the plugin “Deploy to Container”
  2. Configure Tomcat Server with Credentials

These Two steps are necessary to integrate the Tomcat server with Jenkins

STEP 1:- Install the plugin “Deploy to Container”

STEP 2:- Configure Tomcat Server with Credentials

Username & Password will be given as USER NAME =” deployer ”, Password=”s3cret”

Deploy the Application onto Tomcat Server through Jenkins:-

To deploy the application on to Tomcat Server, we will follow the below steps now-

STEP 1:- Create the New Jenkins Job to build and deploy the application on server

STEP 2:- After creating Jenkins Job, we will run(build) that job now

STEP 3:- Now we will verify whether Artifact is deployed or not.

Video recording

Still you have any doubt in any steps, please go through this video again

How to Change, Commit and Push The Code to GitHub

First, we need to make one folder in my local system(laptop) so that we can clone the repo from GitHub into my local system.

Here, we have made one folder named “Devops_project” in the ‘D’ drive where we will clone the source code from GitHub with the help of GitBash.

On Mac, no need to install Gitbash. You can clone the default terminal.

NOTE:- you can make a folder anywhere in your system according to your convenience.

We will do the following steps to change the code, commit the code, push the code to github. And Then we will run jenkins job again to build and deploy to the Tomcat Server-

Step 1: - Clone(Pull)the code from GitHub.

Step 2: - Do some changes to the code.

Step 3: - Commit and push the code to GitHub again in the same GitHub Branch.

Step 4: - Build the Jenkins job again.

Step 5: - Now verify that your code is deployed & Running or not.


Step 1: - Clone(Pull)the code from GitHub to your local system's folder.

First, we will create the local folder(directory) named Devops_project in our local system with the help of Gitbash terminal and then will clone the code from Github to our local system(in the local folder). For this, we will use the following command-

				
					cd D/
mkdir Devops_project
cd Devops_project
cd clone https://github.com/abhishek0400/hello-world.git
git init
git branch
ls
cd hello-world/webapp/src/main/webapp
ls


Step 2: - Do Some Changes To The Code

After cloning the code into your local system, we will do some changes to the code with the help of the “VI editors” or “Visual Studio code”

Here, we will use “VI editor”  to change the code but you can also use other editors as well like Visual Studio code

NOTE: – for going inside the insert mode = Press i 

             Then , For Saving the code and exit = press ‘Esc’ and then press ‘:wqenter

Step 3: - Commit & Push the code to GitHub again

Now, We will commit that code and push the code to GitHub again in the same GitHub Branch.

For that, we will use the following commands-

				
					git status
git add .
git commit -m “<your any msg>”
git push origin master


NOTE: – After pushing the code into Github, you will get one prompt to authenticate. there you can put your Github token. Know more about GitHub Token generation please click here

Step 4: - Build the Jenkins job again.

Now go to the Jenkins dashboard and select the below job and then Build that job.

Step 5: – Now verify whether your application is deployed & Running or not.

Video Recording

Still you have any doubt in any steps, please go through this  video again

How to Automatic Build and Deploy on tomcat Server with POL SCM

Leave a Comment

Your email address will not be published. Required fields are marked *

Scroll to Top