Introduction
What is Ansible?
- Ansible is an open-source configuration management automation tool designed to simplify IT tasks such as configuration management, application deployment, and task automation.
- It uses declarative language to describe system configurations, making it easy to understand and implement.
- Ansible is agentless, meaning it doesn’t require any software to be installed on the target systems, making it lightweight and easy to set up.
Use Cases
1. System automation (Any system automation)-
- If You want to set up web services and database service configuration, start and restart the services.
- You can do all those kinds of automation by using Ansible.
2. Change Management (production server change)-
- You can manage your production machines, and any changes to your production server through Ansible.
- If you write a proper Ansible playbook, it can go directly into your documentation. It’s not going to be a very complicated script to understand If you write titles to your task in the Ansible playbook. you can also use that in the documentation.
3. Provisioning (Setup server from scratch/Cloud provisioning)-
- Provisioning means you can set up anything from scratch.
- You can use Ansible to launch cloud instances like an EC2 instance. and then you can set up services on it like any front-end, back-end database, or web services.
- Complete provisioning you can do through Ansible.
4. Orchestration (Large scale automation framework)-
- we can say combining multiple automation tools and scripts together and executing them in a proper order.
- You can integrate Ansible with various other tools like Jenkins or any other integration tool or cloud services.
- So, there’s so much integration with different tools and services that Ansible provides. so, you can do complete orchestration.
WHY Ansible?
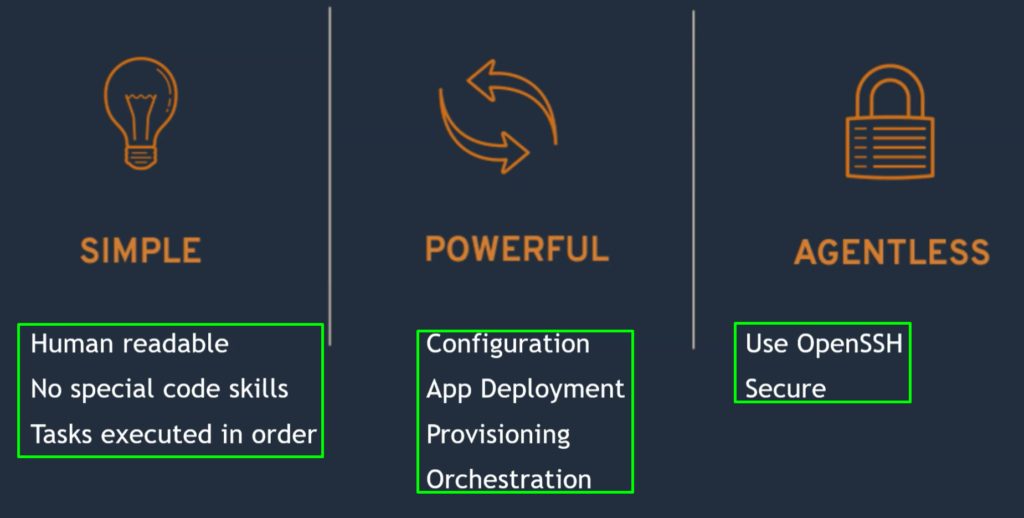
Ansible is Simple-
- Ansible is really a very simple tool compared to other automation tools or scripts. It’s also very clean.
No Agent(Agentless)- (Target machines are accessed by SSH, winrm & API)
- you don’t have any agent in Ansible like Puppet, Chef, or Salt Stack.
- So if you’re managing 100 servers through Puppet, Chef, or Salt Stack, you need to install agents in all those 100 machines.
- But In Ansible you don’t need to do that. Ansible uses existing connections like for Linux, it uses SSH. For Windows, it uses winRM, or it has API-based modules.
- So based on the target, it will use the right communication methods in its module.
- So you don’t need to have any agent, you don’t need to do any setup.
No Database(YAML, INI, texts)-
- There are no databases and complicated storage in Ansible.
- You have YAML, INI, or text format where You have your playbooks, your scripts, your configuration in these formats, very simple formats. The output is written in the JSON format.
No complex Setup-(it’s just a Python library)
- The setup is very simple For Ansible.
- It is just a Python library, so you can say Pip install Ansible.
- Also, you can install Ansible through package managers if you want to upgrade them again.
YAML-
- You don’t need to write programming language to do any automation.
- Ansible script or Ansible playbook is written in YAML format, which is very easy to read, and very easy to write.
- Its structure has very less complication compared to any programming language.
- That’s why we say Ansible is easy to read and write.
How does Ansible connect to its target?
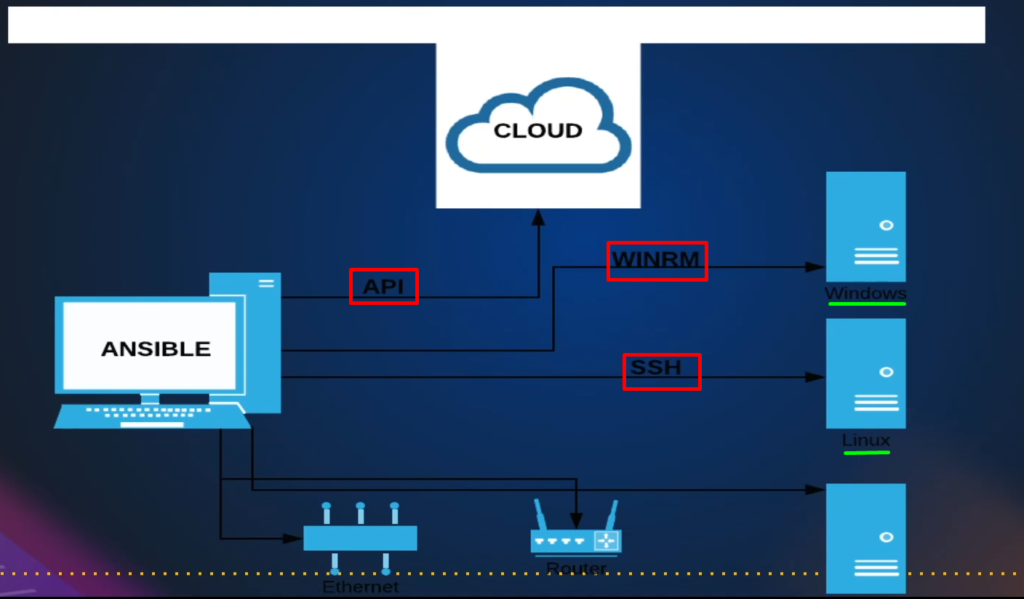
As a target system, it could be a Linux Server, Windows Server, cloud account, database, or it could be network equipment.
For Linux Server Connection-
- As I said, it is going to use SSH to connect to any Linux machine.
- Every Linux server will have SSH and you can take any Linux Server.
- Linux server operating systems like Ubuntu Server, CentOS, and RHEL will have SSH running. So you don’t need to set up anything, you just need SSH detail and Ansible can connect to Linux machines using SSH.
For Windows Connection-
- it uses Winrm. Again, there will be WinRM service already there. You just need to enable a remote connection.
- In Windows PowerShell, you have to enable the remote connection so you can connect to Windows through Winrm connection remotely.
For cloud Connection-
- Clouds like AWS, Azure, Google Cloud, or any other cloud, use APIs.
- Apart from that, you can also manage network devices like switches and routers through Ansible or even databases.
For the database-
- it’s going to use its own Python libraries. Like MySQL, it has Python MySQL Library.
So my point is you don’t need to set up an agent on the destination or in the server itself.
Well, by the way, there is no server in Ansible. Ansible is called a control machine In general.
NOTE: – We don’t call it Ansible server because it doesn’t run any service Like Puppet Server (it runs a service That’s why it’s a Puppet Server).
Chef Server (because it also runs a service), or Salt Master, Salt Server, runs the service.
But Ansible does not run any service. It just uses the Python modules and Python scripts.
to connect to the target machine, dump the Python script they’re executed, and return the output.
Important points 1: –
- Ansible is a pushed-based mechanism means the Ansible server pushes all the changes onto the target system.
- The target system doesn’t need to do anything to update itself and its a source.
Important points 2: –
- For Winrm or SSH, it’s going to send the Python script to the destination, execute, and return the output.
- But for the API task, it’s going to execute on the control machine locally. There’s no place where it’s going to send the script. It’s going to execute all the scripts locally.
- So, you have remote execution in Ansible, and you have local execution also, and that’s totally dependent on the target. And you don’t need to really mention anything you just use the module, and you mention the destination. All those things are abstracted from you. Ansible will do all kinds of connections and execution behind the scenes.
Ansible Architecture: -
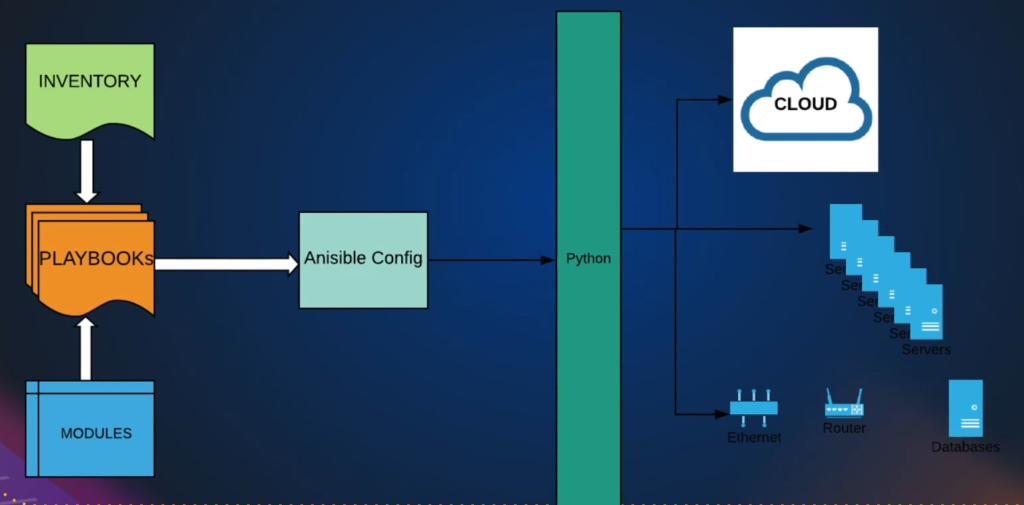
a.Inventory file: –
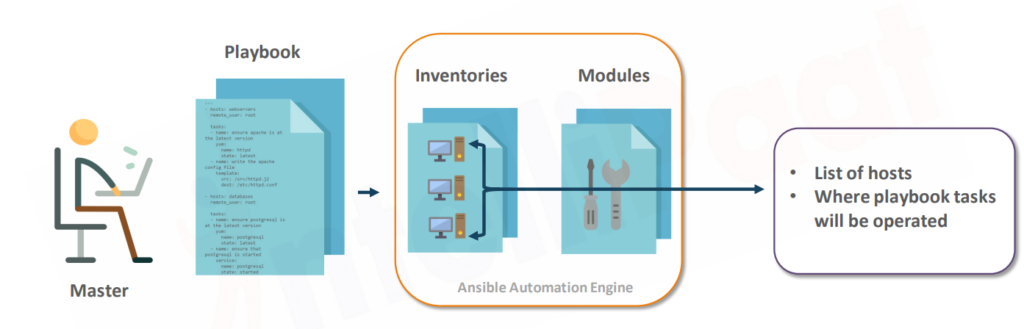
- In the inventory file, you will have the target machine’s information.
- for example, IP addresses and username passwords will be mentioned in the inventory file.
b.Modules: –
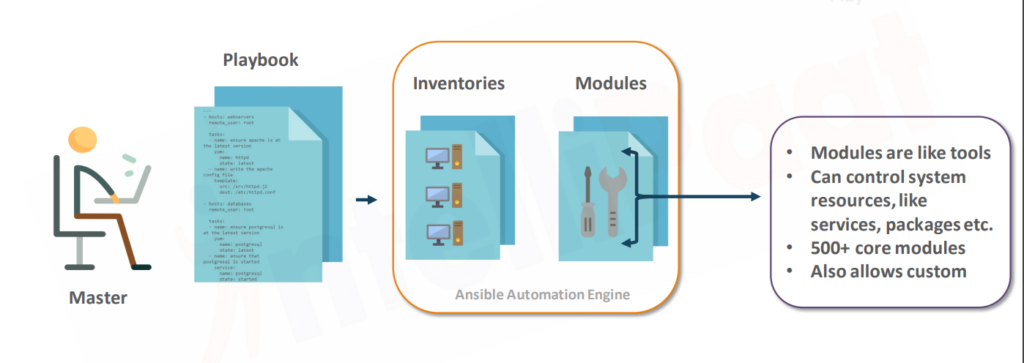
- Ansible has lots of modules.
- In-built modules that are supposed to do a particular task.
- for example, installing a package or restarting a service, or taking a snapshot of EBS volume.
- So, like that there are hundreds and more than 1000 modules in Ansible. you write a playbook, and you mention from the inventory file that this is the host and I want to execute so and so module on this host. So, this will be a task in the playbook.
c.Ansible Configuration File: –
- Then Ansible is going to use the configuration and create Python scripts and Python packages.
- Python package means the group of Python modules. So when you execute, it’s going to create a Python package, deliver it to the destination(Let’s say the Linux server executes there), and return the output.
- If the target is not an operating system, probably a cloud account (Let’s say You’re launching an EC2 instance). So it’s going to create a Python package and execute locally.
d.Playbook: –
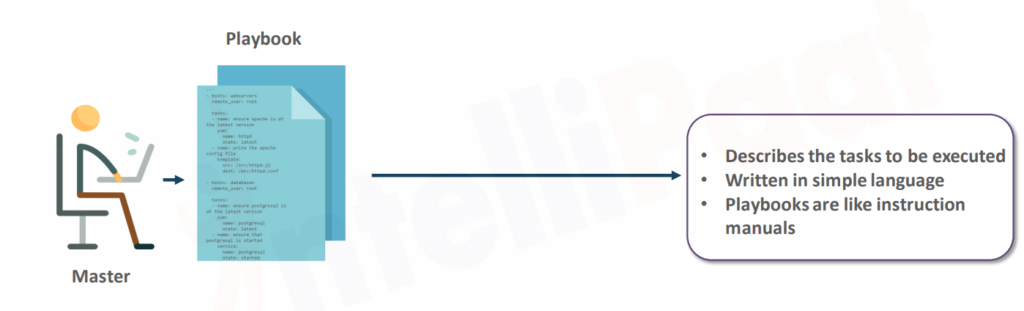
- Playbook describes the tasks to be executed.
- it’s written in simple language i.e., YAML.
- Playbooks are like instruction manuals.
Advantages of ansible
- Easy to learn.
- Written in Python.
- Easy installation and Configuration steps.
- No need to install ansible on slave (managed-node or client node).
- Highly scalable
Problem Statement: Example
Problem Statement: Say, Josh runs an enterprise,wants to install a new version of Apache Tomcat in all systems.

Problem Solution with Ansible: Instead of going to each system , manually updating, Josh can use Ansible to automate the installation using Ansible Playbooks

How Ansible works with Nodes: Lab Example
Here, I am taking one lab example to make it easy to understand. And on this example, we are going to see how Ansible works.
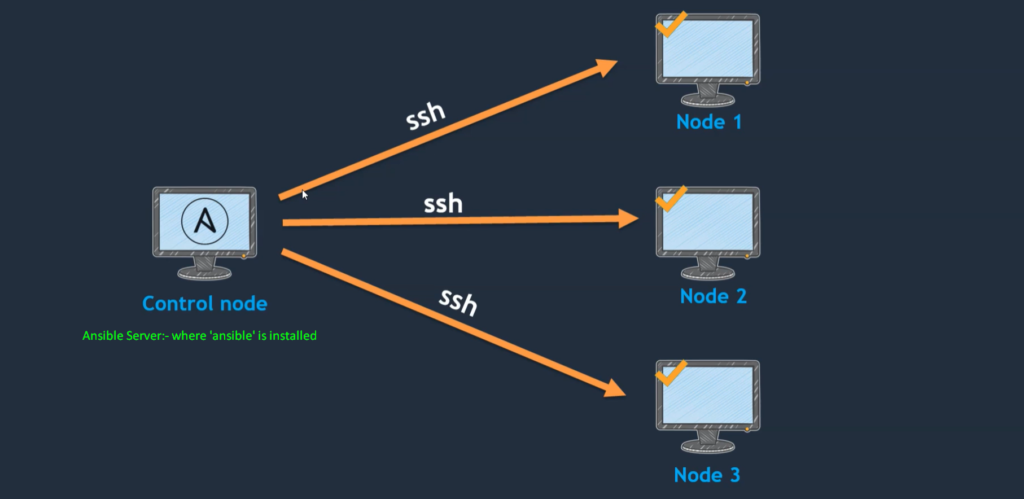
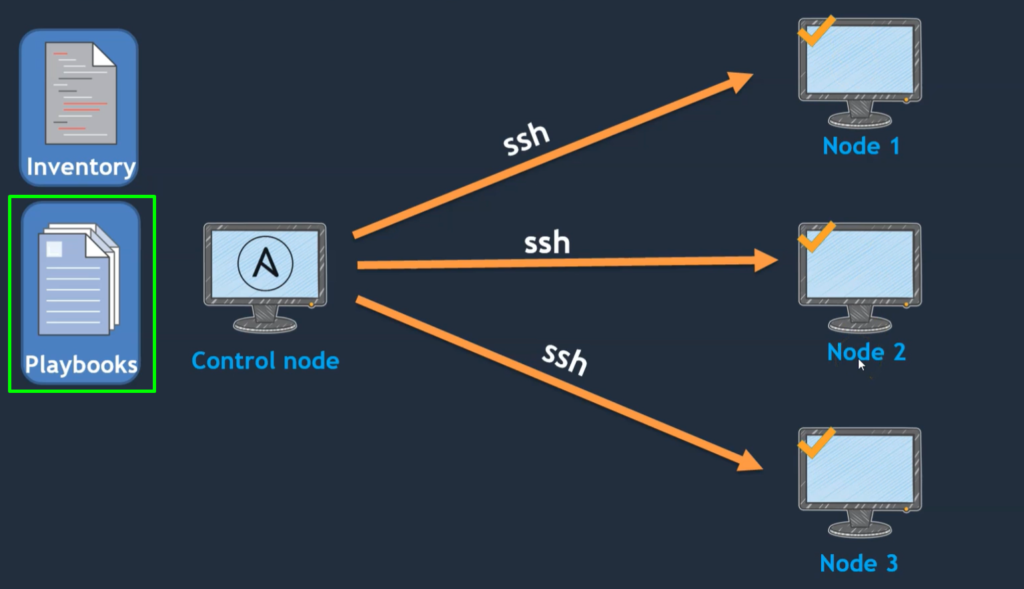
- If you see the above image here, we have a system called the control node and a few other client nodes.
- So, the control node is where we usually install Ansible. So, wherever Ansible is installed, we call it a control node.
- And this control node is going to manage so many clients (client nodes).
- The controls node is going to manage these nodes using SSH.
- Control Node should have access to these client nodes or managed nodes. And it is possible through Password-less authentication.
- So, to manage these nodes, we should enable Password-less authentication.
- If once Password-less authentication is enabled, then only the control node can be able to manage these nodes.
Components in Ansible-Control-Node
Now we will see what components are there in Ansible
1.Inventory: –
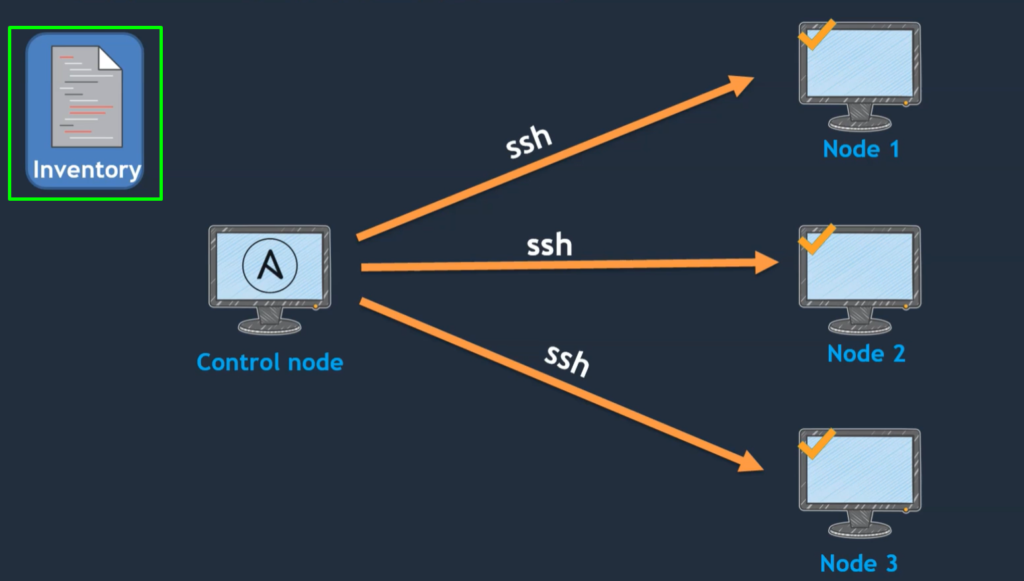
- Inventory is a list of the servers’ information or managed nodes’ information.
- Assume that three nodes we have over here.
- These three nodes’ information is updated in the inventory.
- If these three nodes’ information is not updated in the inventory, it cannot be able managed.
- So, all the nodes that are managed by the control node should be updated in the inventory.
- If it is not updated, even though you enable Passwordless authentication, it cannot be managed.
2.Playbook: –
- The next component is playbooks.
- Playbooks are the actual tasks that you need to execute on the target systems.
- Let’s take an example, we want to create a user on all client systems or managed nodes.
- So how to create a user, Which user you should create? That information is updated in the “playbook”. And on which servers we should update That information is available in “inventory”.
3.Module: –
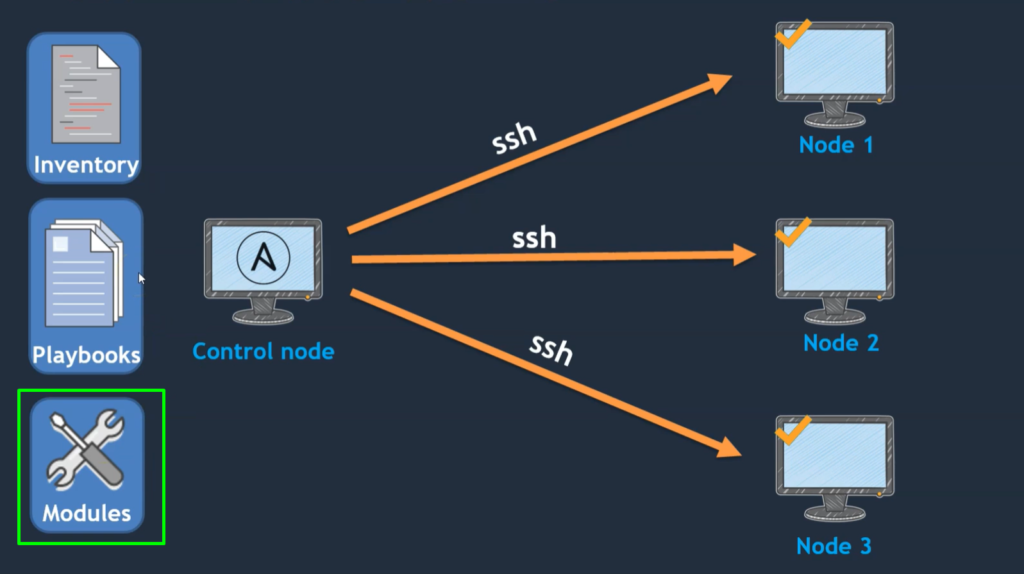
- The next component is the module.
- modules are usually used by tasks.
- So, tasks are nothing but the activity like What do you want to do?
- These modules are shipped with Ansible while you are installing Ansible. Most of the useful modules come while you are installing Ansible.
- And so these modules are used by Ansible playbooks.
So these are the major components on the control node or Ansible master server.
Resources to start
- Please create an AWS account through the below link if you don’t have one.
- https://portal.aws.amazon.com/billing/signup#/start
- Clone the below repo for my ansible playbooks.
- GitHub URL: https://github.com/abhishek0400/ansible_for_beginners
Prepared Ansible LAB
Agenda for this lab:
We will cover the below topics in this hands-on lab in further steps
- Ansible Playbooks
- Multitask Ansible playbooks
- Ad-hoc commands
- Inventory
- Modules
- Notify and Handlers
- Gather facts
- Conditions
- Ansible variables
- Additional concepts
- Ansible Vaults
- Ansible Roles
Ansible Lab Overview-
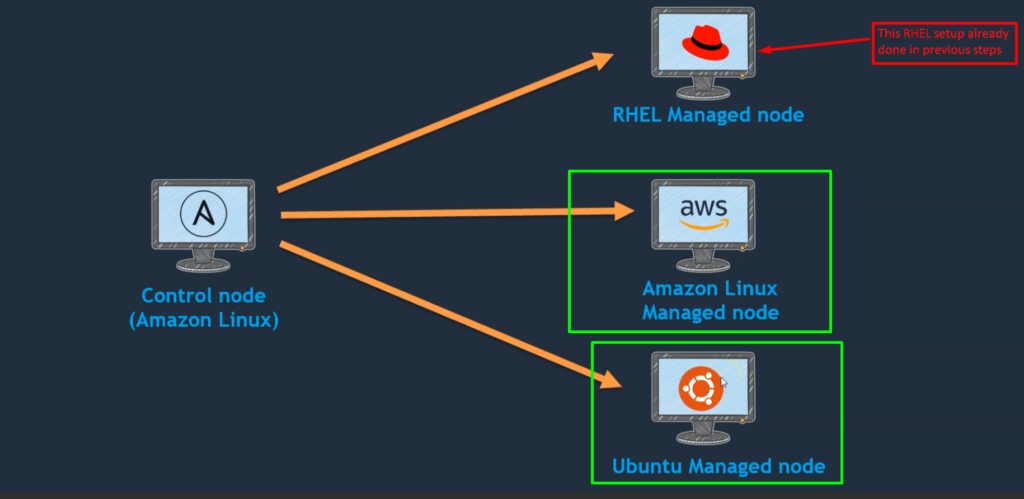
In this election, we are going to talk about how we are going to set up our lab environment for Ansible.
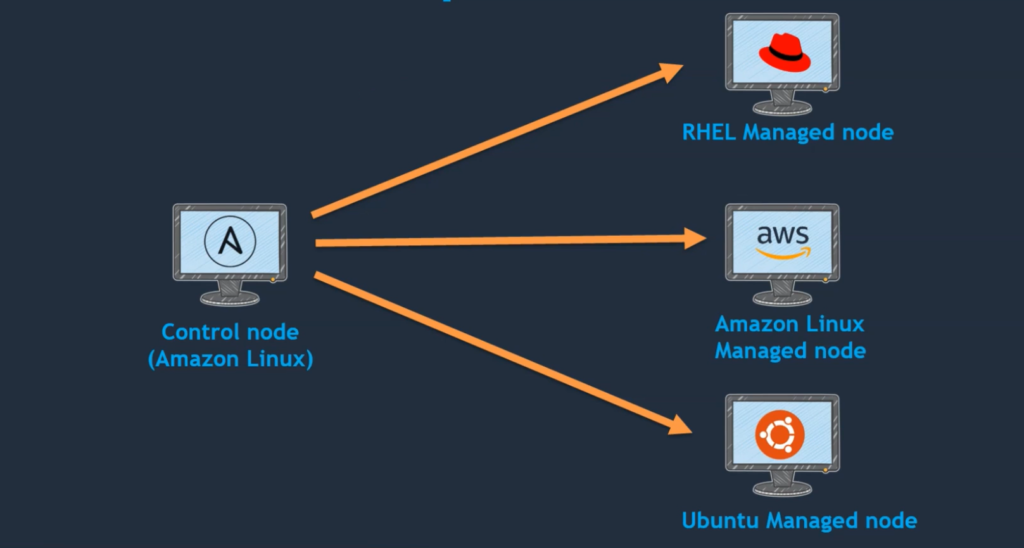
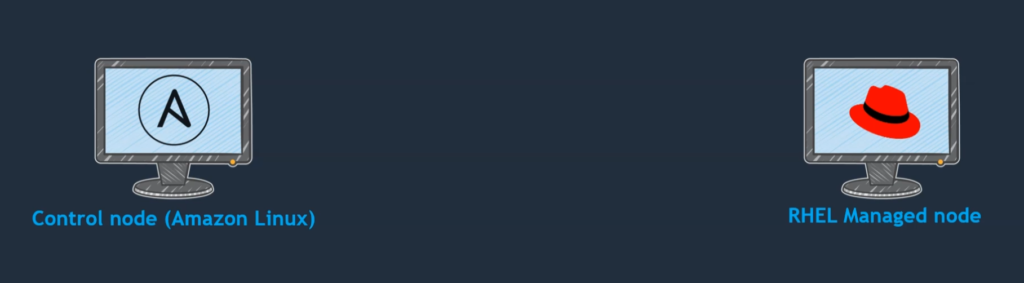
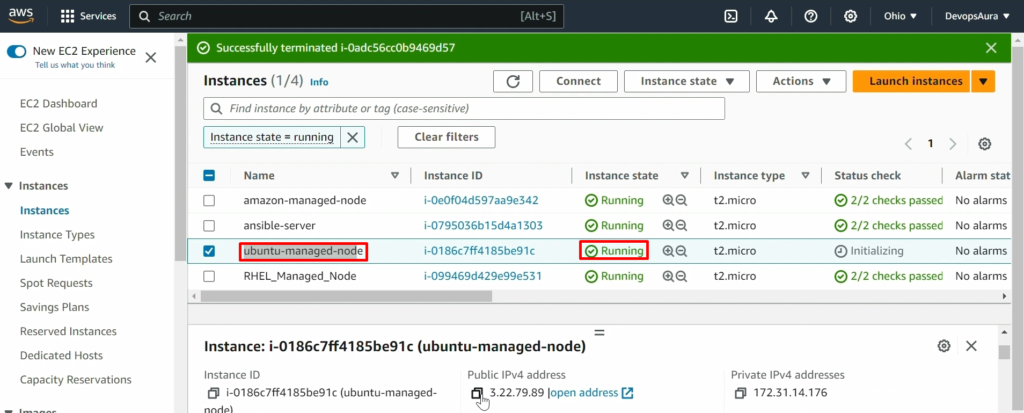
- We will create this lab environment on the AWS cloud where we will launch four EC2 instances.
- one EC2 instance will be for ansible-control-node and the other three EC2 instances will be for managed-nodes (RHEL, Amazon, and Ubuntu) as you can see in the above images.
- we are going to set up a control node that runs on Amazon Linux and it is going to help client nodes( managed-nodes ) i.e. RHEL-managed-node, Amazon-managed-node, and Ubuntu-managed-node systems.
- I’m using three different flavors because Ansible can able to do or perform tasks on any of these operating systems, and we can still set up a control node on our actual server itself.
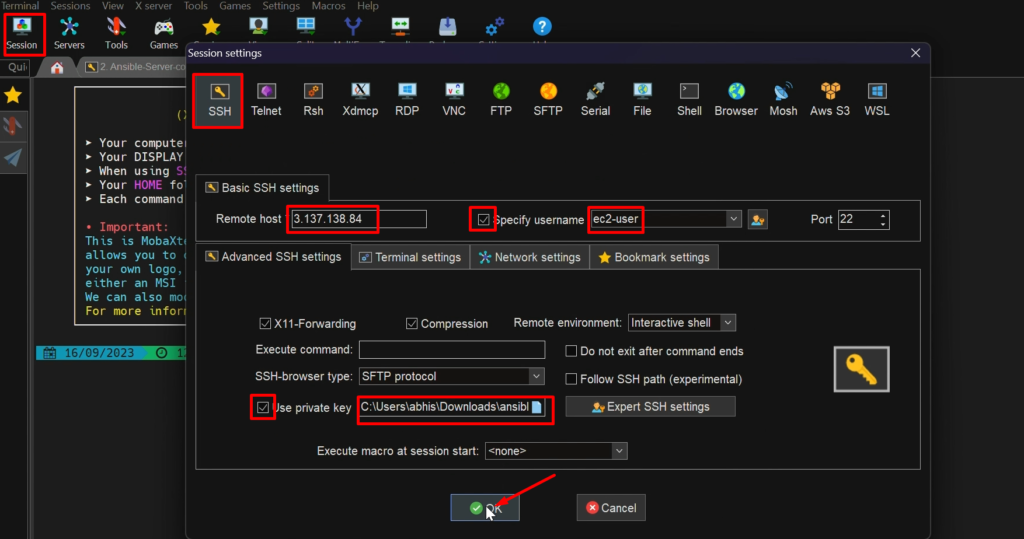
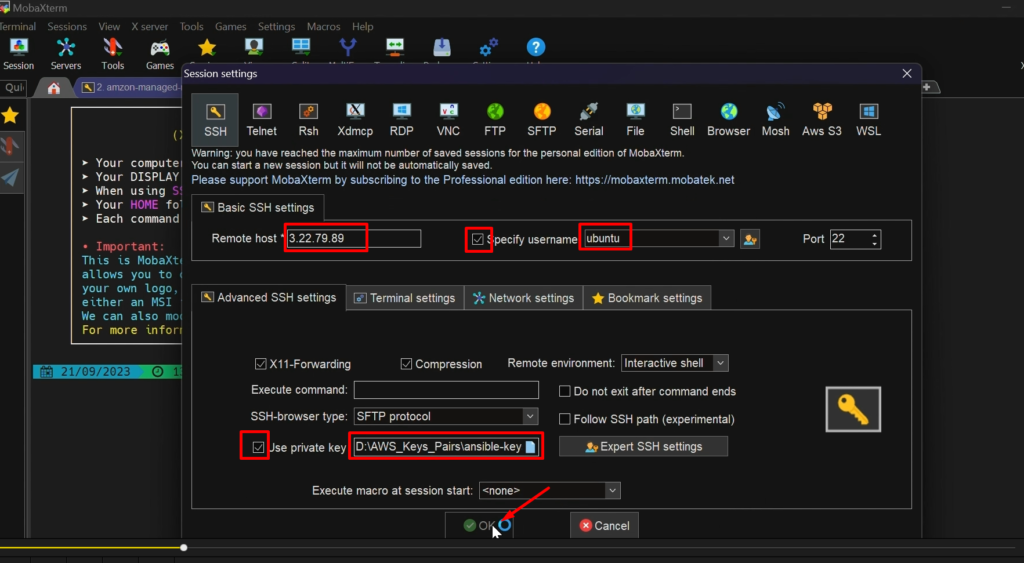
Prepare Ansible System (control-node) on AWS-
We will do the following steps to set up the Ansible System on AWS.
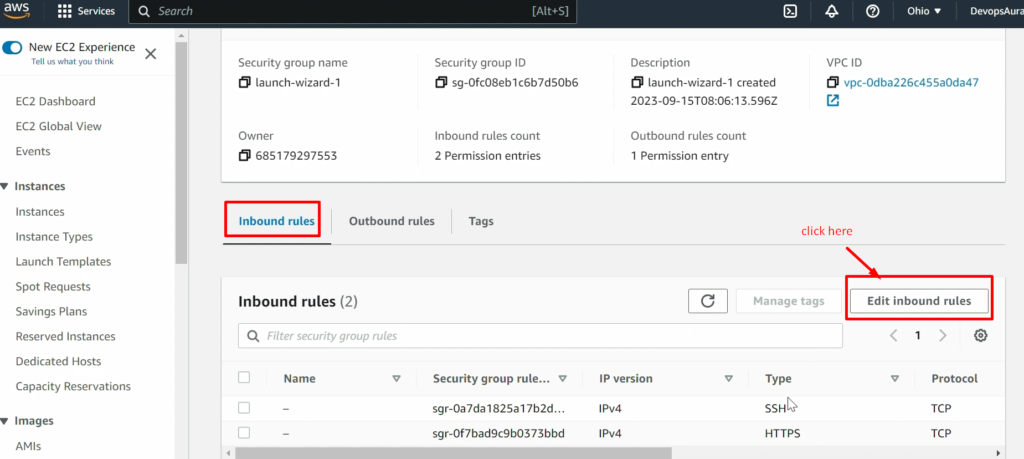
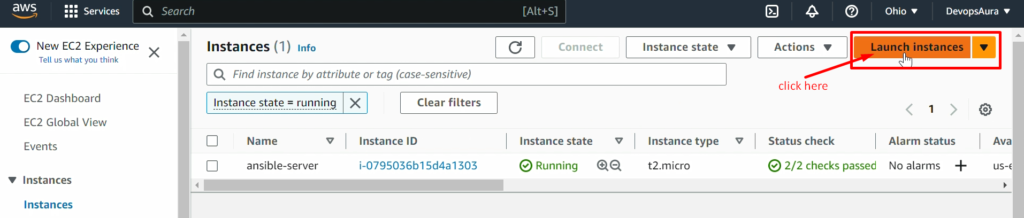
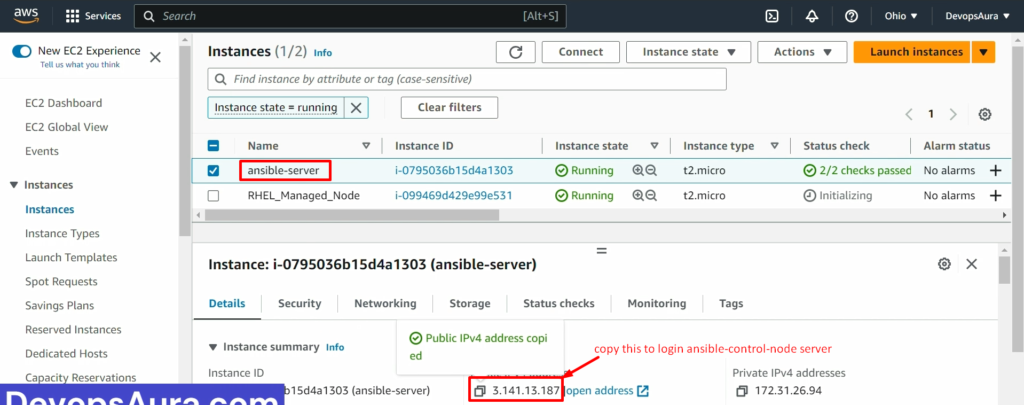
STEP 1:-Setup EC2 instance
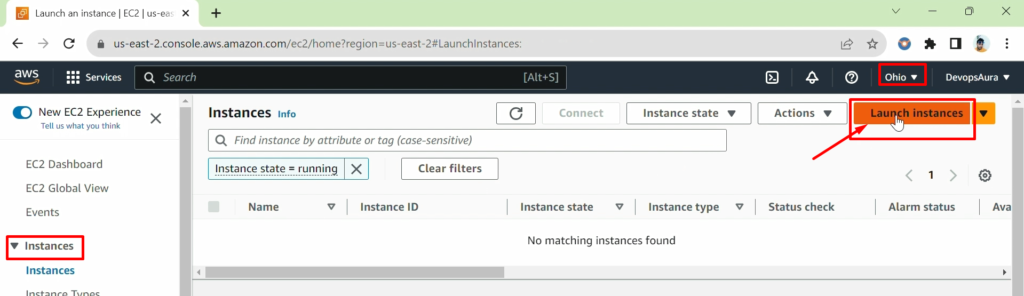
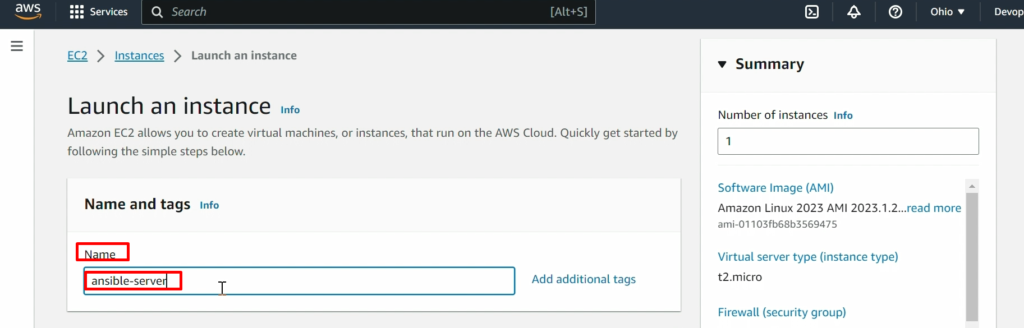
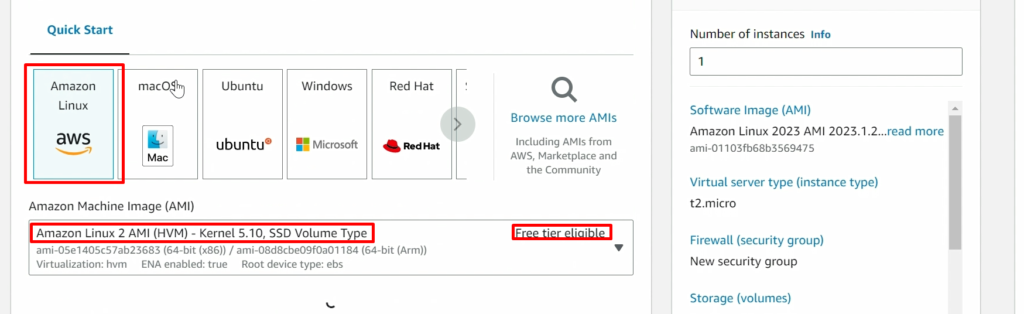
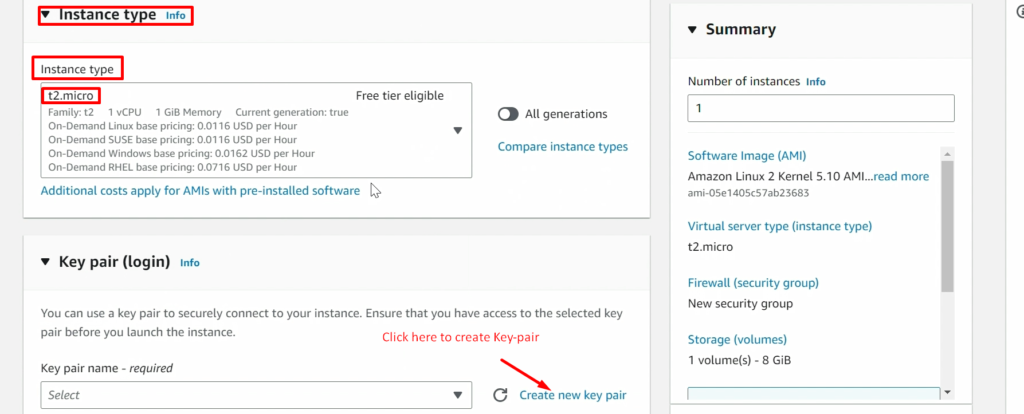
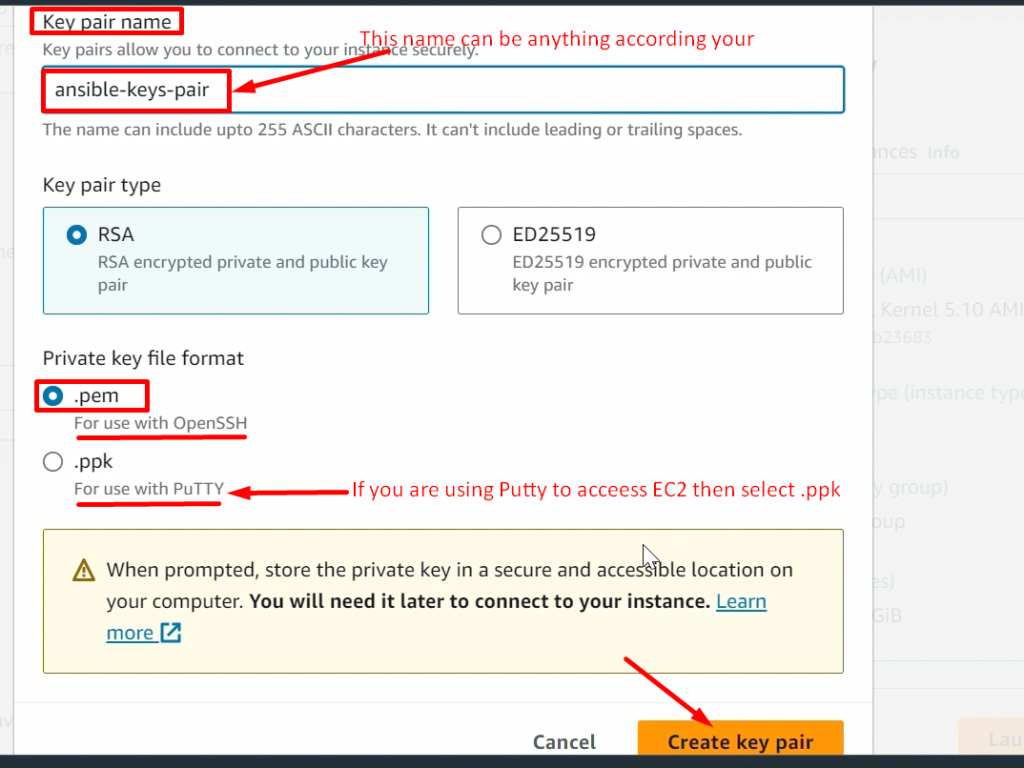
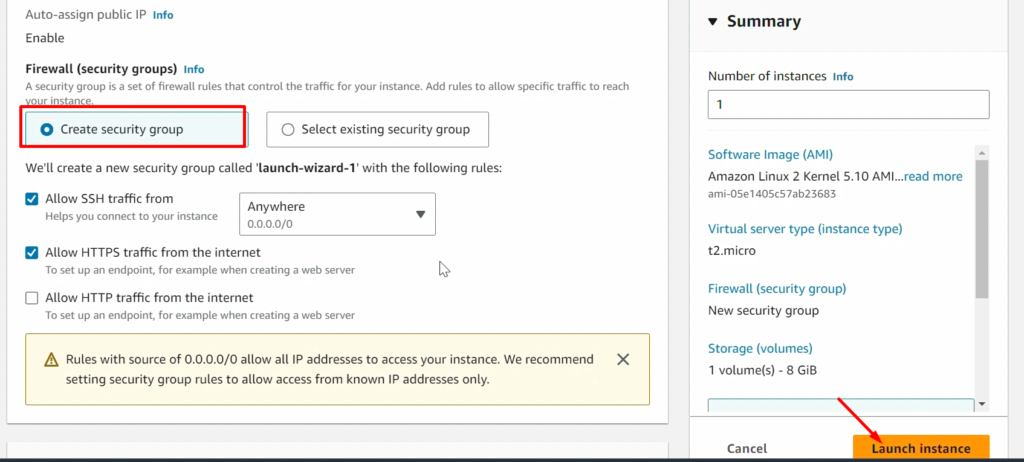

NOTE: – Don’t forget to add the 8080 port in the security policy of ansible-server(ansible-control-node)
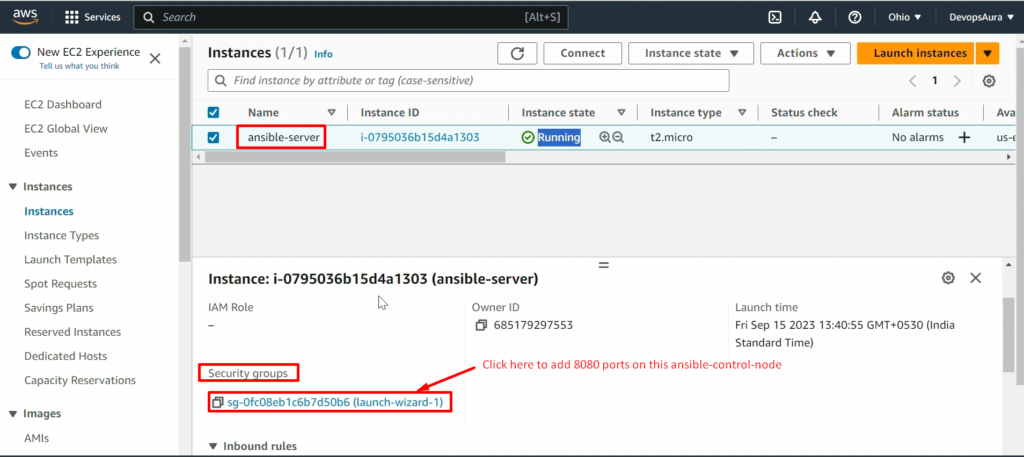

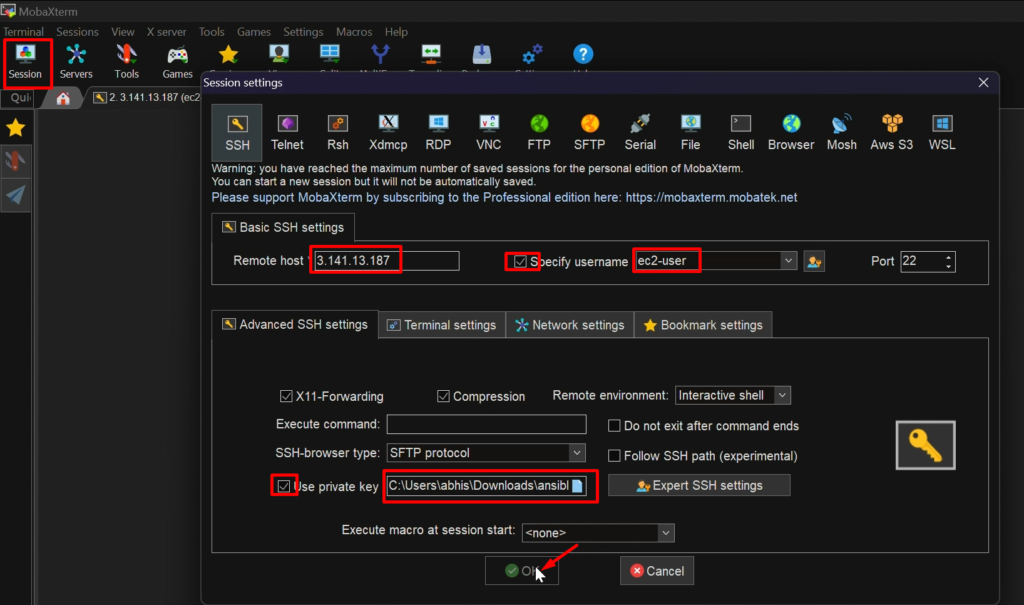
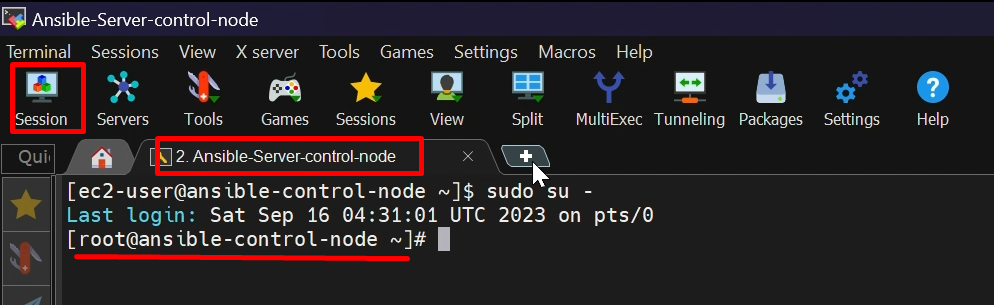
Now, connect this EC2 instance before doing further steps

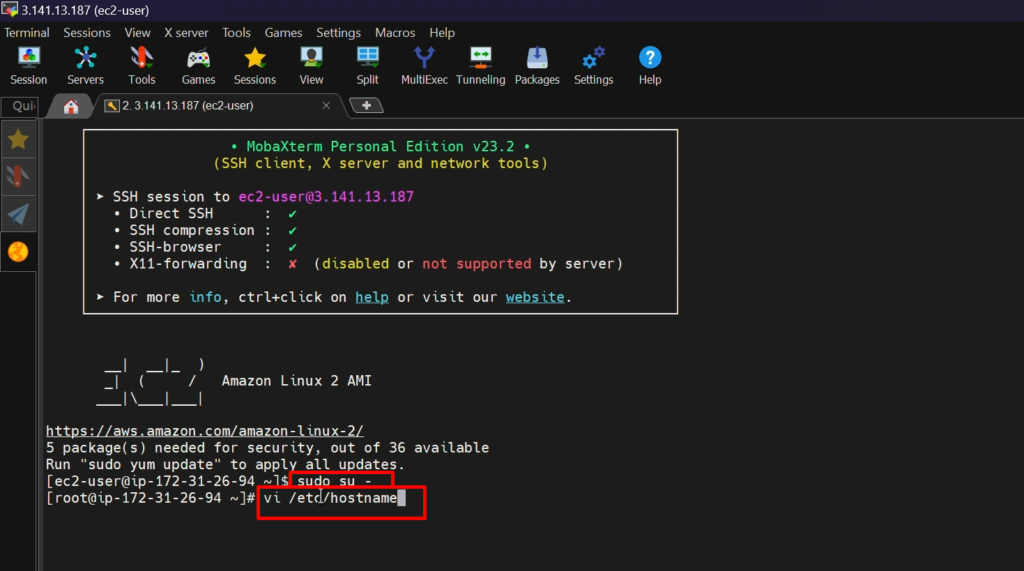
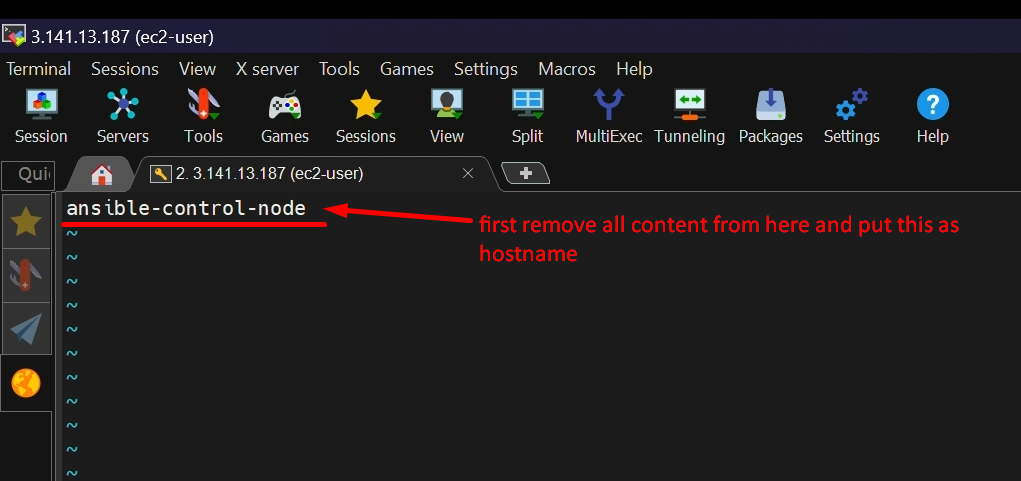
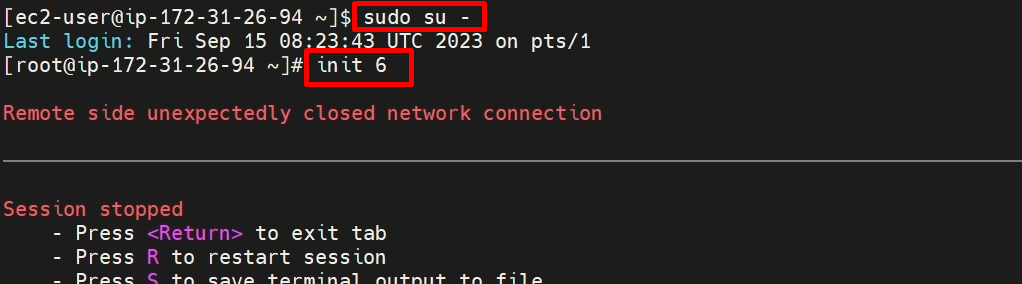
STEP2:- Setup hostname
					sudo su -
vi /etc/hostname
init 6   (for reboot)
NOTE:-
- press ‘i‘ = to go inside the insert mod
- Press ‘Esc’ =to come out from insert mode and
- Then type “:wq“ = to save & Exit
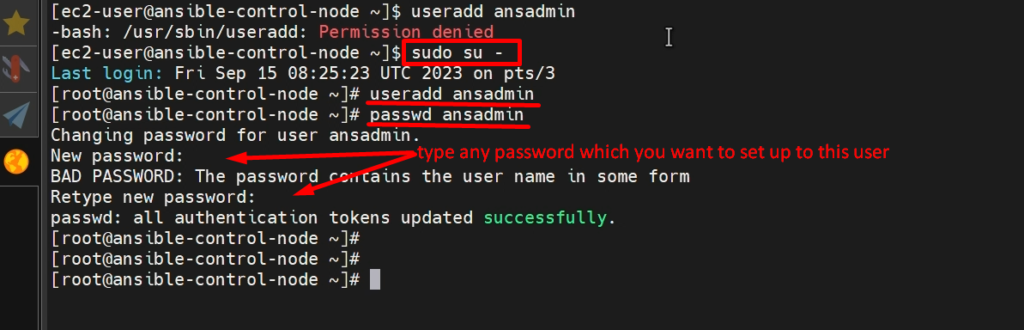
STEP 3:- create ‘ansadmin’ user
					useradd ansadmin
passwd ansadmin      (set password)
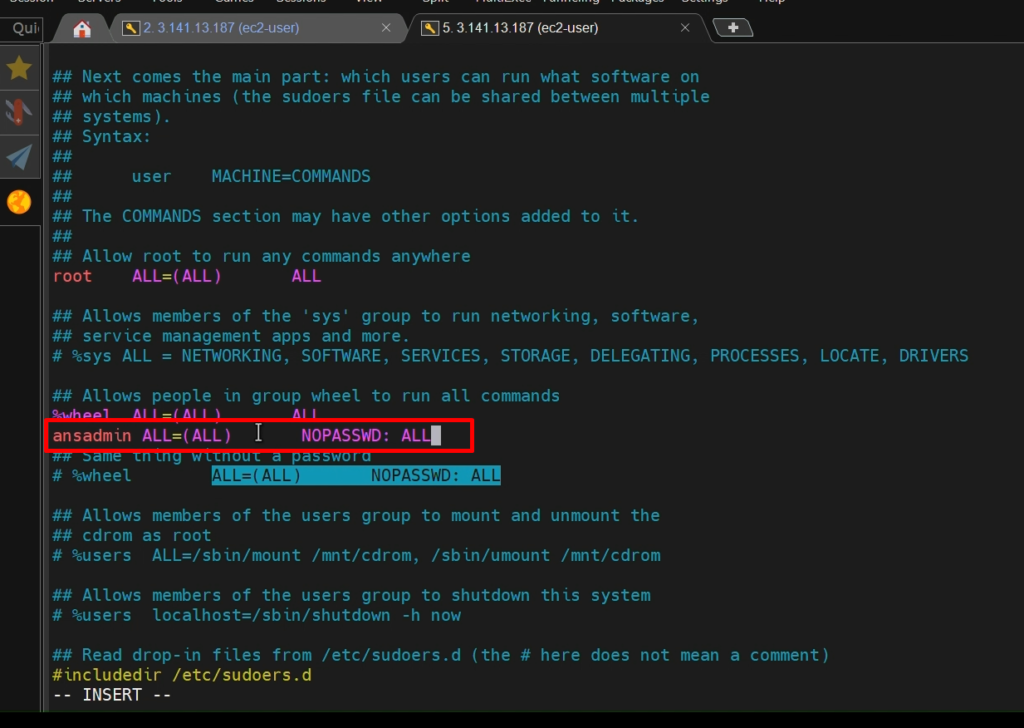
STEP 4:- Add the user to the ‘sudoers’ file
visudo
Put below line
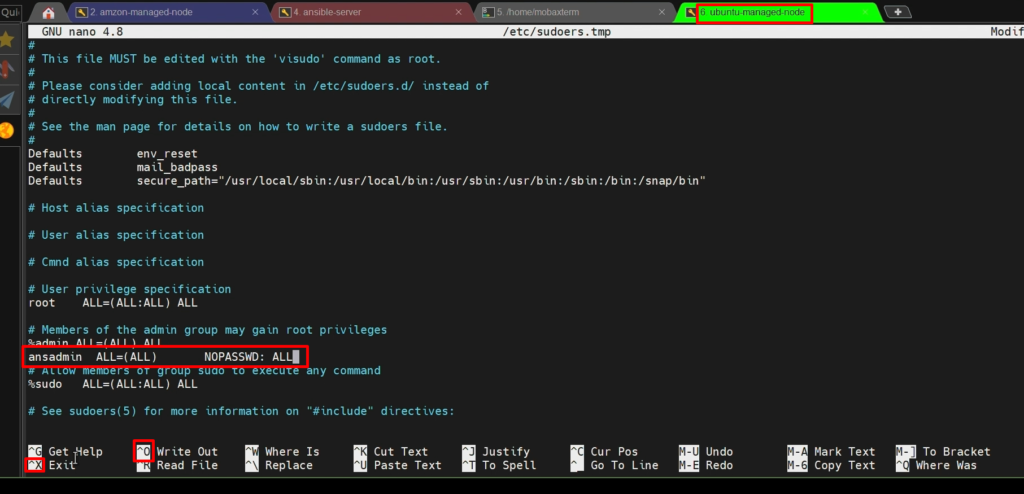
ansadmin ALL=(ALL) NOPASSWD: ALL 
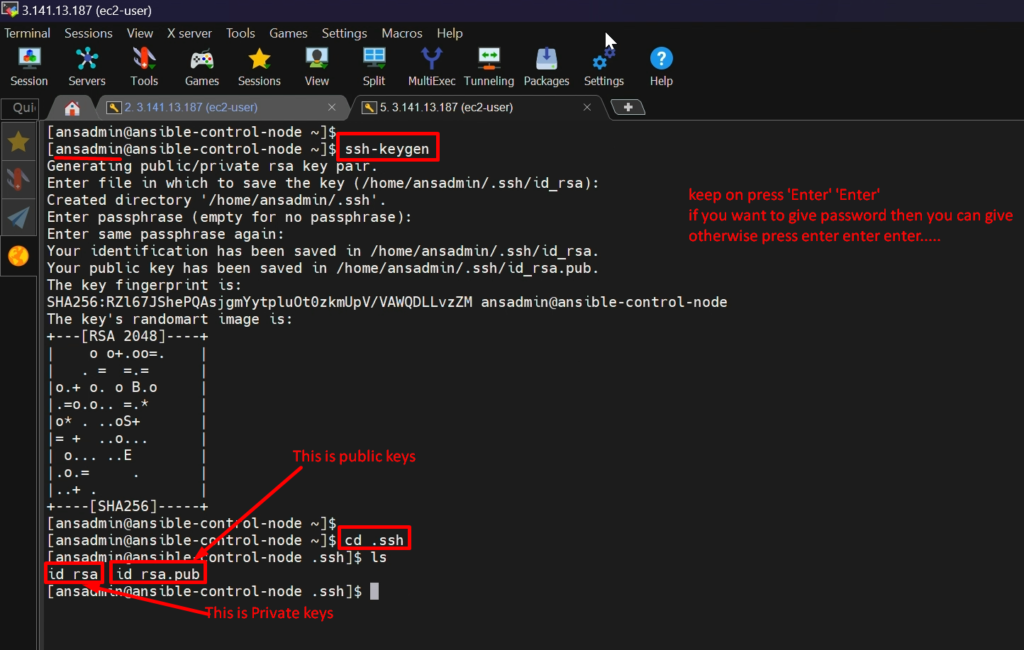
STEP 5:- Login as ‘ansadmin’ user and Generate SSH keys after
ssh-keygen ( which will generate keys pair public keys & private keys )

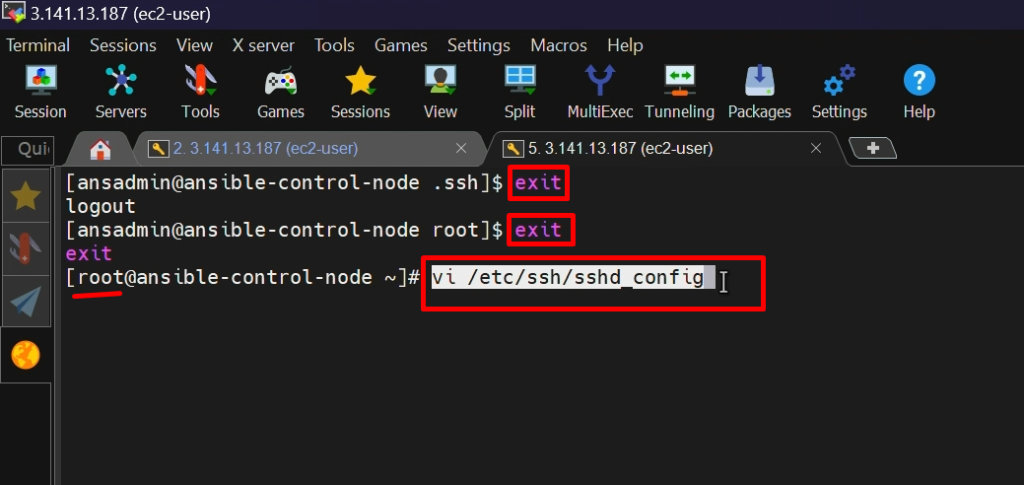
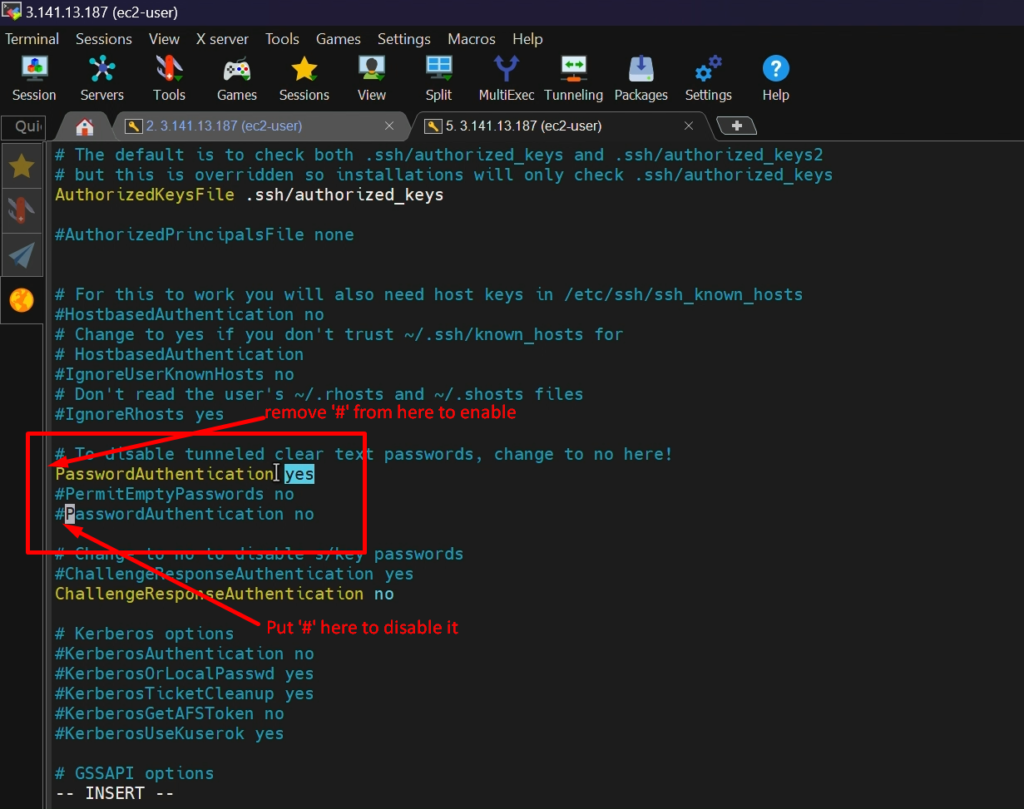
STEP 6:- Enable Password-based login
					vi /etc/ssh/sshd_config
  service sshd restart
Video Recording
Still, if you have any doubt about any steps, please go through this video again
Install Ansible on AWS EC2 instance
Please do the following steps to install Ansible on EC2 instance
Step 1: – Install Python and Python-pip.
					yum install python
yum install python-pip
Step 2: – install ansible using pip and check version.
					pip install ansible
ansible –version   #( To check the version of ansible )
Step 3: – create two files inside ‘/etc/ansible’.
					cd /etc/ansible
vi ansible.cfg
touch hosts   #( we will update client nodes here when will create client nodes. As of                     now, we haven't created any client nodes )
NOTE: – To get started with Ansible, you need to install it on your control node. Ansible supports Linux, macOS, and Windows. Detailed installation instructions for each platform can be found on the official Ansible website.
Video Recording
Still, if you have any doubt about any steps, please go through this video to install ansible again
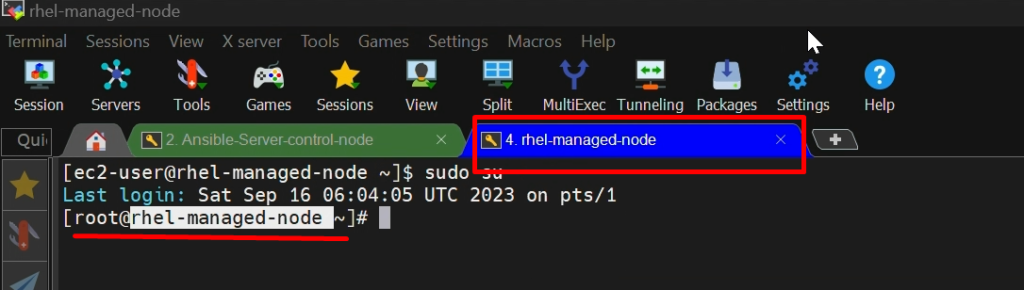
Setup RHEL as an ansible managed-node (client node)
We will do the following steps to set up the RHEL Managed node (Client node) on AWS as almost similar, we did in previous step to setup ansible control-node.
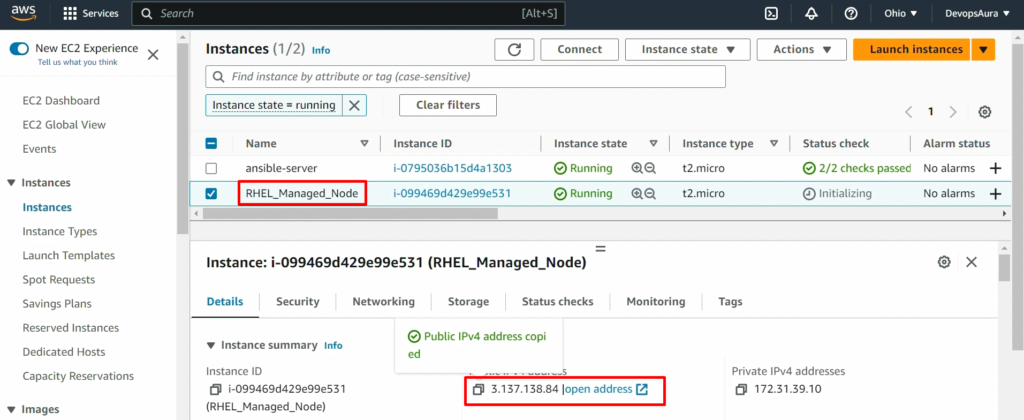
Step 1: -Setup EC2 instance
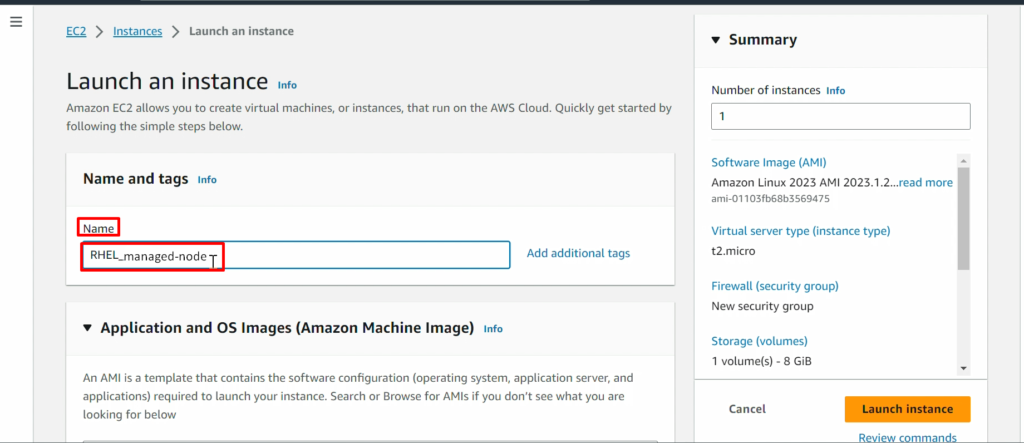
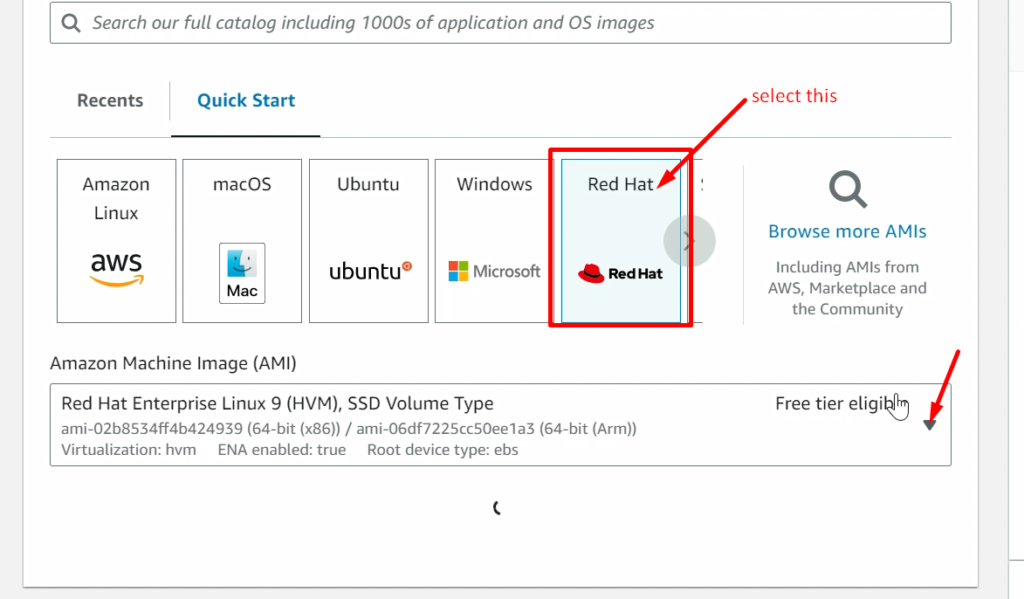

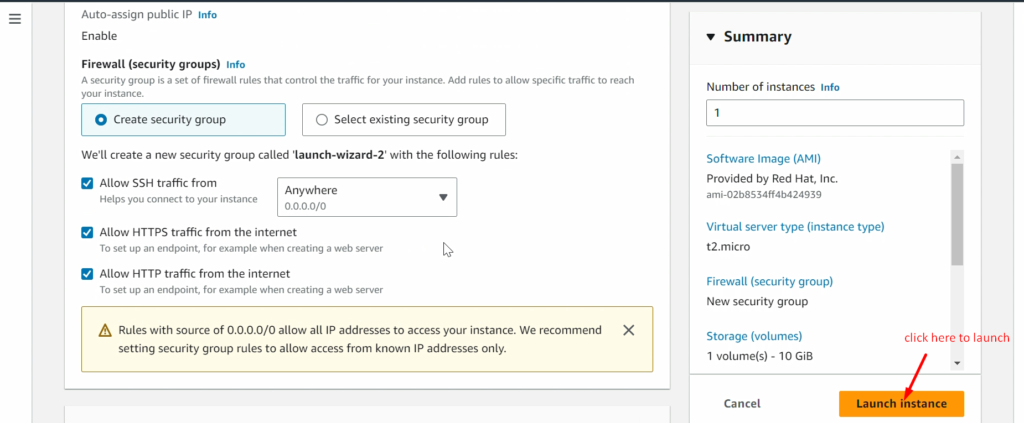
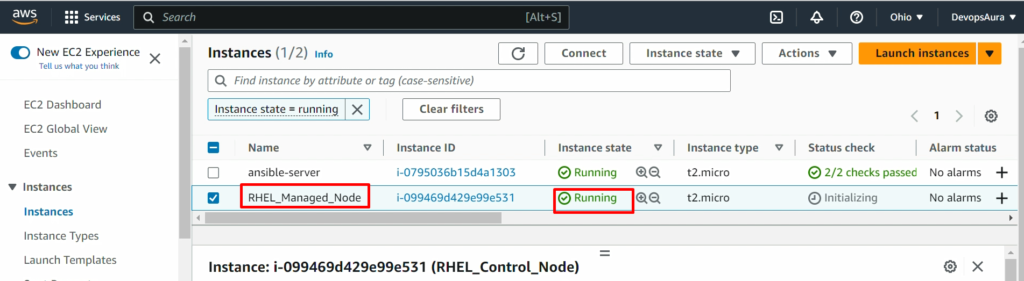
NOTE: – Don’t forget to add the 8080 ports in the security policy of RHEL_Manged_Node (ansible-managed-node) as we did in ansible-control-node
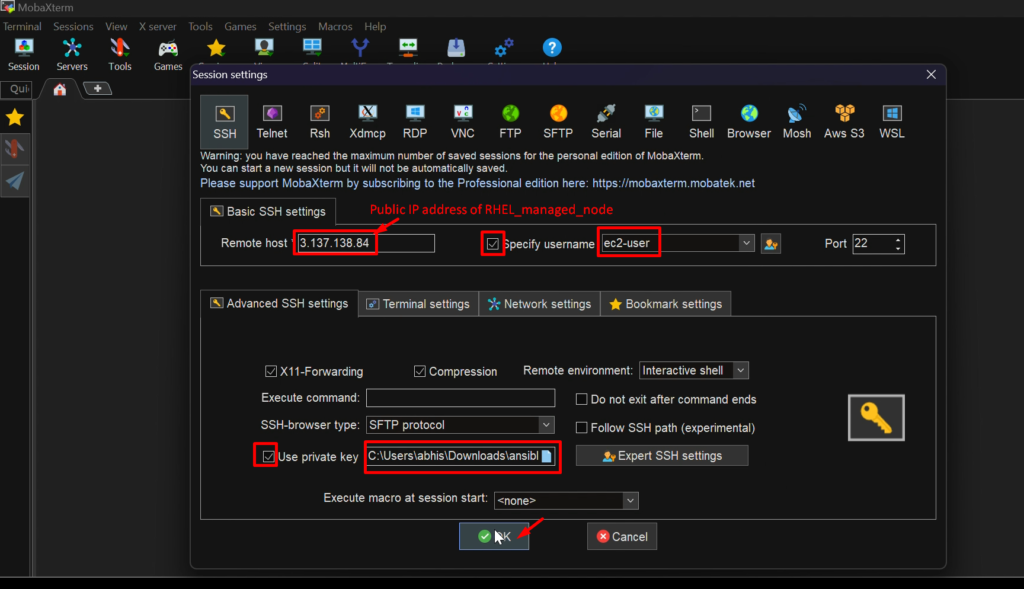
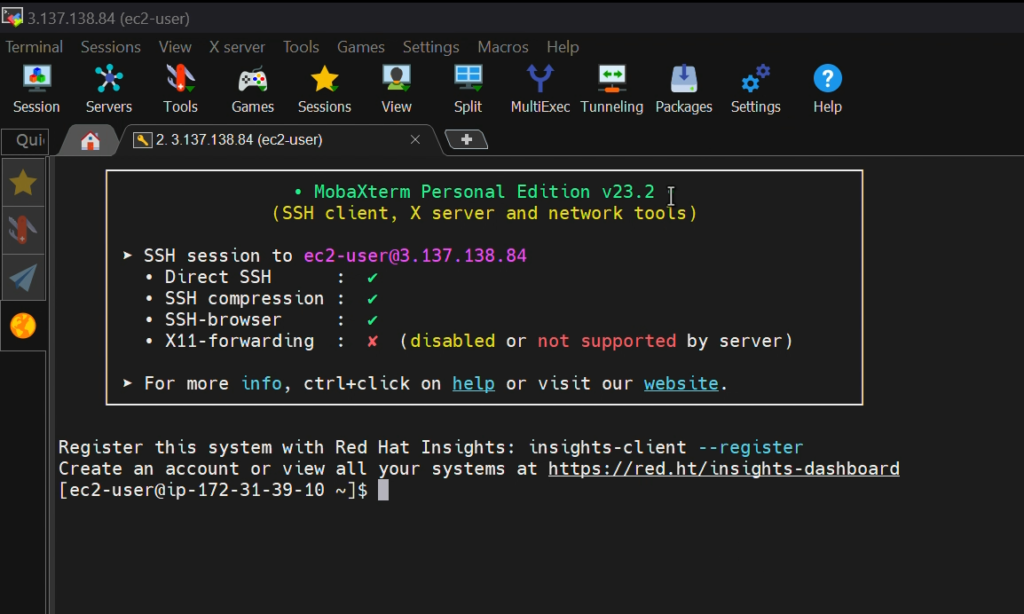
Now, connect this EC2 instance with the help of Mobaxterm Terminal
Step 2: – Setup hostname
					sudo su -
vi /etc/hostname    ( put the hostname inside this as RHEL-Managed-Node )
init 6
Step 3: – create ‘ansadmin’ user.
					useradd ansadmin
passwd ansadmin      (set the password to this user )
Step 4: – Add the user to the ‘sudoers’ file
visudo
Put the below line inside the above ‘sudoers’ file
ansadmin ALL=(ALL) NOPASSWD: ALL Step 5: – Enable Password-based login
					 vi /etc/ssh/sshd_config
service sshd restart
NOTE: – press i= for insert mode
Press ‘Esc” = to exit from insert mode
Press ‘SHIFT+G’=to go at the end of the terminal
Video Recording
Still, if you have any doubt about any steps, please go through this video to Setup RHEL-Managed-Node again
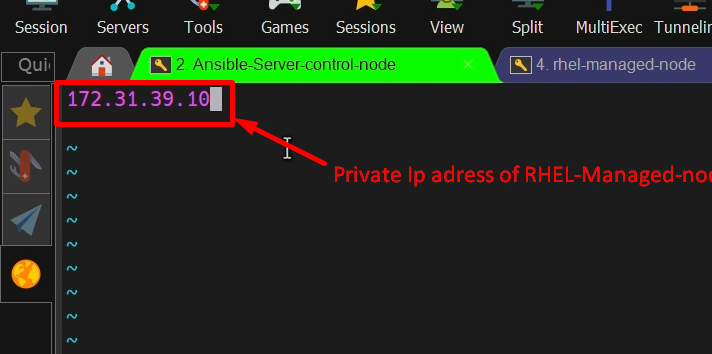
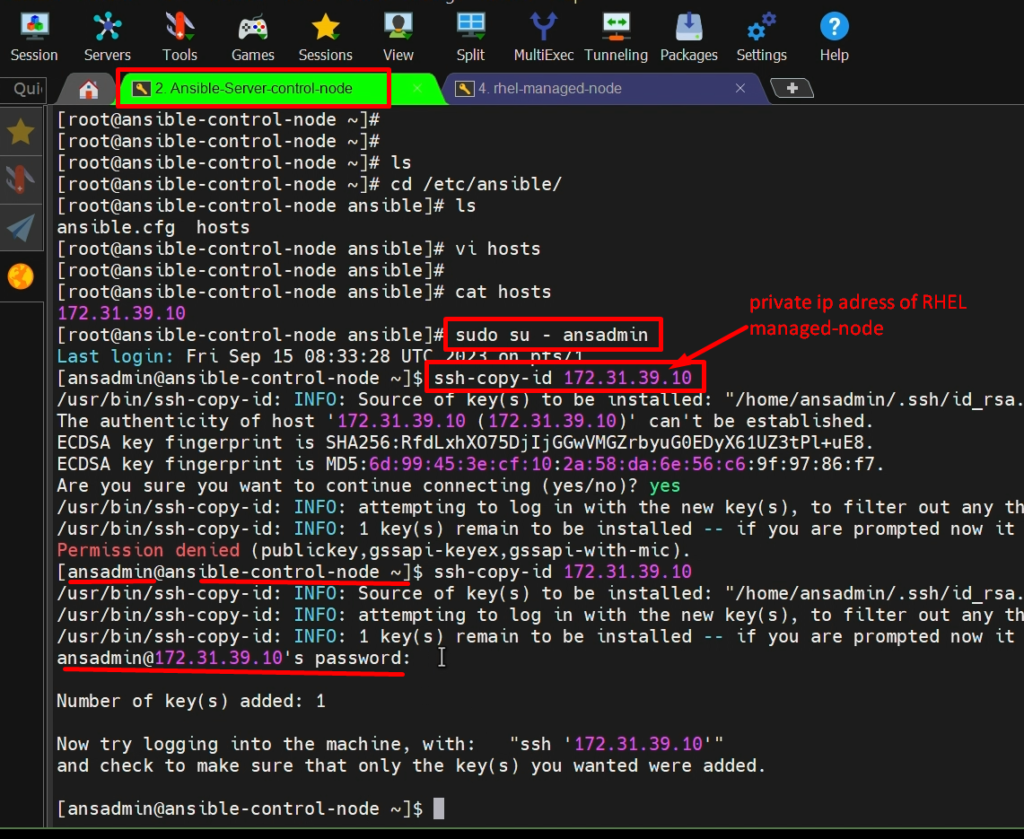
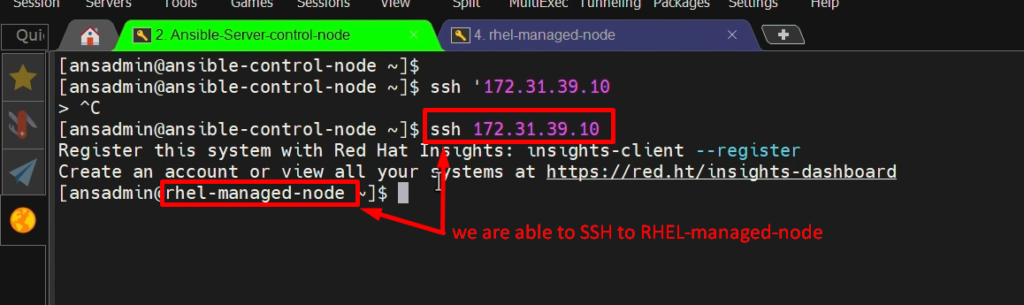
Add RHEL-managed node to Ansible.
- So far, we have set up our Ansible control node and our managed node (Client Node).
- Now we should establish a connection between these two.
- For that purpose, we should update the RHEL server IP address on the control node side.
- We have created a file called ‘/etc/ansible/hosts’. That is the inventory file we should update there.
- Once we update there and after that, we should copy the SSH key (public keys) onto our RHEL server (client node).
- Then we can be able to manage our server.
NOTE: – Don’t copy your private keys into your client node. Always copy your only public keys onto client node.
Step1: – login into both the servers- control node & RHEL managed node
Ansible-control-node
RHEL-Managed-Node
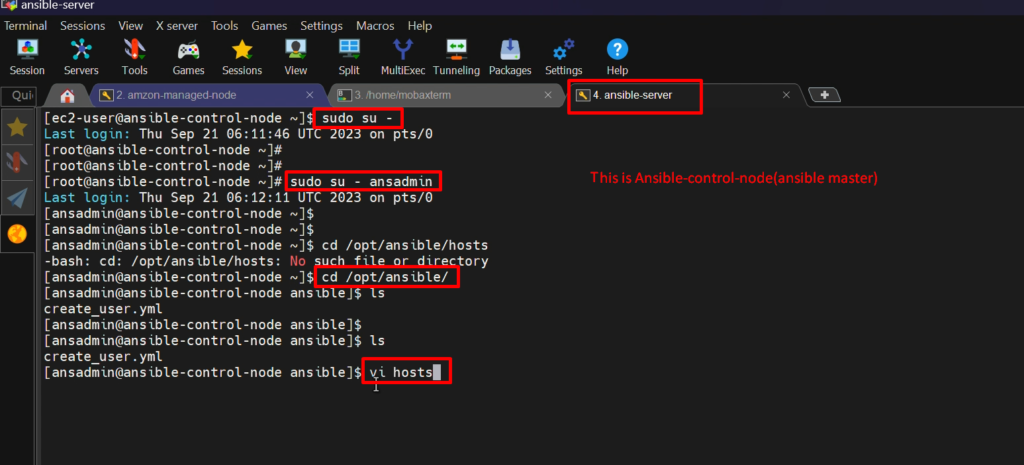
Step2: – copy the IP address of RHEL managed node into the control node’s inventory file “/etc/ansible/hosts”

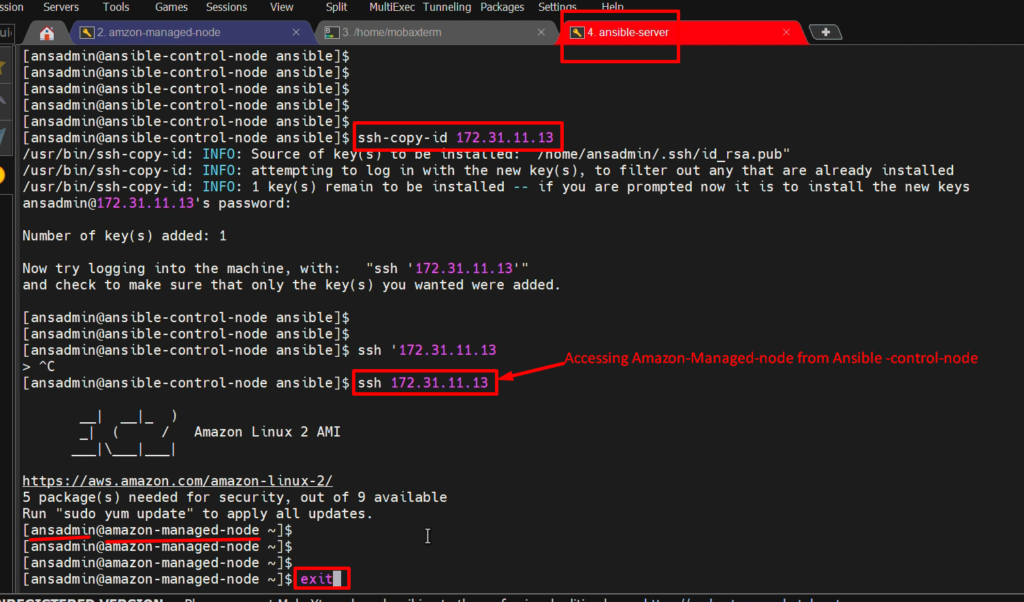
Step3: – Copy Public SSh keys into the RHEL server from the control node
					sudo su - ansadmin
    ssh-copy-id <ip address of destination>
Video Recording
Still, if you have any doubt about any steps, please go through this video to Add RHEL-Managed-Node to ansible-control-node again.
Introduction to ad-hoc commands
Introduction
- Ansible is a powerful open-source automation tool used by IT professionals and system administrators to manage and configure systems, deploy applications, and perform various tasks on remote servers.
- While Ansible playbooks are commonly used for defining and executing automation tasks. Ansible also offers a feature called “Ad-Hoc Commands” for quick, one-off tasks.
- Here, we will explore Ansible Ad-Hoc Commands, their usage, and how they can simplify and expedite routine administrative tasks.
What are Ansible Ad-Hoc Commands?
- Ansible Ad-Hoc Commands are one-liner commands that allow you to perform simple tasks on remote hosts without the need to write elaborate playbooks.
- They are especially handy for tasks that don’t require a structured playbook or for quick troubleshooting and system maintenance.
- Ad-hoc commands offer a straightforward and efficient way to interact with remote systems using Ansible.
Usage and Syntax
The basic syntax for an Ansible Ad-Hoc Command is as follows:
ansible <target_hosts> -m <module_name> -a “<module_arguments>”
- <target_hosts>: Specifies the target hosts or groups of hosts where you want to run the command.
- -m <module_name>: Specifies the Ansible module you want to use for the task.
- -a “<module_arguments>”: Provides the module-specific arguments needed to complete the task.
Examples of Ansible Ad-Hoc Commands
1. Gathering System Facts: To gather facts about remote systems, use the “ansible” module with the “setup” module.
ansible <target_hosts> -m setup
This command fetches information about the target hosts, including hardware details, network configuration, and more
2. Installing Packages: Use the “ansible” module with the “yum” or “apt” module to install packages on remote systems.
ansible <target_hosts> -m yum -a “name=<package_name> state=present”
Replace <package_name> with the desired package name.
3. Restarting Services: To restart a service on remote hosts, use the “service” module:
ansible <target_hosts> -m service -a “name=<service_name> state=restarted”
Replace <service_name> with the name of the service.
4. Creating Files: You can create files on remote systems using the “ansible” module with the “file” module.
ansible <target_hosts> -m file -a “path=</path/to/file> state=touch”
Replace ‘/path/to/file’ with the desired file path
Some Useful Ad-Hoc Commands-
For the time being, we are going to use these modules to execute our commands.
we are going to use the below modules in our lab as Ad-Hoc commands.
pingcommandstatyumusersetup
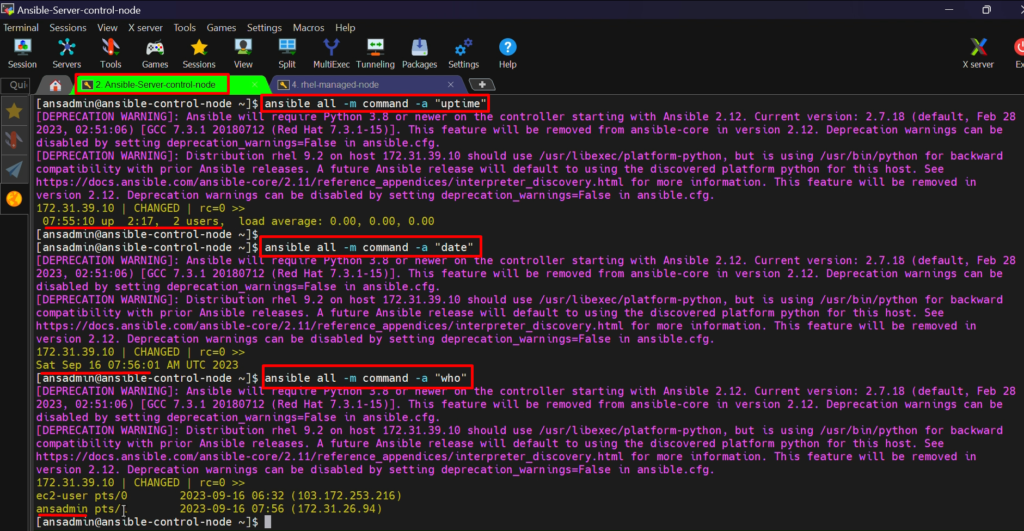
PING: –
- This module is going to execute on the systems which are in the inventory file.
- So, as of now, in our inventory file, we have one host. So, in that one host, it is going to perform a ping test.
- So, whenever it does the ping, it gets the response as a ping-pong if the server is fine.
					ansible all -m ping
#where -m= for module
#all= Means all hosts inside the inventory file

command
- While executing the “command” module, we should provide an argument that is ‘-a’.
- So, assume that I want to just see the uptime of my system.
ansible all -m command -a “uptime”
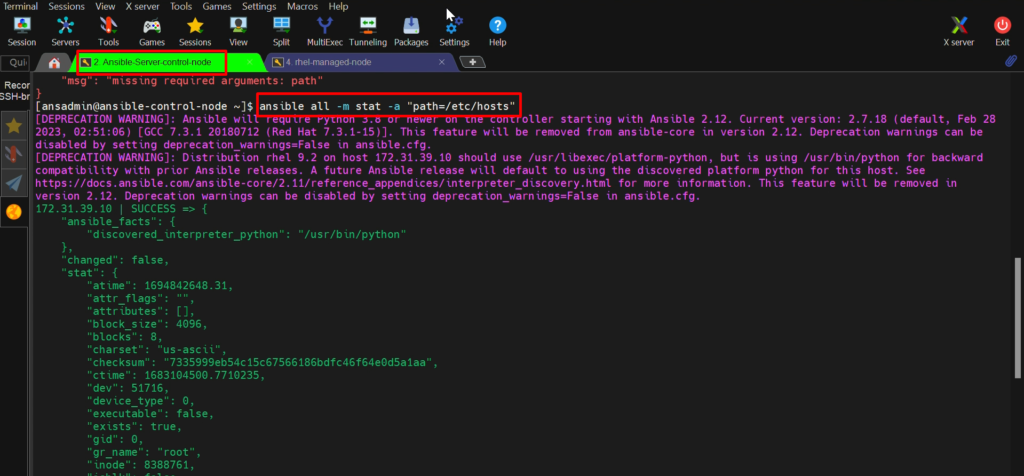
stat
- Whether the file exists or not, it is going to show us. So, I just want to see the path where the file exists.
- This file exists under /etc/ansible/hosts, so I just want to see whether /etc/ansible/hosts file exists or not.
					Ansible all –m stat -a “PATH=/etc/ansible/hosts”
#It gives the information about this file.
yum
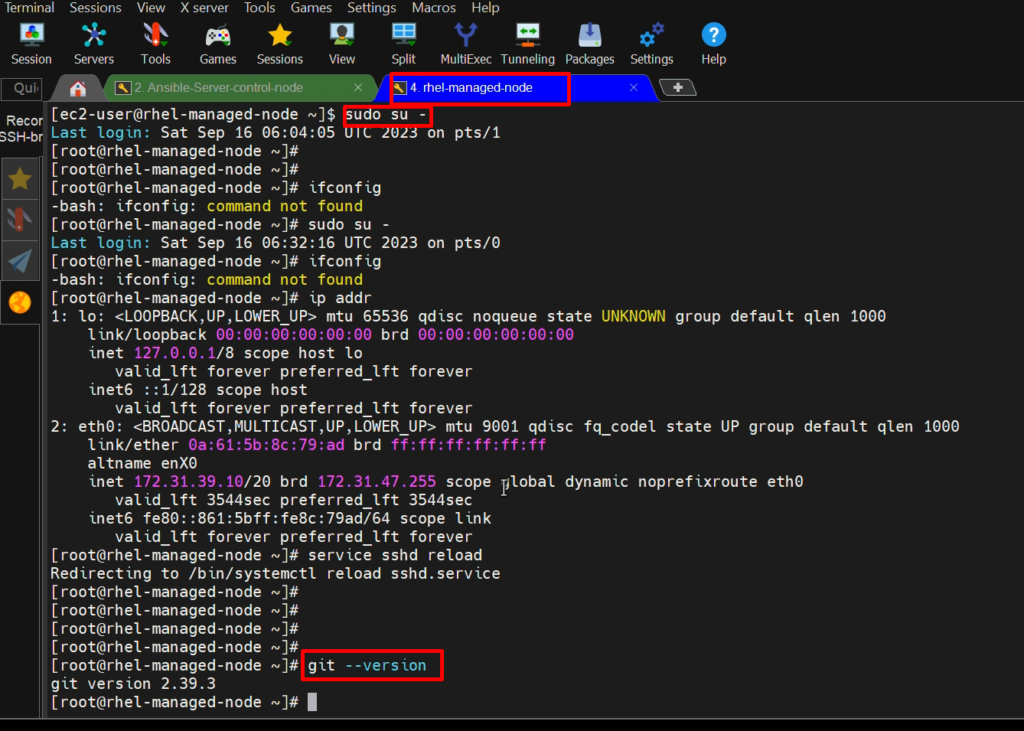
- I want to install “git” on the target system (RHEL Managed node)
ansible all –m yum -a “name=git” -b
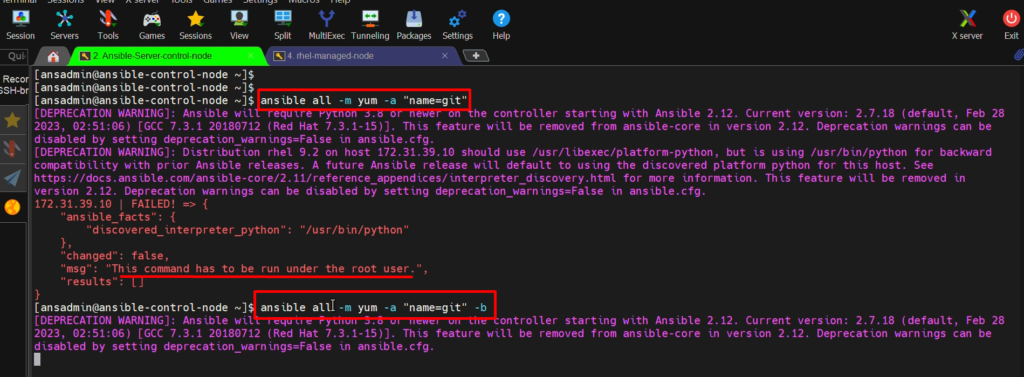
- To check Git version on the target system
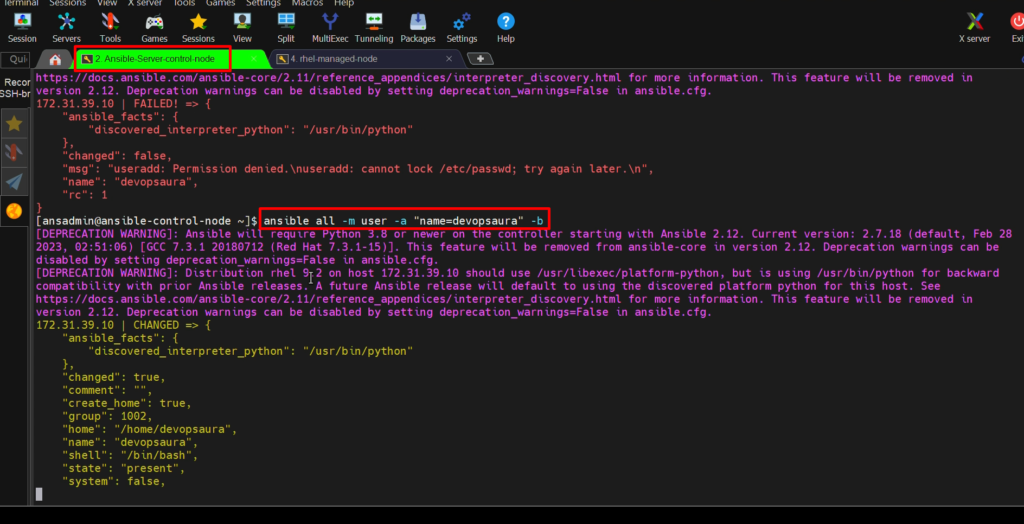
user
- I want to create a user on target system.
ansible all –m user -a “name=devopsaura” -b
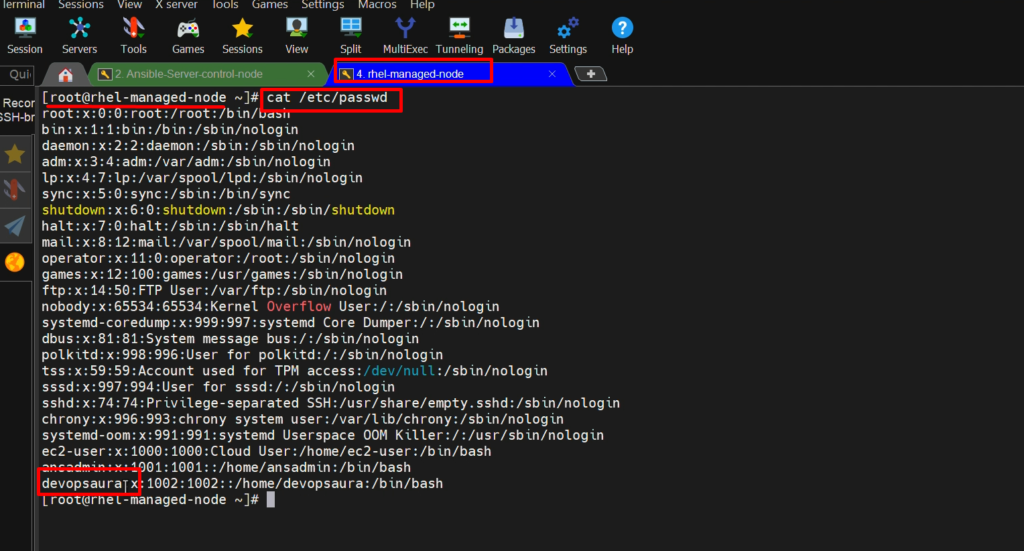
- To check user on the target system,
cat /etc/passwd/ #(run on the target system)
Video recording
Still, if you have any doubt about any steps, please go through this video again.
Inventory:-
What is inventory?
- The inventory file is where you define your target hosts and group them for easier management. Ansible uses this file to know where and how to execute tasks.
- You can create an inventory file manually or use dynamic inventory scripts for more complex environments i.e we can say that
- “An inventory file is a collection of hosts or nodes that are managed by an Ansible control node”.
- We can use a default inventory file or we can create a custom inventory file.
Let’s see how many ways we can define our inventory file.
Types of Ansible Inventory
Hosts’ information can be defined in the following way
1)Default inventory:-
- The default location of hosts inventory is “/etc/ansible/hosts”
2) Custom inventory:-
- we can use, our custom hosts file.
- Hosts file nothing, but we can create our own inventory file in any location that we can apply while running our command by using the ‘-i’ option.
NOTE:- ‘-i’ stands for inventory over here
					sudo su - ansadmin
vi my_hosts  #put here private ips of your managed-nodes
ansible all -m ping -i my_hosts
#if you dont use '-i' then it will take default inventory file i.e '/etc/ansible/hosts'
3) Define in the “ansible.cfg” file:-
- If you remember we have created an ansible.cfg file.
- in that, we can define our inventory file so that it will treat whatever file you have specified in this configuration file.
- While executing any Ansible command, Your Ansible command requires some inputs and if you haven’t specified, it is going to take the default values from this Ansible.cfg file.
Playbooks: -
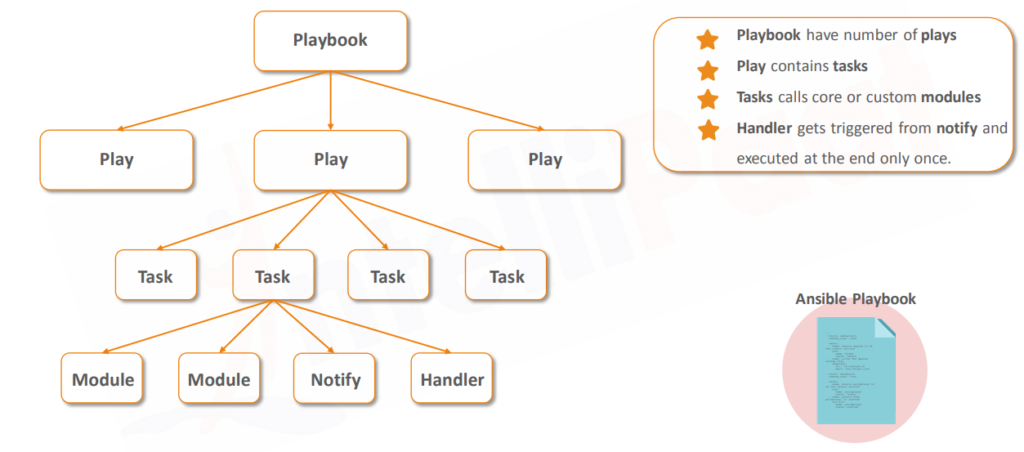
Ansible Playbook Structure:-
Playbooks are at the heart of Ansible automation.
They are written in YAML format and contain a series of tasks that should be executed on the target hosts.
Playbooks allow you to automate tasks like software installation, configuration changes, and more.
Creating Ansible Playbook-
- A Playbook is a Text File written in YAML format, And it is normally saved as .yml.
- The playbook begins with a line consisting of three dashes ( – – – ) as the start of the document marker.
- An item in the YAML list starts with a single dash [ – ] followed by a space.
- hosts and tasks are mandatory items in a Playbook
- The playbook primarily uses indentation with space characters to indicate the structure of its data.
- Modules are used to perform tasks.
- Comment start with #
Example:- We will create a “user” with the help of the playbook.
On Ansible-control-node
					sudo su - ansadmin
cd /opt
sudo mkdir ansible
ls
sudo chown ansadmin:ansadmin ansible
cd ansible
vi create_user.yml
---

- hosts: all

  become: true          #true because we can only create a user as root)

  tasks:

  - user: name=john     #where “user” is a module)
Now execute the playbook
ansible-playbook create_user.yml
Video recording
Still, if you have any doubt about any steps to create Ansible playbook to create a user, please go through this video again.
Now, We are going to create two more servers
- One is Amazon Linux,
- Another one is the Ubuntu system.
And we are going to execute the same playbook on those and we’ll see how it works.
Setup Additional Managed Nodes: -
1.Amazon Linux Managed node setup:
Step 1: -Setup EC2 instance.
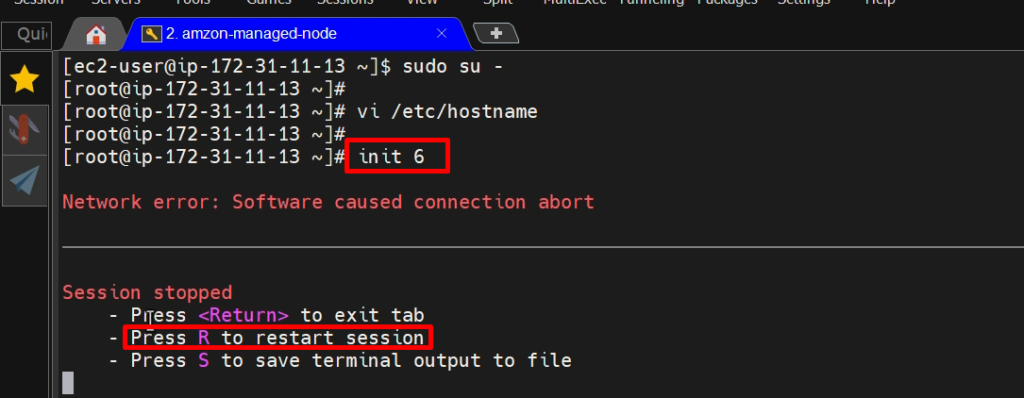
Step 2: – Setup hostname
					sudo su -
vi /etc/hostname  #put Private Ip address of amzon Linux managed node
init 6   #for rebooting node to get effect of hostname

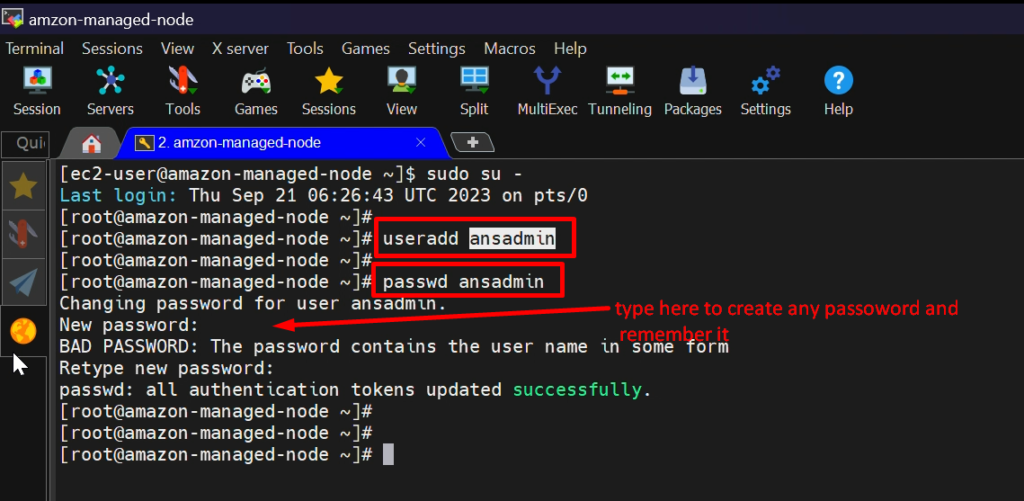
Step 3: – create ‘ansadmin’ user
					useradd ansadmin
passwd ansadmin      #set password
Step 4: – Add the user to the ‘sudoers’ file
visudo
ansadmin ALL=(ALL) NOPASSWD: ALL


Step 5:- Enable Password-based login
vi /etc/ssh/sshd_config

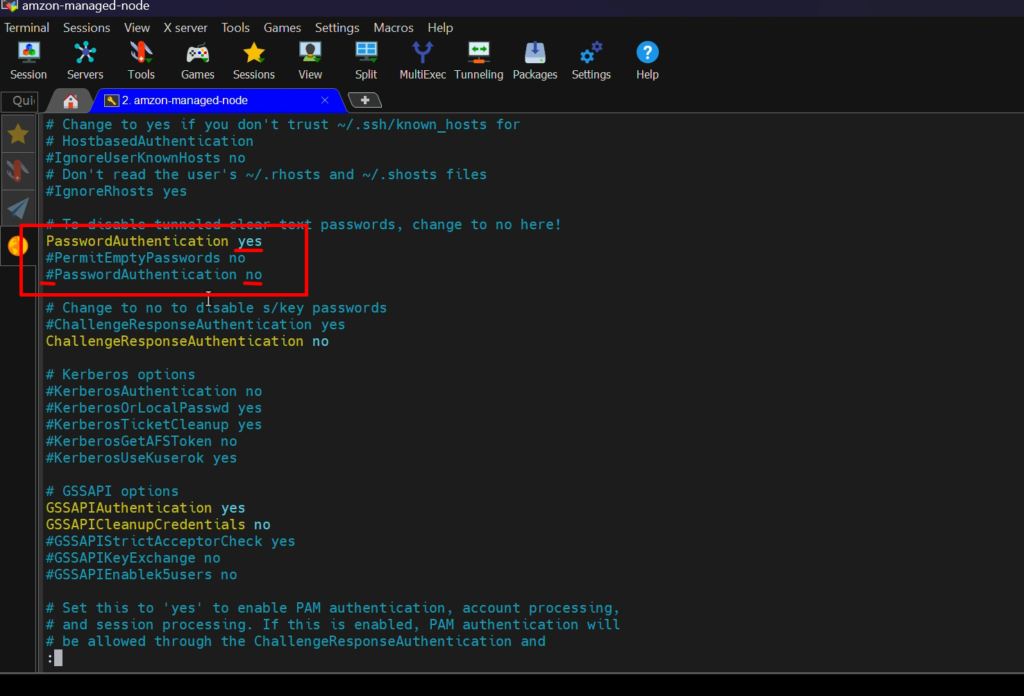
					service sshd reload
service sshd restart
Step 6: – Now add this Node to “ansible server (control node)” inside “/opt/ansible/hosts”
Login ansible-control-node
					sudo su -
sudo su - ansadmin
cd /opt/ansible/
vi hosts
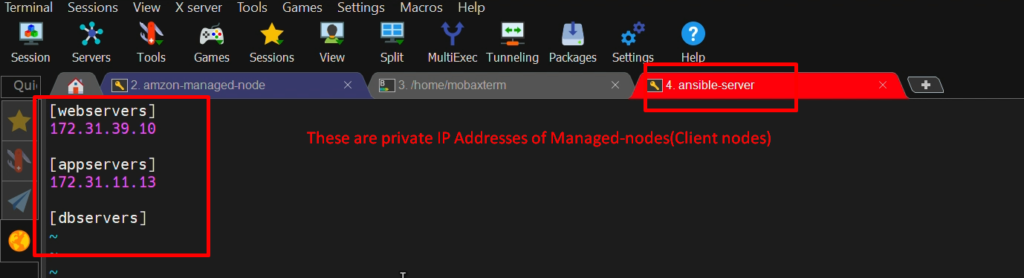
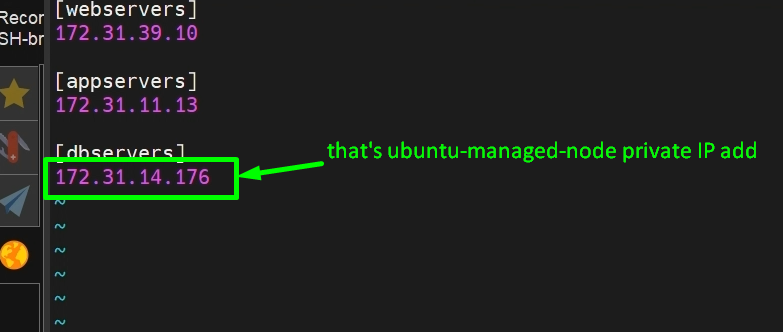
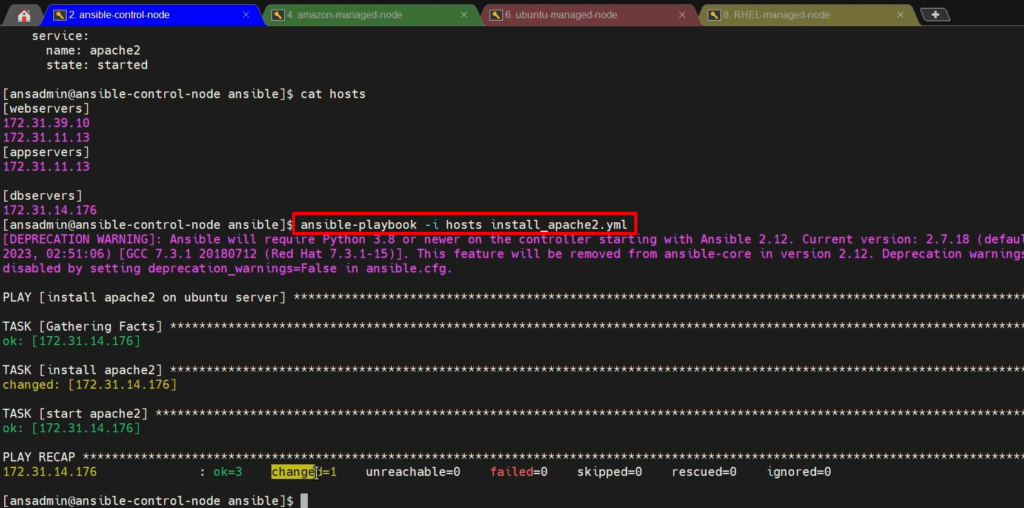
NOTE:-I have created groups in this inventory file(hosts) so that I can put multiple hosts in the same groups if we need them. And I am creating three groups.
- [webservers] for RHEL-managed-node
- [appservers] for Amazon-managed-node <ipadress>
- [dbservers] for ubuntu-managed-node
Step 7: – Now Enable its password-less authentication.
- For this we will copy ssh-id of Ansible-control-node to “amazon-managed-node” system
Video Recording
2.Ubuntu Managed node setup:-
Step 1: -Setup EC2 instance for Ubuntu Managed Node
Step2: – Setup hostname
- Do as we have done in previous steps
					sudo su -
vi /etc/hostname   #give hostname inside this as ubuntu-managed-node
init 6
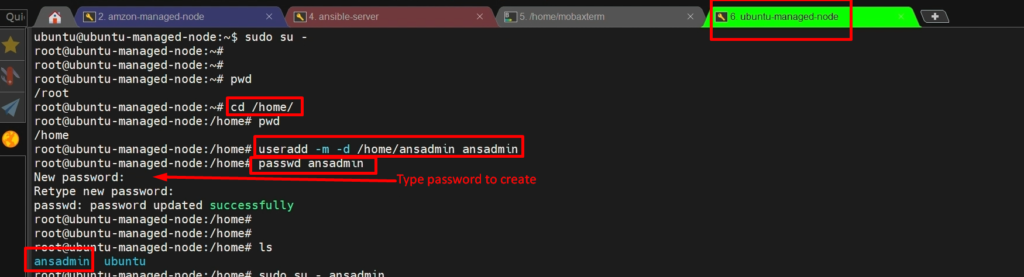
Step 3: – create ‘ansadmin’ user.
					sudo su  -
cd /home/
useradd -m -d /home/ansadmin ansadmin
passwd ansadmin      (set password)
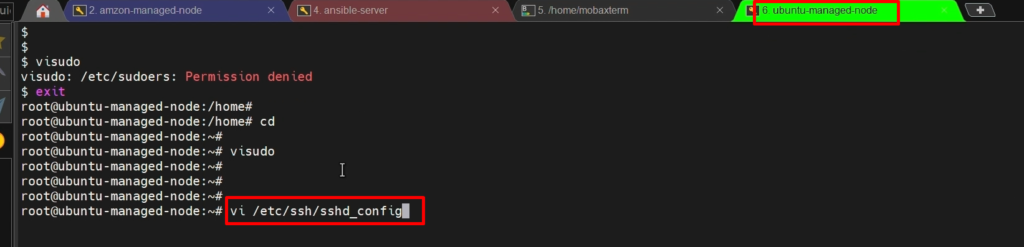
Step 4:- Add the user to the ‘sudoers’ file
visudo


Step 5: – Enable Password-based login.
					vi /etc/ssh/sshd_config
service sshd reload
service sshd restart
service sshd reload

Step 6:- Now add this Node to “ansible server(control node)” inside “/opt/ansible/hosts”
					sudo su - ansadmin
cd /opt/ansible
vi hosts    #put private IP Address of Ubuntu-managed-node

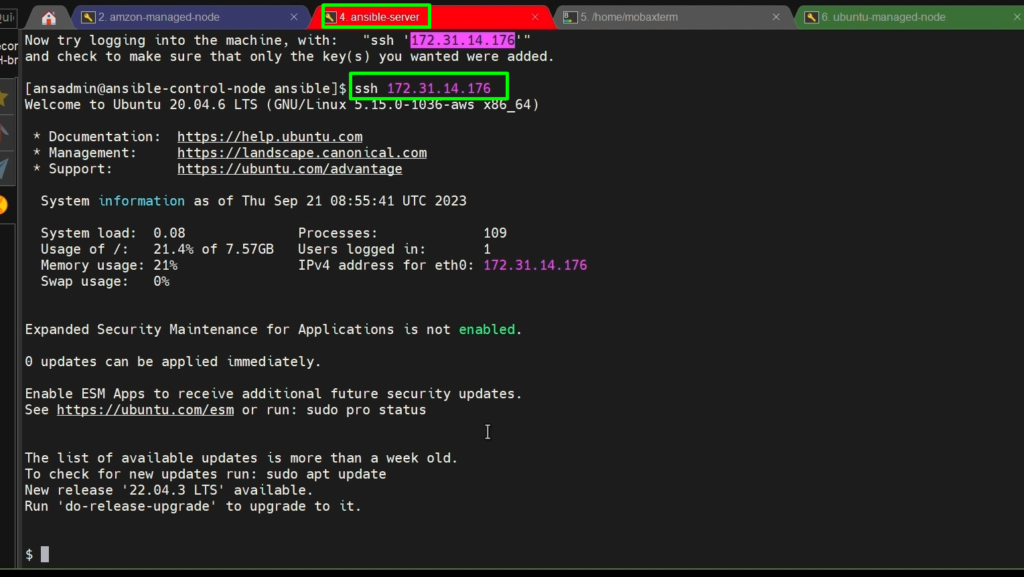
Step 7: – Now Enable its password-less authentication.
ssh-copy-id 172.31.14.176 #private ip adress of target systme means ubunutu
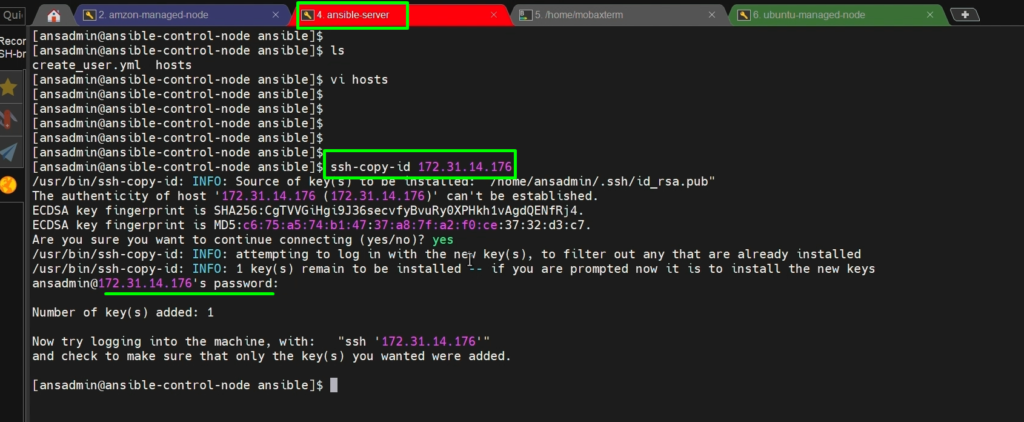
NOTE:- On Ubuntu: Why do we need /home/ directory? Because the keys get copied into /home/ansadmin.
if the home directory doesn’t exist, it creates a problem. That is why we should have the home directory of /home/ansadmin.
Video Recording
Run ansible-playbook: -
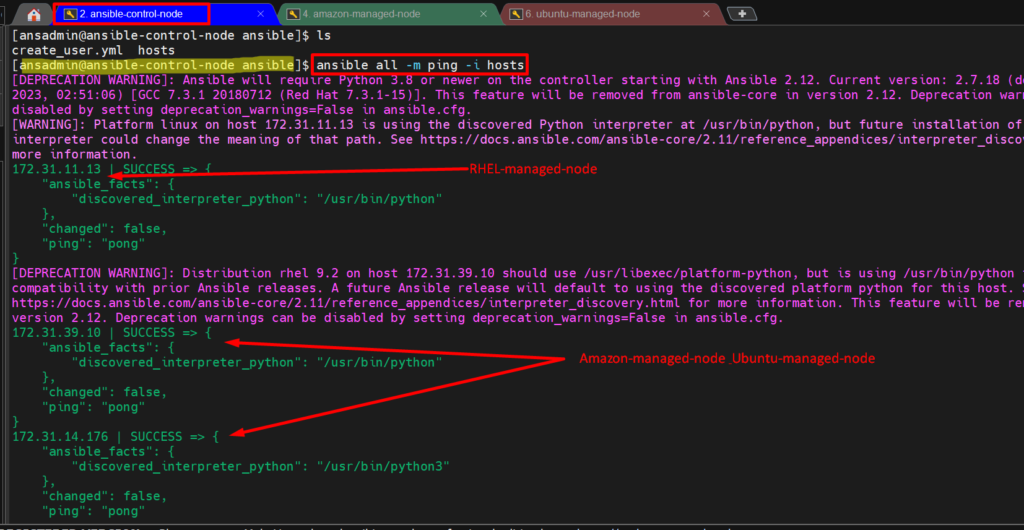
Before running our playbook, first, we will verify that our ansible control-nod can communicate to all managed nodes(RHEL, Amazon, Ubuntu)
ansible all -m ping -i hosts
- Now, we will run our ansible-playbook on the control node for our lab’s remaining managed node (amazon-managed-node and ubuntu-managed-node) to create a user.
- And we had already created a Playbook in previous steps.
ansible-playbook -i hosts create_user.yml
Video Recording
Modules
- Ansible modules are small programs that Ansible uses to perform tasks on managed hosts(nodes).
- There are hundreds of built-in modules, covering everything from package management to network configuration.
- You can also write custom modules to suit your specific needs.
“Yum” module-
Here, we are going to write ansible-playbook using the “yum” module to install packages
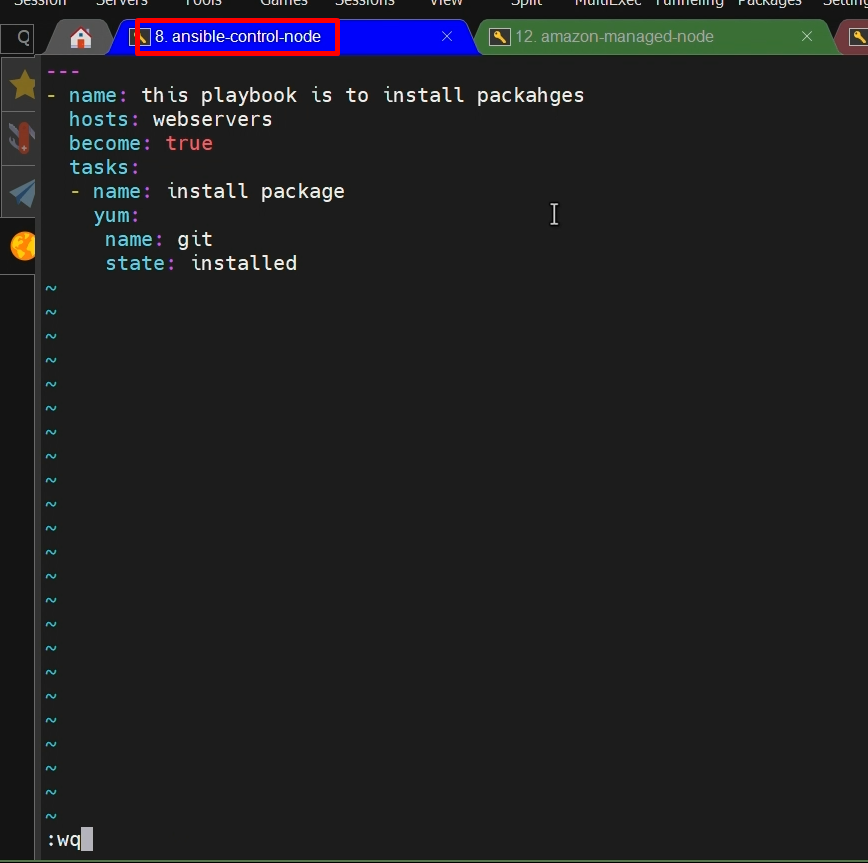
vi install_packages.yml
- - -- name: this playbook is to install packages
hosts: webservers (want to install on specific servers so i have given group name here)
become: true
tasks:
- name: install package
yum:
name: git
state: installed

Now run ansible-playbook on ansible-control-node-
					ansible-playbook -i hosts install_packages.yml
#where, hosts=inventory file
#install_packages.yml=our ansible-playbook
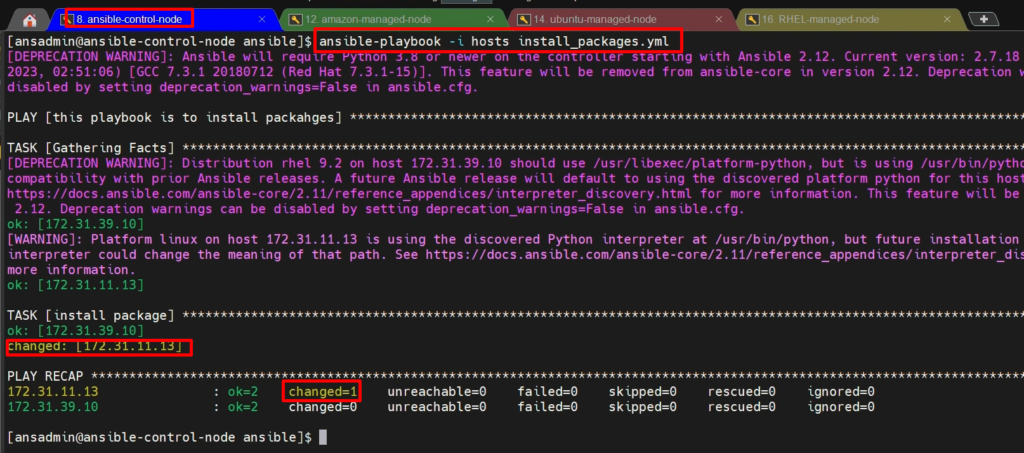
NOTE1: – if you don’t use the option “-i” in the command then it will take the default inventory file which is inside “/etc/ansible/hosts/” where our group “webservers” is not mentioned.
NOTE2: – if you don’t use “become: true” in the playbook script then it will not install the packages because we need to install them as root user. Without a root user, we can’t install packages
Video recording
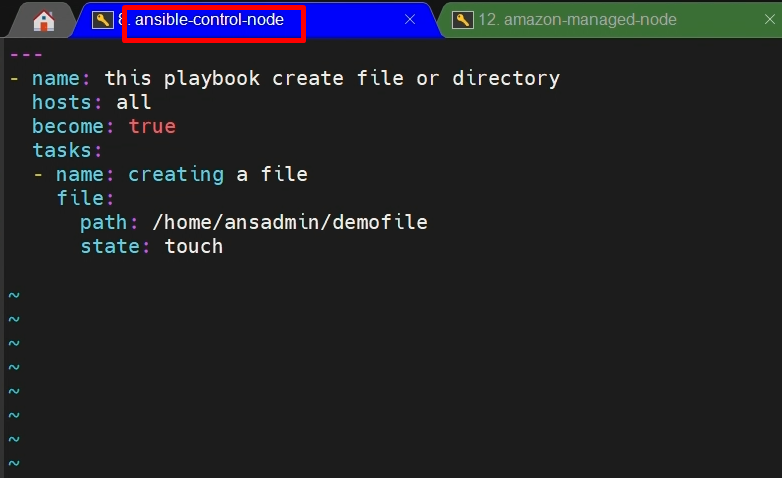
“File” module-
- Here, we will create a File or directory on our target system (managed nodes)
vi create_file.yml
- - -

- name: this playbook is to create a file or directory

  hosts: all

  become: true

  tasks:

  - name: creating a file or directory

    file:

       path: /home/ansadmin/demofile

       state: touch

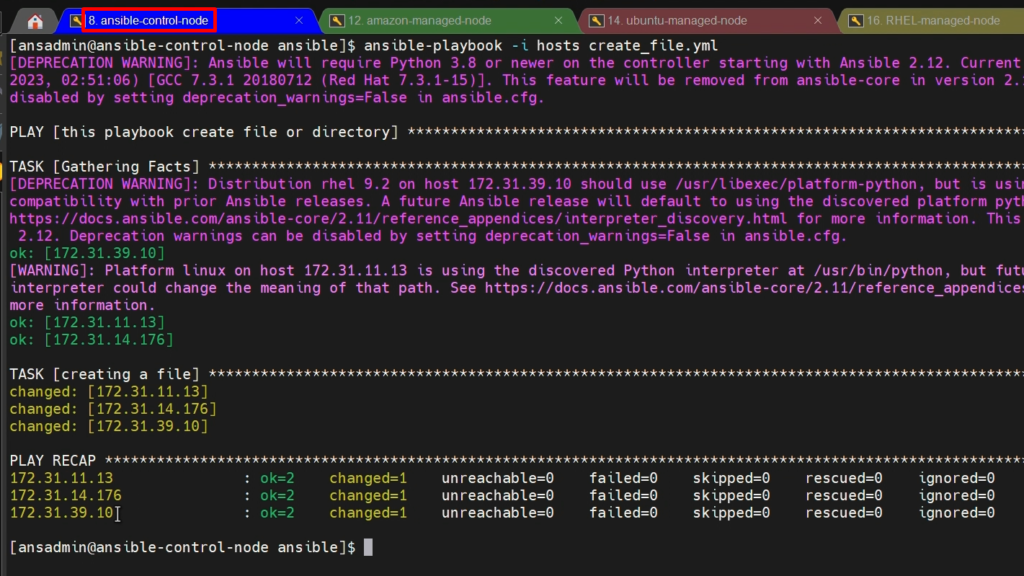
cat hosts

Now we will run our playbook-
ansible-playbook -i hosts create_file.yml
“Copy” module-
- Here, we will copy a file onto managed nodes.
- So first I’m going to create a file called index.html, which I’m going to use in my later steps.
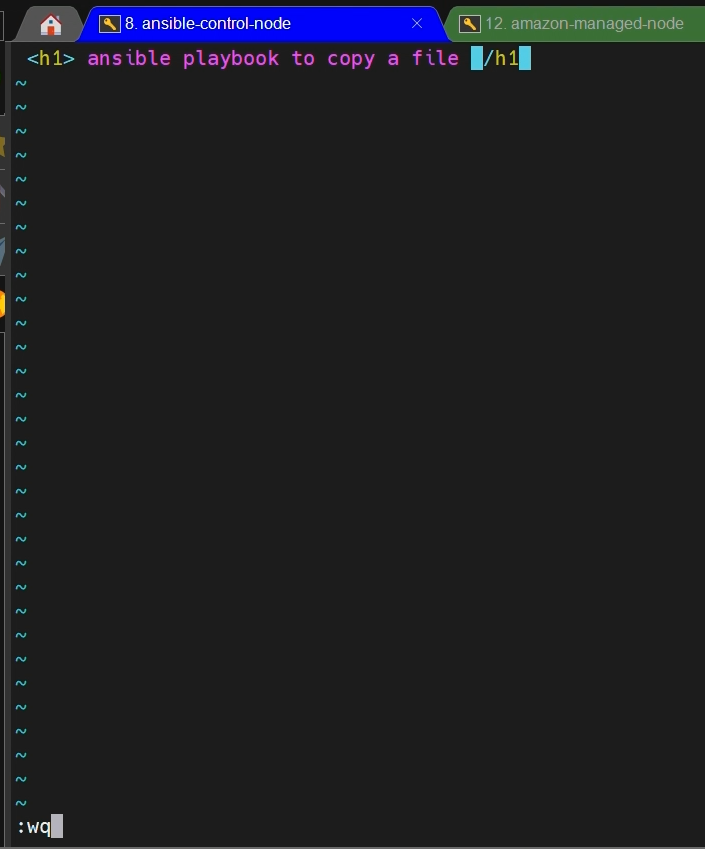
vi index.html (inside /opt/ansible)
<h1> ansible playbook to copy a file </h1> 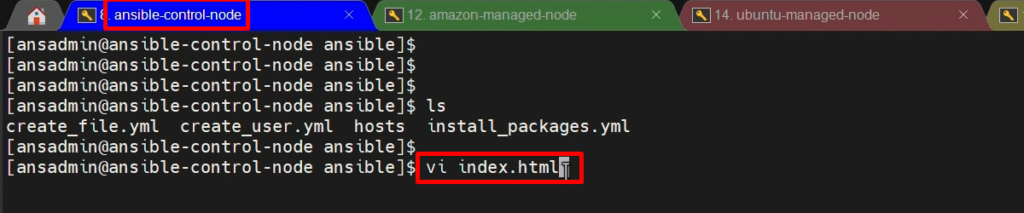
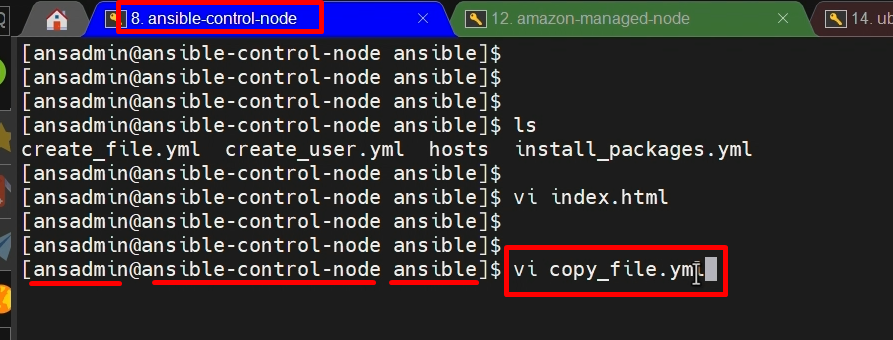
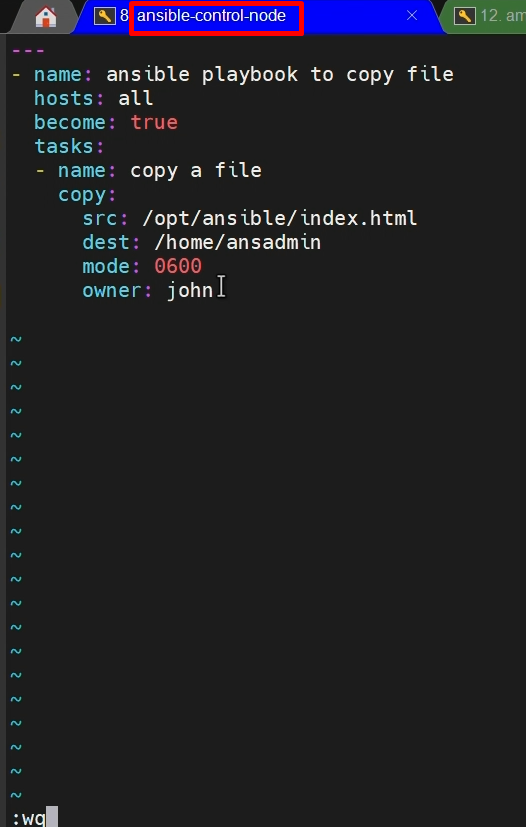
- Now, we will create a playbook
---

- name: ansible playbook to copy a file

  hosts: all

  become: true

  tasks:

  - name: copy a file

    copy:

      src: /opt/ansible/index.html

      dest: /home/ansadmin

      mode: 0600

      owner: john
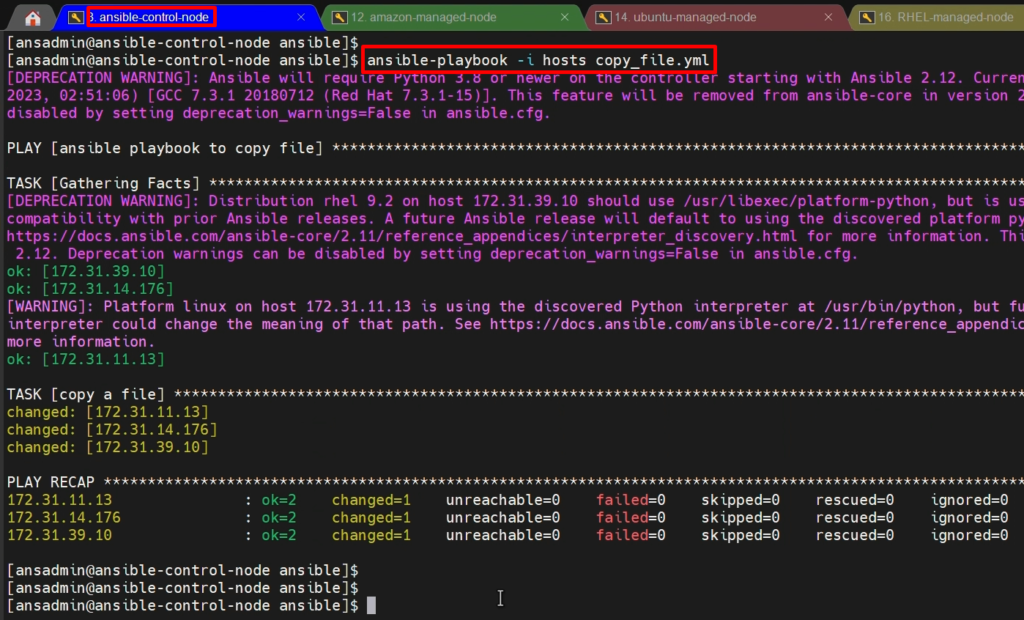
- First, we will verify our playbook script syntax is correct or not?
ansible-playbook -i hosts copy_file.yml –check
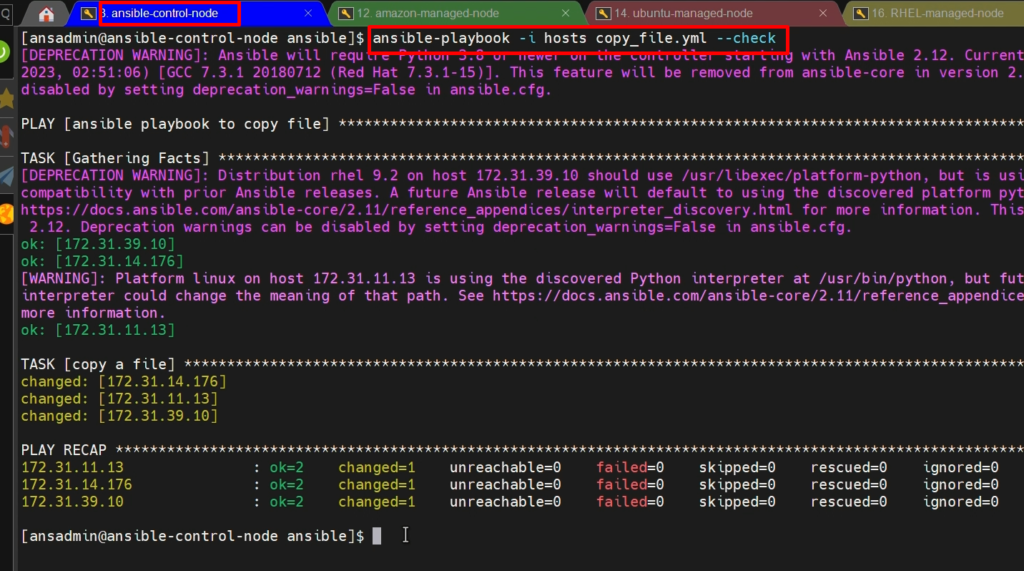
- Now, we will execute our ansible playbook to copy file on managed-nodes as below
ansible-playbook -i hosts copy_file.yml
Video Recording
Multitask ansible-playbook
Install Apache on RHEL-
First, I am copying the script of install_packages.yml to the newly created playbook “install_httpd.yml” to save our time.
					sudo su - ansadmin
cd /opt/ansible
cp install_packages.yml install_httpd.yml
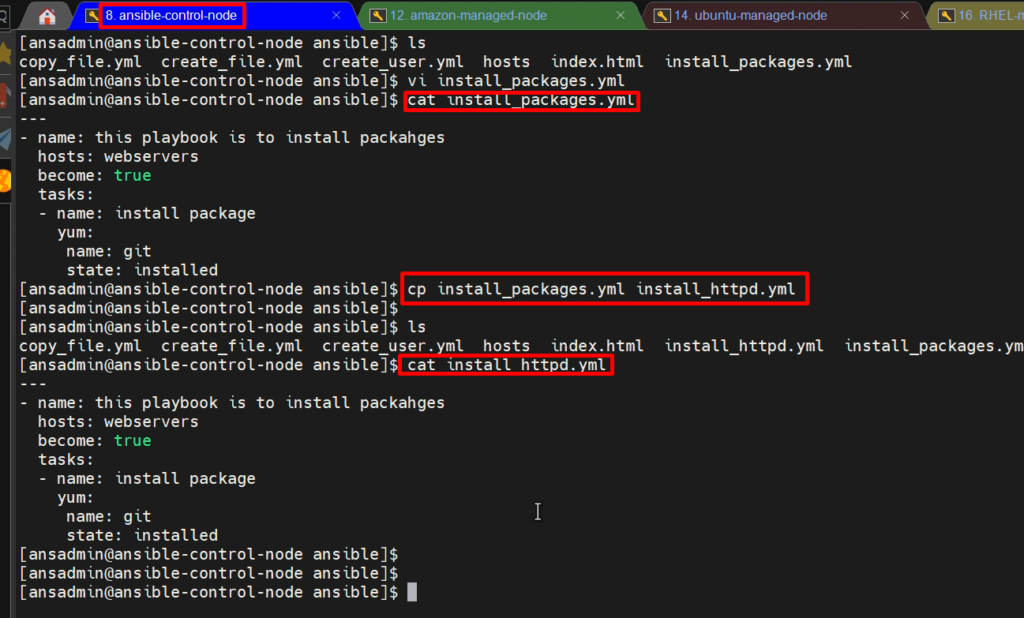
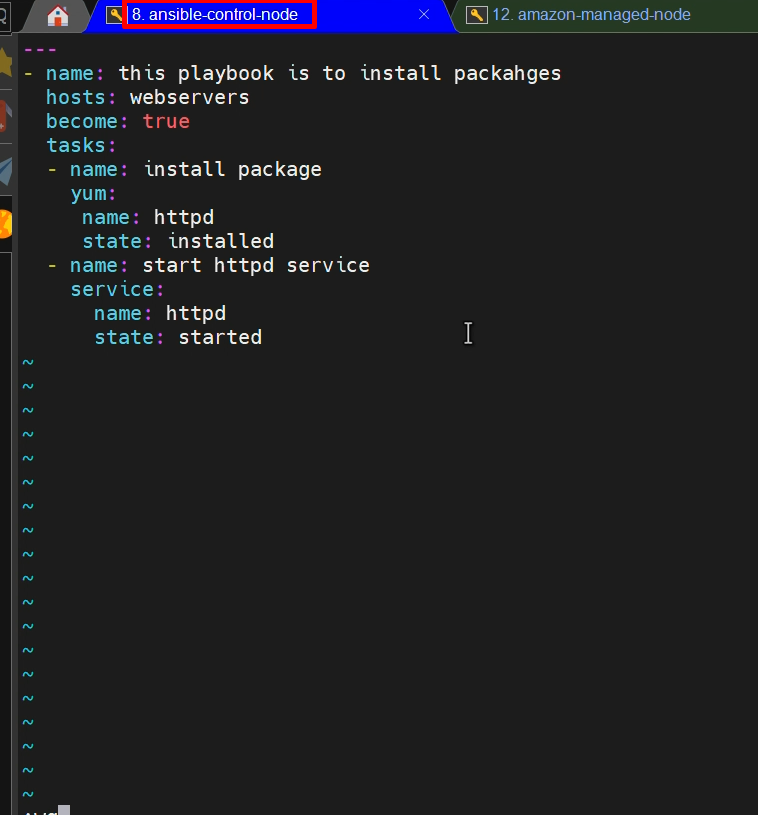
And now I will modify and add another task to “install_httpd.yml“
vi install_httpd.yml
---

- name: this playbook is to install httpd packages

  hosts: webservers

  become: true

  tasks:

  - name: install package

    yum:

     name: httpd

     state: installed

  - name: start httpd service

    service:

      name: httpd

      state: started

Now, verify syntax and run this Ansible playbook “install_httpd.yml“
					ansible-playbook  -i hosts install_httpd.yml –check
ansible-playbook  -i hosts install_httpd.yml
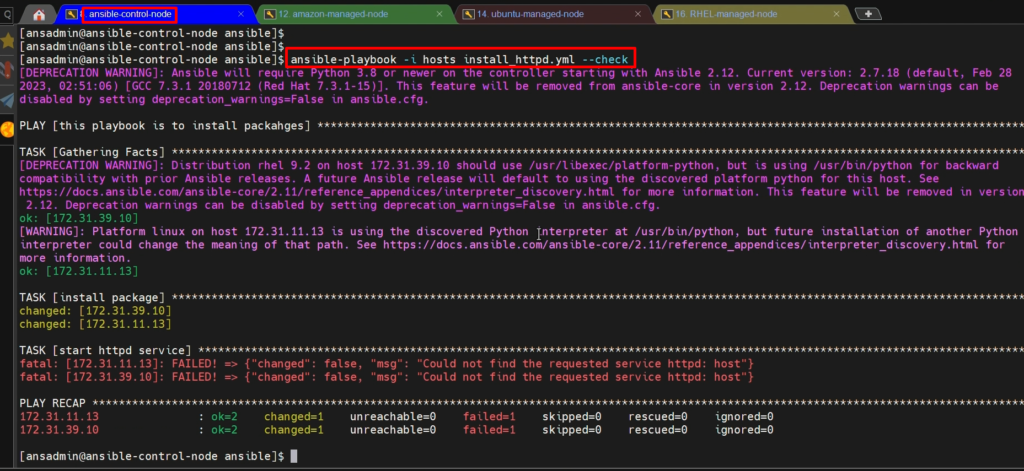
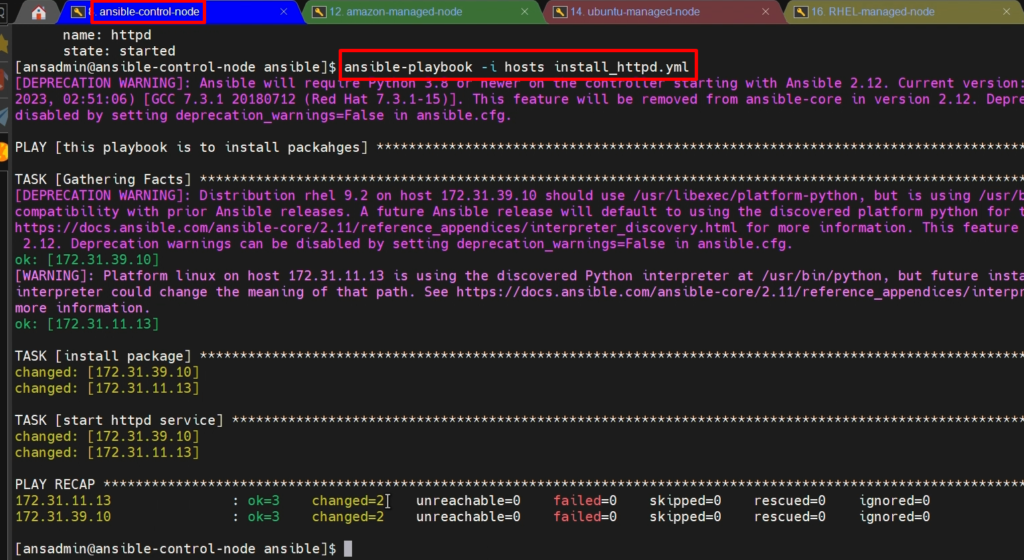
we have successfully installed Apache server on managed-nodes.
To check the status of hhtpd on managed nodes
					ps -ef | grep httpd
rpm -qa | grep httpd
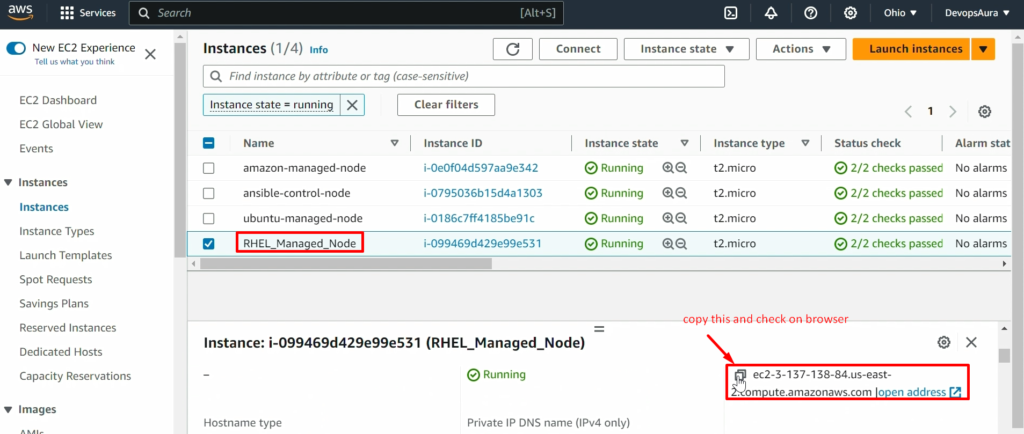
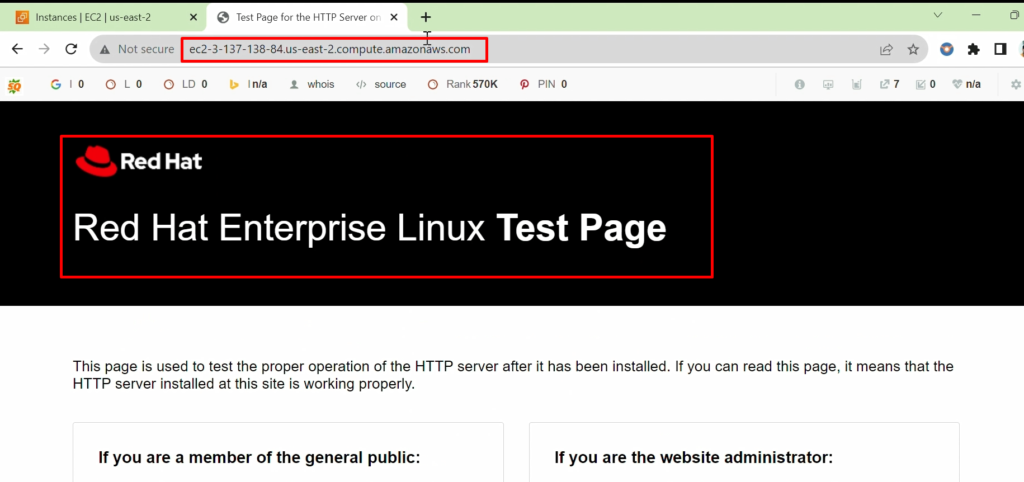
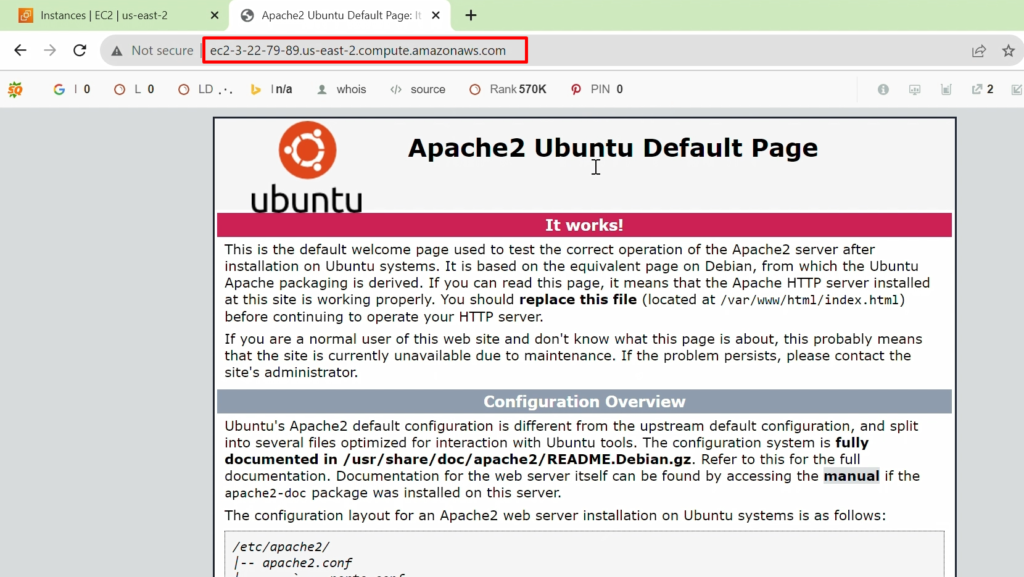
Verify On browser-
- Now, we will access and verify whether the Apache server from the browser is working or not.
- For this, please Copy the public DNS ip and paste the browser
Video Recording
How to remove these packages.
- Now, we are going to remove these packages.
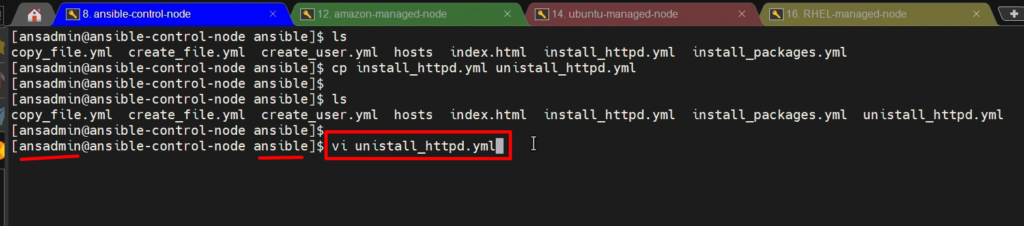
- So, we will copy the content from install_httpd.yml to save time and create a new ansible-playbook “uninstall_httpd.yml” to remove the packages.
cp install_httpd.yml uninstall_httpd.yml
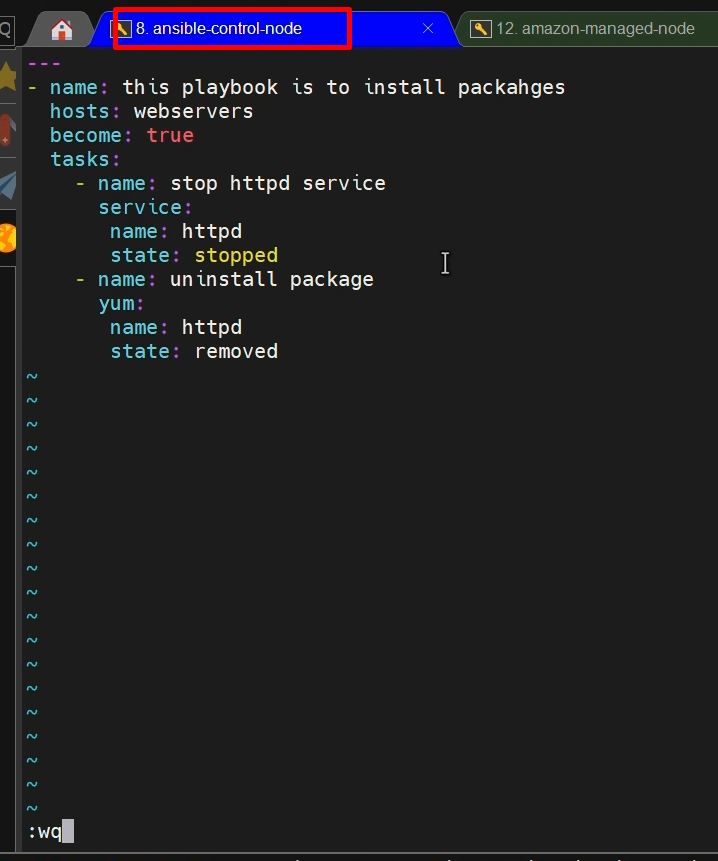
vi install_httpd.yml
---

- name: this playbook is to uninstall httpd packages

  hosts: webservers

  become: true

  tasks:

  - name: stop httpd service

    service:

      name: httpd

      state: stopped

  - name: uninstall package

    yum:

     name: httpd

     state: removed

Now, verify syntax and run this Ansible playbook “uninstall_httpd.yml“
					ansible-playbook  -i hosts uninstall_httpd.yml –check
ansible-playbook  -i hosts uninstall_httpd.yml

Install Apache on Ubuntu-
- we are going to see how to install Apache on the Ubuntu system(ubuntu-managed-node) with the help of ansible-playbook.
- In the previous steps, we have installed Apache on RHEL and Amazon Linux because both the systems run with the ‘yum’ command.
- But to install it on the Ubuntu system, we cannot use the ‘yum’ module m is not identified.
- Usually, we use the ‘apt install’ package name.
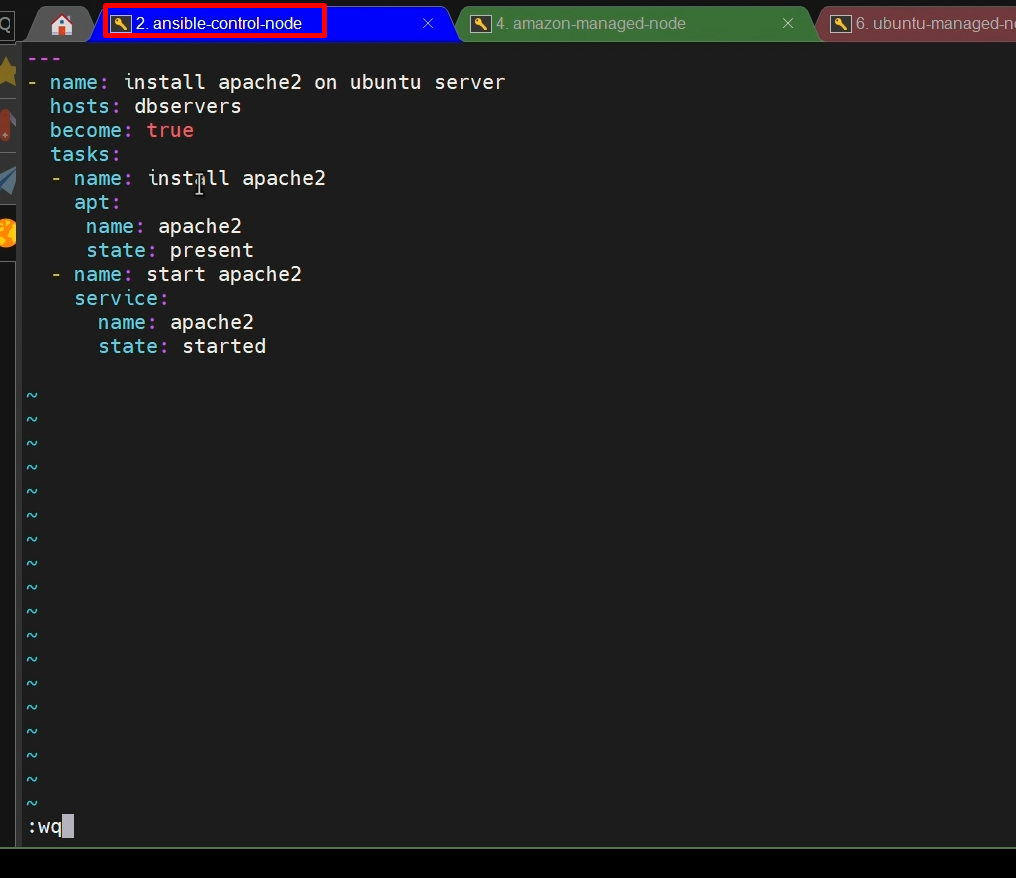
vi install_apache2.yml
---

- name: install apache2 on ubuntu server

  hosts: dbservers

  become: true

  tasks:

  - name: install apache2

    apt:

     name: apache2

     state: present

  - name: start apache2

    service:

      name: apache2

      state: started

- Now execute the ansible-playbook on control-node
ansible-playbook -i hosts install_apache2.yml
Verify On browser-
- Now, we will access and verify whether the Apache server from the browser is working or not.
- For this, please Copy the public DNS ip and paste the browser

Video Recording
Notify and Handlers in playbook
- Suppose I want to start the httpd service on the managed nodes (if httpd is already installed on the managed node), which means I want to skip the task of httpd installation.
- But if httpd is not installed, I don’t want to start the service. means i want to skip the task of starting the service here. So, for this case, we will use ‘notify’ and ‘handlers’ in the playbook script.
- This means if httpd is not installed, then ‘handlers’ skip the task of ‘starting service’
In the previous steps, we have seen how to install Apache on our servers.
In this step, we are going to talk about how we can use notify and handlers.
NOTE: –
- If ‘hhtpd’ is not installed on the system, you cannot start the service. This means service is dependent on the package.
- And also, your target server is already installed and up and running with httpd, then you should not install it. in this case, we need to skip the next tasks itself.
- And This can be possible by using the Notify and Handlers.
Let’s use ‘notify and handlers’ in the existing playbook “install_httpd.yml” to skip the task of starting the service (because httpd is already installed and running up.)
vi install_httpd.yml
---

- name: this playbook is to install httpd packages

  hosts: webservers

  become: true

  tasks:

  - name: install package

    yum:

     name: httpd

     state: installed

     notify: start the httpd service

  handlers:

  - name: start the httpd service

    service:

      name: httpd

      state: started
Now, run this playbook-
					ansible-playbbok -i hosts install_httpd.yml –check
ansible-playbbok -i hosts install_httpd.yml
Now we will execute the same playbook again . And it will not notify the handlers and skip the task to start the httpd service
ansible-playbbok -i hosts install_httpd.yml
Gather facts
Here, we are going to talk about gathering facts.
I am going to take one of our ansible playbooks that is create_file.yml and let me execute this
Ansible playbook.
What exactly gathering facts is going to do?
- Usually gathering facts is going to retrieve the system information from your remote system.
- In our case, we have three managed nodes, right?
- So, these three manager nodes information, it is going to gather, then it is going to execute the task.
- But to delete a file or create a file, you don’t require gather your system information.
Why should you need to do? And when it is going to be useful?
- Whenever we are doing some installations on the target system, you want to check out what is the status of your current operating system. Then you can do that one.
- So, during the installations gathering facts is going to perform the major task.
Now, i would like to disable your gathering facts.
For that, I’m going to edit this playbook create_file.yml
vi create_file.yml
---

- name: this playbook create file or directory

  hosts: all

  become: true

  gather_facts: no

  tasks:

  - name: creating a file

    file:

      path: /home/ansadmin/dir1

      state: absent
Now run playbook
ansible-playbook -i hosts create_file.yml
why should we need to restrict gathering facts?
- Assume that your environment has around 100 plus systems.
- If you are collecting each system information from 100 systems, it will take a little longer time to run your Ansible playbook.
- Moreover, if you are using that information well & good if you are not using it, it’s also fine because it’s unnecessary.
- That’s how we can use the gathering facts.
Conditions
How ‘when’ condition works?
- we are going to see how the ‘when’ condition does work with our Ansible playbooks.
- If you do remember, we were trying to install Apache on our servers as well as Ubuntu systems, but we have created two different files for a similar kind of task. It doesn’t look good. Right?
- Also, it is not a good way of handling it.
- So, you should write a single ansible playbook and depending upon your operating system, It should take a decision. Whether should I need to run ‘yum’ or ‘apt’.
- This is possible by using a ‘When’ condition.
NOTE: –
- We had created multiple ansible-playbook for the same task (install Apache)
- We created two files (ansible playbooks) because the OS flavors of the systems were different ( i.e. Amazon Linux, RedHat, and Debian Ubuntu ).
- And ‘yum‘ and ‘apt‘ modules work depending on the operating system like the ‘apt’ module is used for Ubuntu OS. The ” yum module is used for RedHat OS and Amazon Linux OS.
so now, we will create a single ansible-playbook to do the same task for different OS flavors using the ‘when’ condition in the playbook.
and this ‘When” condition will decide whether the “yum” or “apt” module will run.
Install Apache using the ‘when’ condition:-
So now, we will create a single ansible-playbook to do the same task for different OS flavors using the ‘when‘ condition in the playbook.
vi install_apache_httpd.yml
---

- name: this playbook is to install packages on servers

  hosts: all

  become: true

  tasks:

  - name: install package

    yum:

     name: httpd

     state: installed

    when : ansible_os_family == “RedHat”


  - name: start apache service

    service:

      name: httpd

      state: started

    when : ansible_os_family == “RedHat”

  - name: install apache2

    apt:

     name: apache2

     state: present

    when : ansible_os_family == “Debian”


  - name: start apache2

    service:

      name: apache2

      state: started

    when : ansible_os_family == “Debian”
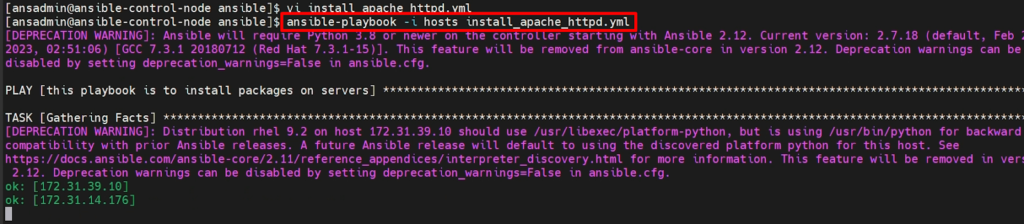
Now verify and execute the ansible playbook
					ansible-playbook -i hosts install_httpd_apache.yml –check
ansible-playbook -i hosts install_httpd_apache.yml
Uninstall Apache using ‘when’ condition:-
Here, I am going to uninstall the server from all managed nodes (amazon, ubuntu, and RHEL managed nodes) by Ansible playbook using ‘when’ condition.
And I am editing the existing ansible-playbook ‘uninstall_httpd.yml’
					sudo su -
sudo su - ansdamdin
cd /opt/ansible
vi uninstall_httpd.yml
---

- name: this playbook is to install packages

  hosts: webservers

  become: true

  tasks:

    - name: stop httpd service

      service:

       name: httpd

       state: stopped

      When: ansible_os_family == ‘RedHat’

    - name: uninstall package

      yum:

       name: httpd

       state: removed

      when: ansible_os_family == ‘RedHat’

 - name: stop apache2 service

      service:

       name: apache2

       state: stopped

   when: ansible_os_family == ‘Debian’

  - name: uninstall apache2

      apt:

       name: apache2

       state: absent

     when: ansible_os_family == ‘Debian’
Now verify and execute the ansible playbook
					ansible-playbook -i hosts uninstall_httpd_apache.yml –check
ansible-playbook -i hosts uninstall_httpd_apache.yml
Adding 'copy' task to apache playbook:-
- Here, We are going to copy this ‘index.html’ onto our /var/www/html location then we will modify our install_apache_httpd.yml ansible playbook.
- So whenever we refresh our pages, we are going to get whatever content is there in that file.
NOTE: – Before copying the ‘index.html’ file onto our /var/www/html location, we will modify the content of ‘index.html’ first.
Content can be anything. we will modify the file for our verification purposes only.
Before copying, let me modify this file ‘index.html’ file.
vi index.html
<h1> Welcome to Apache Tomcat </h1>
Now I am going to modify our Ansible playbook to copy this file “index.html” to the ‘/var/www/html’ location on all managed-nodes
vi install_apache_httpd.yml
---

- name: this playbook is to install packages on servers

  hosts: all

  become: true

  tasks:

  - name: install package

    yum:

     name: httpd

     state: installed

    when: ansible_os_family == "RedHat"

  - name: start httpd service

    service:

      name: httpd

      state: started

    when: ansible_os_family == "RedHat"

  - name: install apache2

    apt:

     name: apache2

     state: present

    when: ansible_os_family == "Debian"

  - name: start apache2

    service:

      name: apache2

      state: started

    when: ansible_os_family == "Debian"

 - name: coppy index.html

   copy:

    src: /opt/ansible/index.html

    dest: /var/www/html

    Mode: 0666
Now, validate and execute the ansible playbook
					ansible-playbook -i hosts install_apache_httpd.yml –check
ansible-playbook -i hosts install_apache_httpd.yml
Video Recording
List and with_items
we are going to see how to install multiple packages with a single task.
vi install_packages.yml
---

- name: this playbook is to install packages

  hosts: webservers

  become: true

  tasks:

  - name: install package

    yum:

     name: [ ‘git’,  ‘make’,  ‘gcc’, ‘wget’, ‘telnet’, ‘gzip’ ]

     state: installed
Now, validate and execute the ansible playbook.
					ansible-playbook -i hosts install_packages.yml –check
ansible-playbook -i hosts install_packages.yml
Video Recording
Variables
- Here, we are going to talk about ansible variables.
- Ansible allows you to define variables that can be used in your playbooks and roles. These variables make your automation more flexible and reusable. You can set variables in playbooks, inventory files, or external sources.
- There are various ways we can use ansible variables, but I am going to use a few of the ways that most of the industry does use.
Ways are-
Define within the playbook-Ansible variables can be defined within the Ansible playbook. So this is one of the ways we can use
Passing from external files–passing from the external files means we can define Ansible variables in the external file and call it in our playbook by referring to that
Passing from hosts inventory- we have created host inventory right even there. Also, we can define Ansible variables.
Passing while running playbook-While running our Ansible playbook, we can still pass the variables.
Using group_vars or hosts_vars-We can use group_vars or hosts_vars while we are using Ansible roles.
Example:-
- We are creating a user called ‘John’ by using this ‘create_user.yml’ playbook. Already we have this playbook, and we will modify this existing playbook ‘create_user.yml’
- But assume that in your team, a new guy has joined.
- Now you would like to create his user. So again, you need to go inside the playbook and change his user ID.
- If you have a hardcode, it is quite difficult.
- Also, if you are using the same value again and again in your playbook, you need to modify it in all these locations whenever a new joiner comes into your team.
- To overcome this problem, we can use variables instead of hard coding values like this.
- So, I’m going to use variables within the file, and we’ll replace this value with the variable.
Define within the playbook-(vars)
vi create_user.yml
---

- name: this playbook is to create user

  hosts: all

  become: true

  vars:

    user: john

  tasks:

  - name: creating user john

    user:

      name: “{{ user }}”
Now run playbook.
					ansible-playbook -i hosts create_user.yml –check
ansible-playbook -i hosts create_user.yml
Passing from external files– (vars_files)
- Now, whenever there is a new user, we are modifying our ansible playbook. Right?
- But I don’t want to modify our ansible playbook. I would like to get this variable value from the external source means we can create a separate file and from there we can pass this username.
vi user.yml
user: modi Now, I need to tell my playbook that the variable is coming from this file ‘user.yml’.
So, let’s modify our file.
vi create_user.yml
---

- name: this playbook is to create user

  hosts: all

  become: true

  vars_files:

    - user.yml

  tasks:

  - name: creating user john

    user:

      name: “{{ user }}”
Now run playbook
					ansible-playbook -i hosts create_user.yml –check
ansible-playbook -i hosts create_user.yml
NOTE: – Please remember that while running your ansible command, if you pass any variables, those have highest priority.
Means wherever you have defined, all those are ignored and whatever you are passing while running your ansible playbook, that will be taken it as a variable value.
Currently, variable username Modi is there, but I’m providing it as ‘–extra_vars’ or -e “user=Abhishek upadhyay” and this username “abhishekupadhyay” will be taken on priority
ansible-playbook -i hosts create_user.yml -e “user=abhishekupadhyay”
Video recording
Additional Concept
Convert shell command into an ansible playbook-
Here, I am going to show you how can we convert our shell or Unix commands into Ansible playbook?
vi setup-tomcat.yml
---

- name: setup tomcat

  hosts: all

  become: true

  tasks:

  - name: install java

    yum:

      name: java

      state: installed

    when: ansible_os_family == "RedHat"


  - name: install java on ubuntu

    apt:

      name: default-jdk

      state: present

    when: ansible_os_family == "Debian"


  - name: download tomcat packages

    get_url:

      url: https://dlcdn.apache.org/tomcat/tomcat-10/v10.1.13/bin/apache-tomcat-10.1.13.tar.gz

      dest: /opt


  - name: untar apache packages

    unarchive:

      src: /opt/apache-tomcat-10.1.13.tar.gz

      dest: /opt

      remote_src: yes


  - name: add execution permissions on startup.sh file

    file:

      path: /opt/apache-tomcat-10.1.13/bin/startup.sh

      mode: 0777


  - name: start tomcat services

    shell: nohup ./startup.sh

    args:

      chdir: /opt/apache-tomcat-10.1.13/bin
Now run playbook
					ansible-playbook -i hosts setup-tomcat.yml –check
ansible-playbook -i hosts setup-tomcat.yml
Video Recording
Using Tags in ansible playbook:-
- we are going to talk about tags.
- Usually, tags are useful if you want to segregate only specific tasks from your playbook.
- So how does it work?
- We are going to see in the existing playbook ‘install_apache_httpd.yml’
Example: –
- So, in my case, I just want to install packages only. I don’t want to start the service.
- Other tasks should not be executed.
- In that case, we are going to modify our playbook by using tags.
vi install_apache_httpd.yml
---

- name: this playbook is to install packages on servers

  hosts: all

  become: true

  tasks:

  - name: install package

    yum:

     name: httpd

     state: installed

    when: ansible_os_family == "RedHat"

    tags: install_apache


  - name: start httpd service

    service:

      name: httpd

      state: started

    when: ansible_os_family == "RedHat"

    tags: start_apache


  - name: install apache2

    apt:

     name: apache2

     state: present

    when: ansible_os_family == "Debian"

    tags: install_apache


  - name: start apache2

    service:

      name: apache2

      state: started

    when: ansible_os_family == "Debian"

    tags: start_apache


  - name: copy index.html file

    copy:

     src: /opt/ansible/index.html

     dest: /var/www/html

     mode: 0666
Now install only packages-
NOTE: – We are going to perform only specific task on managed nodes with the help of mentioning the ‘–tags” and tags name in our command as below-
ansible-playbook -i hosts install_apache_httpd.yml --tags "install_apache"
Now start only services
ansible-playbook -i hosts install_apache_httpd.yml --tags "start_apache"
Video Recording
Error Handling in the playbook
NOTE: – So usually while running Ansible, it executes all the tasks in the sequential. If it finds any particular task has failed, it cannot proceed with further tasks.
So here, we will take the existing playbook “install_apache_httpd.yml” and will modify it to ignore(skip) the error and proceed with further tasks with the help of ‘ignor_errors’ in the playbook.
Before that, we will edit the file ‘/etc/httpd/conf/httpd.conf‘ in the RHEL server(rhel-managed-node). And we are doing this only just to understand this concept.
On RHEL managed-node-
					vi /etc/httpd/conf/httpd.conf
#(write anything inside)

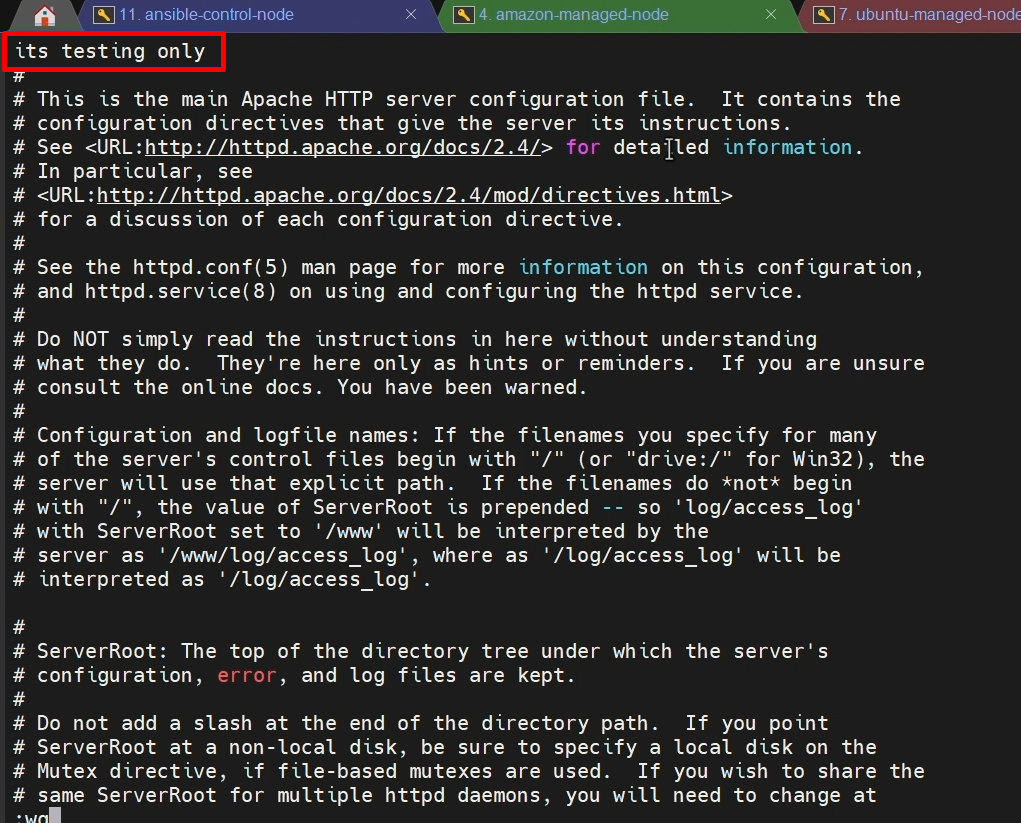
On ansible-control node-
vi install_apache_httpd.yml
---

- name: this playbook is to install packages on servers

  hosts: all

  become: true

  tasks:

  - name: install package

    yum:

     name: httpd

     state: installed

    when: ansible_os_family == "RedHat"


  - name: start httpd service

    service:

      name: httpd

      state: started

    when: ansible_os_family == "RedHat"

    ignore_errors: yes

  - name: install apache2

    apt:

     name: apache2

     state: present

    when: ansible_os_family == "Debian"


  - name: start apache2

    service:

      name: apache2

      state: started

    when: ansible_os_family == "Debian"


  - name: copy index.html file

    copy:

     src: /opt/ansible/index.html

     dest: /var/www/html

     mode: 0666

Now Execute playbook to ignore error
ansible-playbook -i hosts install_apache_httpd.yml

You can see in above image that the playbook is ignoring the error and doing further steps(tasks).
That’s how we can handle the error.
Video Recording
Ansible Vault
- Ansible vault is a feature of Ansible that allows you to keep sensitive data such as passwords or keys in encrypted files, rather than as plain text in playbooks or roles.
- So Ansible vault is one of the features of Ansible, which will help us to protect our sensitive data
- Sensitive data is Nothing, but it may be a password or keys or some other information that you should not expose to others.
Example-
- Let’s take an example that you would like to connect to your GitHub. But while connecting to your GitHub, either you need to provide username and password or your keys should be passed to enable the passwordless authentication.
- In this kind of situation, we cannot keep our sensitive data within the playbook because we may need to share our playbook with others which will create a problem.
- So, to overcome this kind of problem, we are going to use Ansible Vault.
We have a few commands to encrypt our data, decrypt our data, and view our data.
Let’s see what those are.
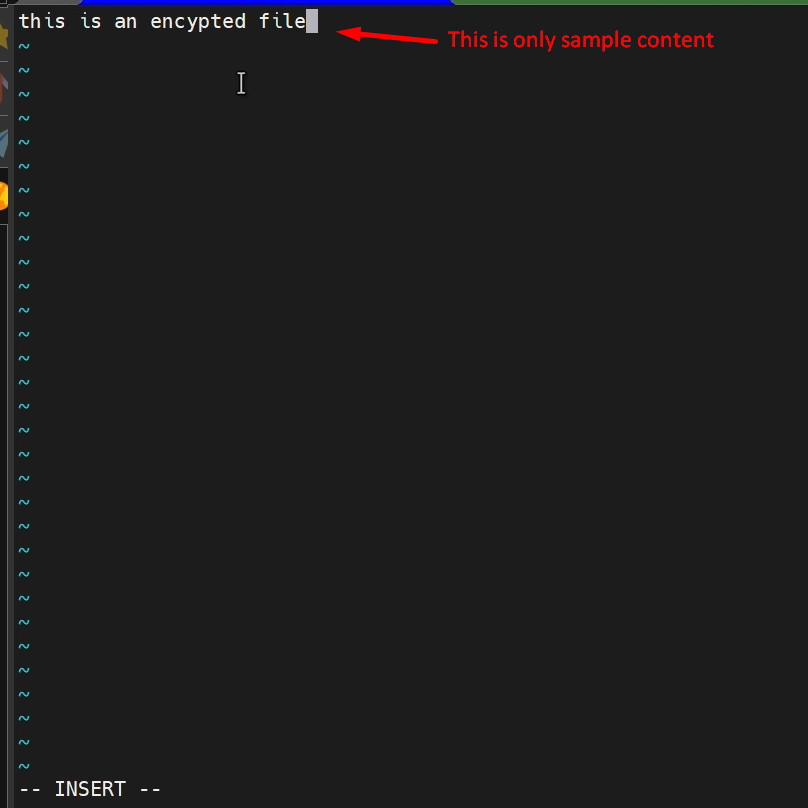
1)create: –
- Assume that you are creating a new file, and you would like to encrypt your data.
- Then we can use Ansible Vault create.
- This will help us to encrypt our data while creating our file.
NOTE: – Please remember that while using Ansible Vault, we need to protect our files with passwords, and we should remember those passwords.
2)view: – To view data of encrypted file.
- View Command is to see the data in the encrypted file. So, in the above step, we have created a file. Now I would like to see the data.
- Then we should use Ansible vault view similar way.
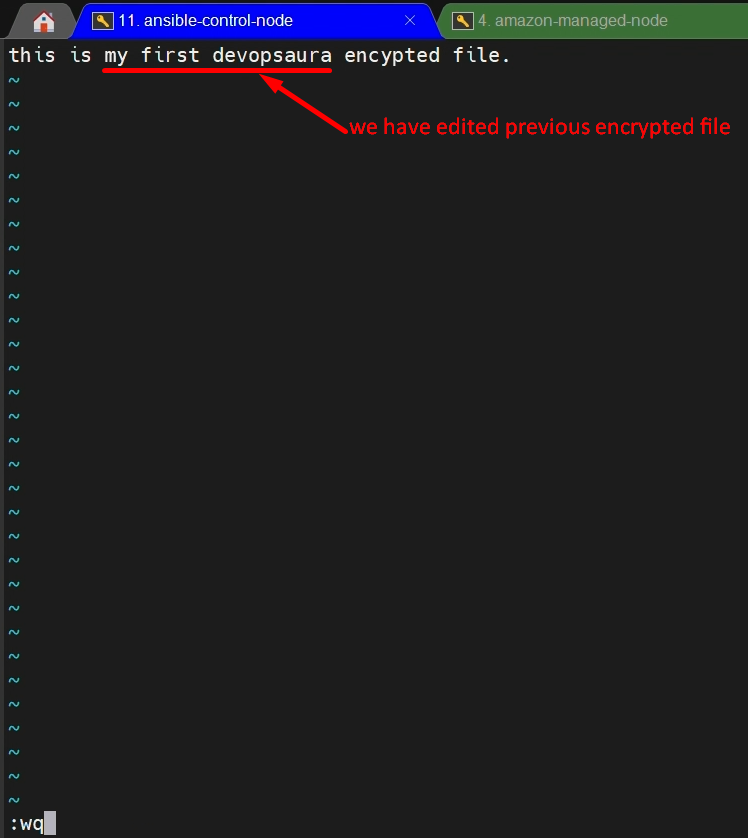
3)edit: –To edit the encrypted file
4)encrypt: – To encrypt the unencrypted file.
- Assume that you have created a file, but it has some sensitive data. Now you would like to encrypt that file. Then we can use the encrypt option.
- This will create a file with an encrypted format means This will convert your file into an encrypted format.
5)decrypt: – To decrypt an encrypted file.
- Decrypt is the option to convert your file as a normal file which is in the encrypted format.
- Assume that we have created a file in encrypted format. And we are not keeping any sensitive data i mean there is no sensitive data. Then there is no point of keeping it in encrypted format so we can decrypt it.
- The same thing applicable for the encrypted file.
6)–ask-vault-pass: – To provide password while running playbook.
- Now, if we want to use an encrypted format file while running our Ansible playbook, we need to pass this password, but it won’t ask for a password directly.
- We need to use an option called –ask-vault-pass.
- So, this is the option we should use. So, whenever we provide this option, it will prompt for the password.
- If we provide that password, it takes that password and decrypts the file.
7)–vault-password-file: – To pass a vault password through a file
- we have one more option which is –vault-password-file.
- So, this will be helpful for us to pass the password through a file.
NOTE: –All your vault commands start with ‘ansible-vault’.While running our playbooks we use the ansible-playbook. Similar way, vault commands start with ansible-vault.
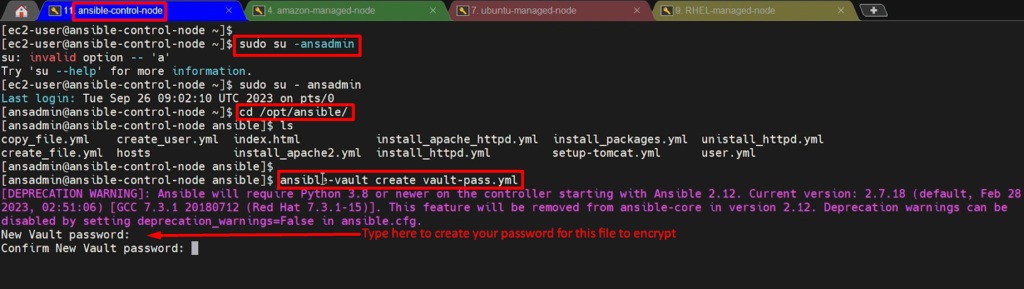
So, let’s jump into our Ansible server(ansible-control-node) and check out These commands.
On ansible control-node-
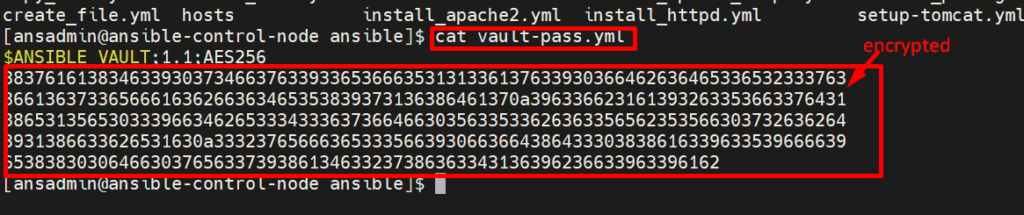
To create encrypted file
					ansible-vault create vault-pass.yml
cat vault-pass.yml
To view data-
ansible-vault view vault-pass.yml

To Edit encrypted file-
ansible-vault edit vault-pass.yml

To decrypt data-
ansible-vault decrypt vault-pass.yml

Video Recording
Ansible Roles
- Roles are a way to organize and reuse Ansible code.
- They encapsulate tasks, variables, and files into a directory structure, making it easier to manage and share automation code.
- Roles promote code reusability and maintainability.
Understanding Ansible Roles
- An Ansible Role is a logical collection of tasks, variables, files, templates, and other Ansible artifacts bundled together to automate specific functions or configurations.
- Roles are designed to be reusable, making it easier to share and apply automation code across different projects and environments.
Role Structure
A typical Ansible Role has a well-defined directory structure that helps organize and encapsulate its components:
- roles/
- my_role/
- tasks/
- defaults/
- templates/
- files/
- vars/
- meta/
- my_role/
Creating Your First Role:-
To create a new Ansible Role, you can use the ansible-galaxy command-line tool:
ansible-galaxy role init setup-apache
This command ansible-galaxy will create the basic directory structure for your role, allowing you to populate it with tasks, variables, and other necessary files.
Role Best Practices
To make the most of Ansible Roles, consider the following best practices:
- Keep roles focused on specific tasks or configurations for better reusability.
- Use meaningful and descriptive role names.
- Document your roles thoroughly, explaining their purpose and usage.
- Leverage version control systems like Git to manage your roles.
- Test your roles in isolation before integrating them into larger playbooks.