How to Create Dockerfile ? Step-by-Step Guide -2023

Table of Contents

Introduction to dockerfile:

Imagine you’re making a cake. To make the cake, you follow a recipe that tells you what ingredients to use and what steps to follow. In the world of software and computers, a “Dockerfile” is like a recipe for making something called a “Docker container.

Now, what’s a Docker container? Think of it as a small, self-contained box that holds everything your software needs to work properly, like all the ingredients needed for your cake. It includes your application’s code, the tools it requires to run, and even the operating system it needs to work on.

So, a Dockerfile is like a set of instructions that tells the computer how to build this special box or container. Just like a cake recipe, the Dockerfile lists out what “ingredients” (software libraries, files, and configurations) to put into the container and how to arrange them.

Dockerfile

How a Dockerfile works?

Here’s a simple breakdown of how a Dockerfile works:

Start with a Base: You pick a basic starting point, like a plain cake in your cake recipe. This is called the “base image.” It already has some essential ingredients.

Add Ingredients: In your Dockerfile, you list out any extra ingredients your software needs. These could be specific tools, files, or code libraries.

Mix and Bake: Your Dockerfile tells the computer to put everything together. It follows the instructions step by step, just like you follow your cake recipe. This process creates your custom container with everything your software needs to run.

Ready to Serve: Once the container is built, it’s like your cake coming out of the oven. You can “serve” your software by running a container based on this recipe. The container contains your app, its dependencies, and even the environment it needs to work.

In short, a Dockerfile is a set of clear instructions that helps you create these neat, self-contained boxes (containers) for your software.

Using of Various commands in Dockerfile:-

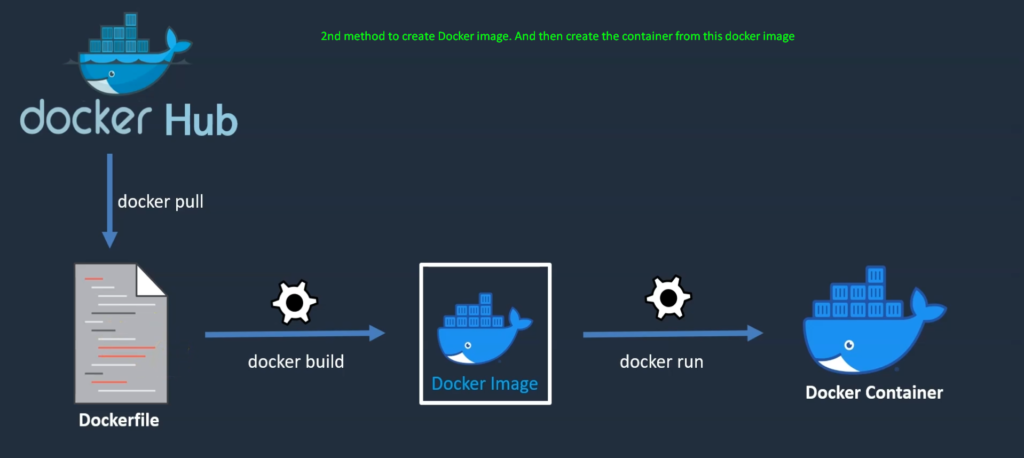
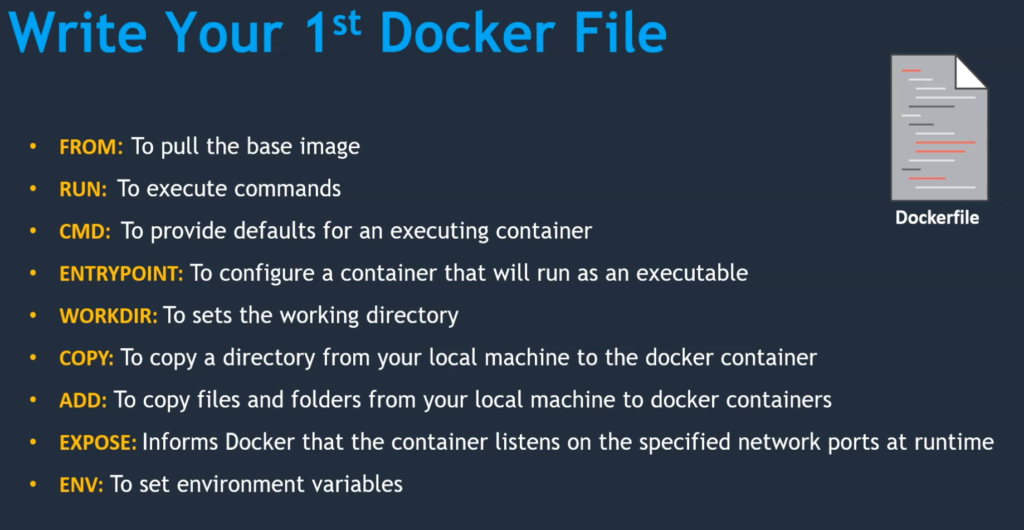
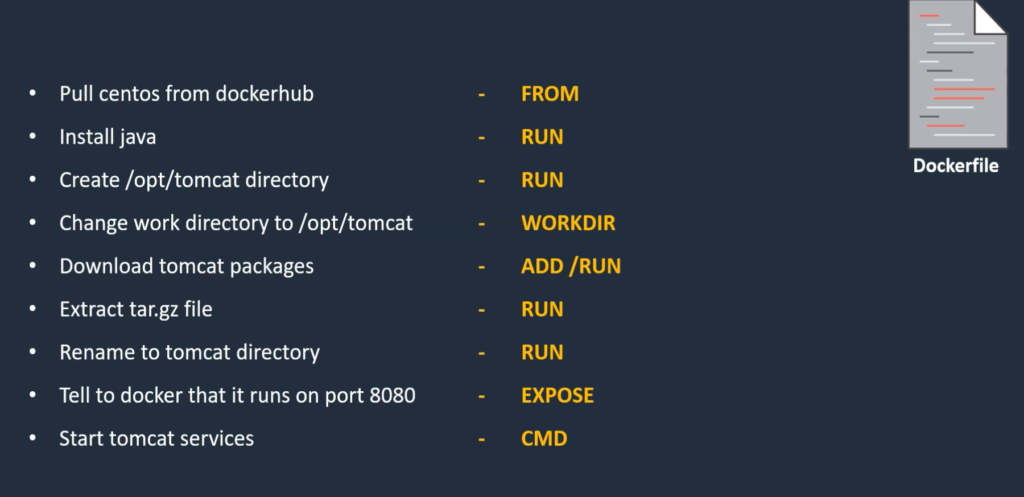
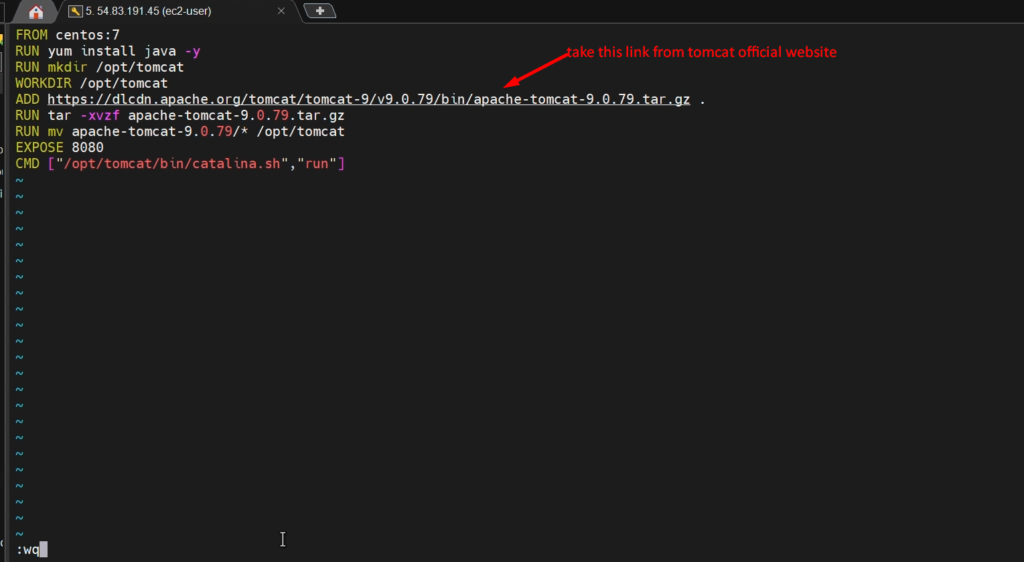
FROM:- it’s used to Pull the image. Almost all Dockerfile starts with the FROM instruction. It tells you what base image you require to start with dockerfile

Example:- FROM ubuntu/centos

RUN: – is used to ‘Execute the Command’. If you have some shell command, like installing packages or creating users is anything, I can say.

Almost all the shell comments we can execute with the RUN command on Dockerfile.

Example:- 

CMD: – To provide a default for executing a container.  This CMD instruction will execute at the time of Docker execution. Whatever instructions you mentioned in the CMD, will be get executed.

ENTRYPOINT: – It is also similar to the CMD. It will get executed at the time of container execution time. However, CMD commands can be overwritten, but entry point comments are not overwritten.

WORKDIR: – It’s something like a ‘cd’ command. If you wish to switch directories within the container then we should use the ‘WORKDIR’ instruction.

COPY: – This command helps you to copy a directory from your local or host or to a Docker container.

ADD: –  this command also going to be helpful to copy a file from the local system to the Docker container. We can also use this as a ‘wget’ command.

I mean, to say the ‘wget’ command, we can download packages onto our system. very similarly if we wish to download something from the browser, We can use the ‘ADD’ command.

EXPOSE: – expose informs Docker that t the container listens on a specified in-network port at runtime which means that inside your Docker container, if we are running some applications, those applications should be exposed to an external network to expose on which port No, these applications are listening. For that purpose, we should use the expose.

ENV: – use to set environment variable

For more details about the docker file, please refer to this as references Dockerfile reference | Docker Documentation

Now, with these instructions, we will try to create our first Dockerfille to Install Tomcat on our CentOs operating system

How to create Dockerfile to install tomcat on Centos?

To create our first Dockerfile, we will do the following Task with the help of Dockerfile instructions-

Step 1:- Login docker Host(EC2 instance) as root

Step 2:- Create a file called ‘Dockerfile’

Now, we will create a file called ‘Dockerfile’ with the below Dockerfile instructions

				
					FROM centos:7
RUN yum install java -y
RUN mkdir /opt/tomcat
ADD https://dlcdn.apache.org/tomcat/tomcat-9/v9.0.79/bin/apache-tomcat-9.0.79.tar.gz .
RUN tar -xvzf apache-tomcat-9.0.79.tar.gz
RUN mv apache-tomcat-9.0.79/* /opt/tomcat
EXPOSE 8080
CMD [“/opt/tomcat/bin/catalina.sh”, “run”]


Please run below command to create Dockerfile

				
					sudo su -
vi Dockerfile


Step 3:- Create a Docker Image

Now, we will create an docker Image with the help of the following commands

				
					docker build -t mytomcat .
docker images


Step 4:- Create a tomcat container

Now, we will create a tomcat container with the Help of above image which was created in previous step 3.

				
					docker images
docker run -d –name tomcat-server -p 8083:8080 tomcat
docker ps 
docker ps -a


Step 5:- Access the Tomcat container from the browser

Now , we will access the Tomcat container from the browser

Congratulation! we have successfully tomcat container with the help of Dockerfile

Video Recording

Still you have any doubt in any steps, please go through this  video again

If you want to know how to implement this Dockerfile in project then please go through the Module-3

Leave a Comment

Your email address will not be published. Required fields are marked *

Scroll to Top